18! Big Birthday Wishes

A big card for a big birthday! In Alberta, 18 means your "of age." You can vote, smoke, drink or join the military, if you're of a mind to do any of the above. So my former co-worker wanted something special for her son's bday.


I laugh when I see this card because my former coworker couldn't stop gushing about how "pretty" it was. I said that it had better not be pretty... I'd worked so hard to get it looking grungy! Any mistakes I made, I made work. I did forget to pull out my Grunge Me set which I had been quite excited to do... This is what happens when I'm in too big of a hurry.

Since I wasn't completely thrilled with this card, I redid it.


Guess it'll be a really big birthday!

Anyone notice my watermarks? lol! On the first pic it says glimmercraft.blospot.com... Whoops! On the second pic, it says glimmermist.blogspot.com... Sheesh!


{Supplies--all Papertrey Ink unless noted}

Card 1
  • Cardstock: Fine Linen, New Leaf, Harvest Gold, browny-colored (Recollections)
  • Patterned Paper: I'm too lazy to go check but it's not Papertrey... ;)
  • Stamps: Birthday Bash Sentiments
  • Ink: Memento Rich Cocoa (Tsukineko), Rusty Hinge, Fired Brick and Walnut Stain Tim Holtz Distress Inks (Ranger)
  • Die: Grommet Tags and Grand Square Nestabilities (Spellbinders)
  • Fibers: ribbon and twine (Jillibean Soup)
  • Other Tools: eyelets/Big Bite (We R Memory Keepers), Cricut and Base Camp cartridge (Provo Craft)
Card 2
  • Cardstock: Fine Linen, Harvest Gold
  • Patterned Paper: Argyle Socks
  • Stamps: Birthday Bash Sentiments, My Father My Hero
  • Ink: Memento Rich Cocoa (Tsukineko), Frayed Burlap Tim Holtz Distress Inks (Ranger)
  • Die: Grommet Tags and Grand Square Nestabilities (Spellbinders)
  • Fibers: ribbon and twine (Jillibean Soup), denim (Costco jeans ;) )
  • Other Tools: eyelets/Big Bite (We R Memory Keepers), Cricut and Base Camp cartridge (Provo Craft), sewing machine/thread

    Playing in Paradise Challenge 17: Sketch


    Welcome to another Playing in Paradise challenge over at the Scrapbooker's Paradise blog! This week, Allison has created another lovely sketch for us to work with.


    I think this is my favorite so far! I even considered an actual scrapbook page but had to get another project out of the way so used this sketch for my tags.


    Have you ever heard of (Amish) friendship bread? It's a bag of batter that you mush for several days, add more ingredients and mush for another few days. On "baking day," you add more ingredients and make more batter bags. The leftover batter gets mixed with still more ingredients and makes the most delicious, most fabulous cake bread EVER!

    I had four starter bags left from my last batch of friendship bread. With "bake day" looming, I really wanted to get rid of a few of them. I thought of my son's Kindergarten teachers (he has one regular teacher, but they often combine with the two other classes for activities such as music and gym). So as a sort of Thank You treat, I packaged off three friendship bread starter bags...


    I didn't have a lot of time to decorate the bags but felt the elaborate tags would make up for it. ;)

    Here's how I made up the tags:

    I cut the kraft tags out with my Cricut, Gypsy and Birthday Bash cartridge. I stamped them with Versamark ink and the Hero Arts Old World Lettering stamp.

    I die cut and embossed three Blossom 4 Spellbinders. Leaving the die on, I stamped the swirl image with Versamark ink and heat embossed with clear powder. I then stamped the solid flower image over top with Versamagic Oasis Green ink.

    After stamping the sentiment onto the tag with Versamagic Jumbo Java ink, I adhered the stamped die cuts.

    Using 1/8" Scor-tape, I adhered some trims from Webster's Pages and Tim Holtz's Lavish Trimmings. Fabulous stuff!!

    Lastly, I taped the kraft bags shut with Martha Stewart decorative tape and tied the tags on with some raffia. I added tiny tags with the word "Thanks" on them using cream twine.

    Be sure to check out the other DT projects!


    The deadline to enter your project is noon on Thursday, June 2nd. This week's prize is Fancy Pants Beach Babe - Flowers and Trim Journal Pieces, an approx retail value of $16!

    Thanks for stopping by!


    {Supplies}
    • Cardstock: Kraft and Rustic Cream (Papertrey Ink)
    • Stamps: Old World Lettering (Hero Arts), Spiral Bouquet and Tiny Tags (Papertrey Ink)
    • Ink: Versamark, Versamagic Oasis Green and Jumbo Java (all Tsukineko)
    • Die: Blossom 4 (Spellbinders)
    • Other Tools: Cricut/Gypsy/Birthday Bash cartridge, clear embossing powder/Marvy heat tool, various trims (Webster's Pages and Tim Holtz), decorative tape (Martha Stewart), rustic cream button twine (Papertrey Ink), kraft bags (dollar store), raffia (unknown)

    Papertrey Ink Blog Hop: Flowers

    This month's blog hop at Papertrey Ink is all about flowers!

    Nothing innovative here but this card definitely had time put into it! ;)


    The card base was made with 2 die cuts from Spellbinders Grand Nestabilities: Big Scalloped Circles. I just score the top of the back piece and glue/tape it to the front when I'm finished everything else.

    I started by Copic-ing the tulip image from Spring Jar Fillers (thanks, Stef!). I think this took the most time of anything! At least, it felt like it. ;) The colors are supposed to match the Royal Velvet cardstock, and while not perfect, it does match better than pictured here.  I used the New Leaf Copic trio for the leaves and stems. After cutting out the colored image, I tied white embroidery floss to the stems and added a matching button.

    I wish that I had remembered to impress the Lemon Tart cardstock before sewing the doily onto it... I prob would've used the Vineyard or Canvas impression plate. I distressed the edges of the circle before sewing it to the Happy Spots patterned paper. This was my first time sewing in a circle!! I was very intimidated by it but it turned out no to be too bad at all! ;) Lastly, I used Scor-tape to adhere the flower image to the white crocheted doily.

    The banner was done about 3 times before I settled on my method...


    I first tried inking the die cut ribbon banner with Memento Paris Dusk. I did a terrible job with the inking so I tried using Chipped Sapphire Tim Holtz Distress Ink. It turned out better but there was a smudge I couldn't blend out and so I pulled out my Copic Airbrush system. I'm still new at its use but I like how it turned out better than the other two, so I went with that one.

    I white embossed the sentiment using Birthday Basics.

    Thanks for stopping by!


    {Supplies--all Papertrey Ink unless noted}
    • Cardstock: Royal Velvet, Lemon Tart, Stamper's Select White
    • Patterned Paper: Happy Spots
    • Stamps: Spring Jar Fillers, Birthday Basics
    • Ink: Memento Tuxedo Black and Versamark (Tsukineko)
    • Dies: Grand Big Scalloped Circles, Grand Circles, Ribbon Banners (all Spellbinders)
    • Copics: YG11, 13, 17, BV13, 08, 29, 0
    • Other Tools: Royal Velvet button, white embroidery floss, Copic Airbrush system, sewing machine/thread, white embossing powder (Filigree), crocheted doily (Kaisercraft)

    Lawnscaping Polka-Dots, Totally Hues #7 and CAS-ual Fridays Bling!

    Hooray!!

    Not only was I able to complete another Lawnscaping challenge entry to include Lawn Fawn stamps (first one here), I ticked off 2 other challenges that I adore!

    The Lawnscaping challenge calls for polka-dots...
     ...the Totally Hues #7 colors are Sweet Blush, Berry Sorbet, Lemon Tart and Spring Moss (delish!)...
     ...and CAS-ual Fridays invites us to Bring the Bling!


    Here is what I finally came up with:


    I colored the dress-form too darkly... I had intended a very pale pink. Not a big deal but now the paper-piecing isn't as distinctive. Anyway, I love this cute little card! I used a Copic to match my rhinestones with the Berry Sorbet. I masked off the frame and dress-form to stamp the green dots.

    I didn't care for my first attempt:

    The gray on the first card wasn't really ideal considering the Totally Hues colors. I also found the green background polka-dots to be too busy. My yellow polka-dots on the Polaroid frame didn't stamp well (I have issues with my Lemon Tart ink) and drive me nuts. ;)


    {Supplies--all Papertrey Ink unless noted}


    Picture Perfect
    • Cardstock: Lemon Tart, Stamper's Select White, Sweet Blush
    • Stamps: Say Cheese and You're Sew Lovely (Lawn Fawn), Polka Dot Basics and Polka Dot Basics II
    • Ink: Memento Tuxedo Black and Versamagic Aloe Vera (Tsukineko), Berry Sorbet
    • Copics: R35, T1, R0000 (I also used R20 when I shouldn't have...)
    • Other Tools: rhinestones, Polka Dots Cuttlebug embossing folder (Provo Craft)

    Happy Birthday to You and a Gift from the Kids

    I've been sitting on this post for awhile, waiting for my stepmother's birthday to pass so I could share this with you (I'm not sure if she checks this blog or not but decided to err on the side of caution).  ;)

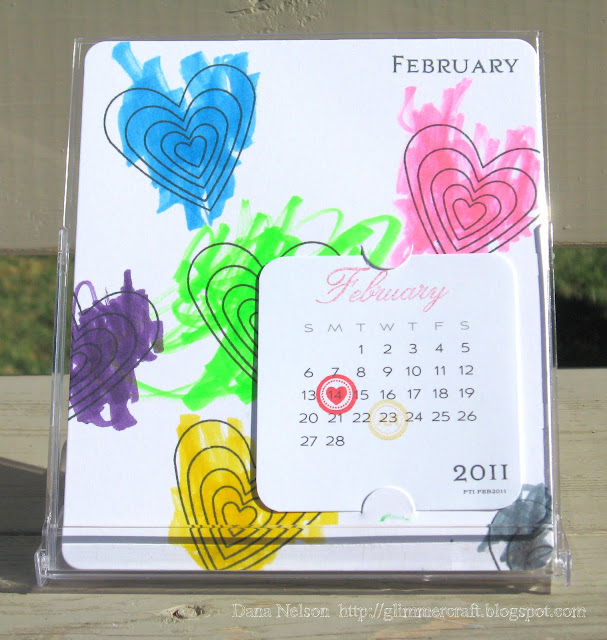
    I really wanted to put my Papertrey Ink calendar tools to work: Calendar Page die, Calendar Basics stamp set and the Mini Calendar pages. I also really wanted to use my Year of Flowers stamps but decided to let my kids participate by stamping some simple images for them to color instead...


    You can tell the difference between the ones my 5-year-old colored as opposed to my 3-year-old. I'm hoping my stepmom will want to put this on her work desk or something. :)

    Here is the card I sent along with:

    I used my living room couch cushion as inspiration:

     I tried using Edgers along the sides and bottom to create a sort of shaped card. I heat embossed the damask with black powder. Everything else is pretty self-explanatory... ;)


    {Supplies--all Papertrey Ink unless noted}

    Calendar:
    • Cardstock: Stamper's Select White
    • Stamps: Calendar Basics, May-Bitty Baby Blessings/Butterfly Dreams, June-Up, Up & Away, July-Vintage Picnic/Boy Basics: Frog Hop, August-Lunar Lights (Lawn Fawn), September-Enjoy the Ride/Tiny Treats: Valentine/Boy Basics: Out of this World/Train Tracks and My Silly Valentine (Lawn Fawn), October-Heebie Jeebies (Lawn Fawn), November-Autumn Abundance/Fly Away/Daily Designs Sentiments, December-Bows and Holly (Lawn Fawn), January-Rustic Snowflakes, February-Heart Prints, March-My Silly Valentine (Lawn Fawn), April-Scattered Showers
    • Ink: a huge variety, mostly Memento Tuxedo Black (Tsukineko)... if you have any questions just leave me a comment ;)
    • Die: Calendar Page
    • Other Tools: Mini Calendar Pages, Corner Chomper-for the mini calendar pages (We R Memory Keepers), CD Calendar Case
    Card:
    • Cardstock: True Black, Simply Chartreuse, Stamper's Select White
    • Patterned Paper (envelope liner): Bitty Dot Basics
    • Stamps: Damask Designs, Fillable Frames #10
    • Ink: Simply Chartreuse, Memento Tuxedo Black (Tsukineko), Versamark (Tsukineko)
    • Dies: Edgers #1, A2 Envelope Liner
    • Other Tools: Bow-Easy (Posi-Bendr), black rhinestones (dollar store)

      LilyPad Cards Sketch & Lawnscaping Polka Dots: Happy Birthday


      Something's missing! I thought maybe some rounded corners... Then I thought maybe there's too much of the patterned paper... I think I just made the card too big... It's an A7 rather A2.

      Anyway, this card is for the new Lily Pad challenge (the sketch is to the right). The prize is a Lawn Fawn stamp set! I {heart} Lawn Fawn! (I know, I didn't use any of their stamps in this project...)

      Also, I had Lawnscaping's polka dots in mind for this, even though, again, I didn't use any Lawn Fawn products. I'm hoping I'll have time to create something else to enter as well, using Lawn Fawn this time!


      {Supplies--all Papertrey Ink unless noted}
      • Cardstock: New Leaf, Kraft, Stamper's Select White
      • Patterned Paper: Green Boutique
      • Stamps: Just the Ticket, Boy Basics: Circles, Grunge Me
      • Ink: New Leaf, Dark Chocolate, Orange Zest, Aqua Mist, Enchanted Evening, Memento Dandelion (Tsukineko)
      • Dies: Labels (Spellbinders), Circle Border, Just the Ticket
      • Other Tools: gel pen (Sakura)

      Playing in Paradise Challenge 16: Black & White


      I am so excited about today's challenge at the Scrapbooker's Paradise blog... Julie invited us to create an all black and white creation...


      and the Design Team created some beauties! I definitely invite you to check them all out!


      For my project, I wanted to try out Gina K's lattice technique, as well as some white heat embossing.


      I really like how the inking makes it look a little distressed.

      I used a Grand Square Nestability to cut emboss and keep a white border and scored the "lattice" lines with my Martha Stewart scoreboard. Then I used my Memento Tuxedo Black inkpad to ink it up.

      The rose and leaves were stamped in Versamark ink on black cardstock and then heat embossed using white embossing powder and my Marvy heat tool. I cut them out and popped them up off of the lattice background. I tried adding dimension by painting the rose with bleach but it didn't have any effect.

      The sentiment was done by die-cutting Spellbinders Labels 4 and stamping the border and sentiment.

      I went back after taking the previous photo and added some Glossy Accents dew drops and random black rhinestones. I think I overdid it... ;)


      Would actually appreciate tips on fixing this, please!!

      Enter your project link by noon on Thursday, May 26 to be in the running for this week's prize: Fancy Pants - It's The little Things collection, assorted flowers and ribbon journal embellishments (approximate retail value of $16)! And, as always, the winner may participate in the next challenge as our Paradise Player!

      Thanks for stopping by!


      {Supplies}
      • Cardstock: True Black and Stamper's Select White (Papertrey Ink)
      • Stamps: Year of Flowers: Rose and Mega Mixed Messages (Papertrey Ink), Vintage Labels 4 (Waltzingmouse Stamps)
      • Ink: Memento Tuxedo Black and Versamark (Tsukineko)
      • Dies: Grand Squares Nestabilities and Labels 4 (Spellbinders)
      • Other Tools: white embossing powder (Filigree) and heat tool (Marvy), Glossy Accents (Ranger), black rhinestones (dollar store)

      Stamping Vacation: What a Guy Challenge

      [Edited to add: the Stamping Vacation blog is on hiatus and I am not sure if it is permanent or not. Thanks for all your support!]

      This month's What a Guy challenge at the Stamping Vacation challenge blog invites us to create a masculine card with a fishing theme. Since Father's Day is approaching, there's no better time for this!

      Here's my project:


      The fishing-man image is from a former sponsor of Stamping Vacation: Stamping Dragon Designs.

      In retrospect, I should have used a punch to add interest to the upper edge of the patterned paper... Oh, well...

      You have an entire month to link your creations for this challenge: until June 19th. Each entry qualifies towards a drawing at the end of each month, this month's prize being a $25 gift certificate to the place of your choice!

      There's still time to enter the other challenges I'm currently over-seeing at Stamping Vacation: Have You Tried, White Space and Lots of Paper. The more entries there are, the larger the chance I have of winning a gift certificate being offered to the design team! Thanks for your support! ;)

      Thanks so much for stopping by! I look forward to seeing your creations!


      {Supplies--all Papertrey Ink unless noted}
      • Cardstock: Kraft, Stamper's Select White
      • Patterned Paper: Library Ledger
      • Stamps: fisherman image (Stamping Dragon Designs), My Father, My Hero
      • Ink: Dark Chocolate, Versamark (Tsukineko), Weathered Wood & Antique Linen (Tim Holtz Distress Ink)
      • Die: Deckled Rectangles (Spellbinders)
      • Other Tools: ink blending foam (Inkssentials), rustic jute twine, Corner Chomper (We R Memory Keepers)

      Denim Rose(tte) Tutorial

      I found a fabulous denim rosette tutorial at Craft Passion! Just what to do with the scads of jean cut-off scraps I have waiting for some crafty use!


      Playing in Paradise Challenge 15


      Whew!! That Blogger issue sure had me panicked! I've definitely been taking its marvelous services for granted!!

      This week's Playing in Paradise challenge asks us to pull out 3 old things from our stash of scrapbooking supplies.


      I pulled out my Martha Stewart decorative tape (this stuff is actually quite fabulous), some felt embellishments by Queen & Co and some brads that haven't seen the light of day in years!


      I'll be the first to admit that this is a very eclectic project. The brad flowers are mod, the decorative tape is traditional (?) and the sun is rather bright. The colors are somewhat tied together, however, by the patterned brads... Right? (Definitely a rhetorical question!)  ;)

      Check out the other DT projects here!

      This week's prize is from Pink Paislee - Soiree - Twine Card, Wood Shapes Tissue Paper, an approximate retail value of $15! And every winner has the opportunity to play along on the next challenge as our Paradise Player!

      Entries are due by Thursday, May 19 @ noon MDT. I hope you have fun fishing through long-forgotten items!!


      {Supplies}
      • Cardstock: Hawaiian Shores, Harvest Gold and Orange Zest (all Papertrey Ink)
      • Stamps: Women of Life (Papertrey Ink)
      • Ink: Memento Pear Tart (Tsukineko)
      • Dies: Inverted Scalloped Circles and Circles (both Spellbinders)
      • Other Tools: Decorative Tape - Pegboard Floral Tile (Martha Stewart), brads (dollar store), Felt Frenzy - Bug Out (Queen & Co), Corner Chomper (We R Memory Keepers), paper piercer (Tim Holtz Tonic Studios)/ piercing mat (Bazzill Basics)