"Black Out" Easy Card Kit


Welcome!

Today I am sharing with you another kit that can be purchased at Scrapbook Essentials BC. This kit consists of 16 cards to make, and these are great cards for a beginner, or for a quick and easy card to make in a hurry! It would also make a great Christmas or Birthday gift!

Here are the 16 cards you can make from the kit.


The instructions will be emailed to you by Scrapbook Essentials BC when you purchase the kit.

CARD KIT #10 - "BLACK OUT" (Black & White cards)

COST: $40 + GST

The cards are all ready for pick up at the studio

This card kit is many things; easy for a beginner, or quick for that last minute card you need to make. It's also a great Christmas gift, or Birthday gift, to give to someone that likes to craft, or wants to start card making. If you purchase one kit for yourself, and one each for family or friends interested, you could even have a card making party day!

Some of the papers from this pad have embossed texture, others have a paper texture to them, and yet others are clear lacquered. And of course there are the usual double sided papers too. All the die cutting is done for your, and the two cards with stamped images on the sentiment pieces are stamped for you too. You will, however, be free to stamp your own sentiments onto the assigned sentiment pieces, so you will need some basic stamping tools to create your sentiments. You are of course free to chooses the papers you want, or embellish as your creativity dictates.

We know you are going to have a lot of fun making these easy cards. Happy creating!

Here are the photos for each individual card.


If you purchase this kit you are free to print off the photos of these cards if you find the ones on your instructions a little too small to follow. If you are not purchasing this kit, I hope you find some inspiration here to create your own version of quick & easy cards to put together.

Here is a photo, taken by Stacey, of the cards on display at the studio.


Happy creating everyone!


Stamperia Fantasy - Unicorn & Roses Shabby Chic Card Class


Stamperia makes some of the most gorgeous papers! I do not get to use them very often, and was excited to get the chance to create another Shabby Chic class using some of this beautiful Fantasy paper. I know many of Scrapbook Essentials BC customers will love it too.

So here are the two cards we will be making in class.


STAMPERIA FANTASY UNICORN & ROSES SHABBY CHIC CARD CLASS


WHEN: Wednesday, November 28th
TIME: 6:00pm - 8:00pm (willing to have an afternoon class that day from 2:00pm to 4:00pm if needed)
COST: $27 + GST

RSVP: Stacey at 778-533-4290 OR sbebc2011@gmail.com

This gorgeous paper lends itself to Winter with the snowflakes and can work as wonderful Winter birthday cards, or what ever you wish. In this class we will not use a paper distresser but learn to give a cleaner Shabby Chic look by using our fingers. We will also learn to use brush blender (Tim Holtz or NUVO) to add colour to lace, etc. For these cards there is very little fussy cutting, so we will do that in class this time. So no homework! We will also be discussing liquid glue and how to avoid that dried glue shine where the glue comes out from behind or from our fingers when accidentally touch somewhere we shouldn't have. Find out in class.

PLEASE BRING TO CLASS: fussy cutting scissors, regular scissors, nonstick craft mat, double sided adhesive tape, liquid glue, tweezers or paper piercer, blending brushes (not foam blenders) either from Tim Holtz or NUVO, wipes for your fingers, a piece of paper towel, white foam pop ups or tape, and the following ink pads - Distress Tattered Rose, & Iced Spruce.


Shabby Chic cards seem to speak to our femininity. Not all women are drawn to to this genre, but it sure is popular at Scrapbook Esstentials BC for the past year.

Let's have a closer look at the cards we will be making in this class. If you are taking the class you may print these photos to bring to class if you feel it will help.

Which girl, or woman, does not like the fantasy of unicorns?


A closer look at the top part...


...the bottom part...


...and the side view.


And what woman does not have a soft spot for roses?


The top part of this card...


...and the bottom part of this card...


...and the side view of this card.


Did you notice the coloured lace? I have a tip to share with you in class.

Happy creating!


Making Dark Brown Pretty Vintage Cards - Ultimate Crafts "Ooh La la"


We are substituting one of our classes with this one! There is more interest in this class, so we are moving it up in place of another class that was scheduled at this same day & time.

Who said dark Browns can not be made pretty?


ULTIMATE CRAFTS 'OOH LA LA' VINTAGE CARDS

WHEN: Wednesday, November 14th

TIME: 6:00pm - 8:30pm

COST: $35 + GST

RSVP: Stacey at 778-533-4290 OR sbebc2011@gmail.com

Who is ready to make some dark brown vintage cards? They almost border on Steampunk! Let's get brown inky fingers to make four old world dark vintage cards. We'll use ink blending, twine, ribbon, metallic embellishments & even buttons, with lots of paper and cardstock layers. 

PLEASE BRING TO CLASS: paper trimmer, scissors, double sided adhesive tape, mini glue dots, liquid glue, black foam tape or pop ups, ink blender, Distress Gathered Twigs, non-stick craft mat, hole punch, & wipes for your fingers & mat.

Ink pad, sentiment stamps, & stamping blocks will be there for you to use.

Her is a closer look at each individual card from the front. (once the class is completed, I will add further detailed photos for you to have a look at and use for more detailed inspiration)

WARM HUGS - with some vintage looking lace and hearts


LOVE YOU! - with buttons, twine, and metallic butterflies!


YOU ARE A LIFESAVER - more metallic embellishments, layers, ribbon & twine.


FABULOUS - layers tucked in between matted pieces with another button & twine, and a stamped owl image to add


I am sure that you will find that these cards, even though dark and brown, slightly Steampunkish, and even masculine in some ways, will appeal to our women friends too.


Happy creating!


A Little Play Time - Graphic 45 "Flutter"


I know that there haven't been too many post of late, but I have been busy creating for classes and making some kits to sell at Scrapbook Essentials BC. I have had some of these ready for a while, but with the studio retreat, and Stacey being very busy, I am still waiting for either a date or cost from her.

So, toady I am sharing with you a very quick and easy card using the scraps left from making the card samples for a class with the Graphic 45 'Flutter' paper collection.


Aren't the rich, bold colours of this collection beautiful? I normally like softer colours, but every so often rich and bold are appealing.

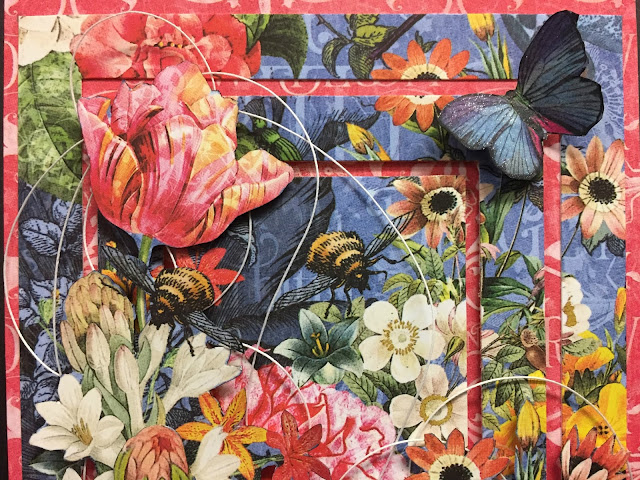
As you can see it is a very simple card. I did add some light gold metallic thread behind the butterfly to give it a little separation from the bold flowers on the paper. You can see it closer in the next photo.


And as always, I show a side view.


Hope you liked this quick post. It is fun to on occasion create something that is not for a class.

Thank you for stopping by to have a peek. Happy creating!


Card Class With Graphic 45's "Flutter" Collection


Have you ever thought you posted something and then when you went to look for it you couldn't find it? That is what happened with this card class! I am wondering if it accidentally was deleted...? So I am posting this class, which is in just a couple weeks, whether it is for the first time, or reposted.

Have you seen the Graphic 45 "Flutter" collection? Such beautiful bright colours with many gorgeous floral designs and butterfly. There is however, some papers that focus on ants and bugs. An ugly topic, let alone images, but I guess they are a part of things that flutter.

Here are the cards that we will be making in the class.


G45 Flutter Collection Cards

WHEN: Wednesday, November 7th
TIME: 6:00 - 8:30
COST: $40 + GST

RSVP: 778-533-4290 OR sbebc2011@gmail.com

Such beautiful paper! But one might ask, but what do I do with the 'bug' paper? Well, how about making a card for the young boys that love bugs! You might know someone that could use the card for a boy that has an interest in bugs, or know an entomologist. We'll keep the rest for everyone else.

One of the things we will be doing in this class is cutting a frame within a frame within a frame on your paper trimmer. And of course I know some of you are eager to create the box card with butterflies floating on clear acetate. We are going to learn some fun paper cutting techniques and create a box card. We have not made one in a few years, so it is time to do it again. And this is the perfect paper for that!
There is a lot of fussing cutting homework for this class. But for the end result one must do the work. Your homework kit will include instructions and should be ready for pick up on Saturday, October 30th, after 6:00pm.


PLEASE BRING TO CLASS: Homework, scissors, dbl sided adhesive tape, liquid glue, white & black foam squares & foam tape, a glimmer pen or Wink of Stella, dark marker (for edges of paper), bone folder, and non-stick craft mat.


For those of you that can not register for class because you do not live here, I am sharing a look at the cards with you.


I love how this card turned out. Creating the rectangle within a frame within a frame without using a die set is actually pretty easy. We will be learning how to do that in this class and then add the lovely fussy cut pieces to that.


When I first saw this paper I was thrilled with the flowers and butterflies. But, when I saw the papers with bugs, I did not know what I could do with that. Then I remembered that I have grandsons and even granddaughters that might like a card with them on it. This is what I came up with.


Here are more photos.


And, I created a box card for this class, since it had been a while since I made one.


When closed and inside an envelope, it looks like this.


Sorry about the glare on this photo. The colours do not look great either.

Anyway, these are the three cards we will be making in this class. We are going to have fun!

Thank you for stopping by to have a peek at the cards for this class.

Happy creating!


I am posting a quick and easy card I made for myself with some of the scraps from these cards. So look for it tomorrow.