Christmas Card Challenge #31 - Paper Piecing

Hello everyone!

Sorry to be posting this a little late, but with my daughter and her family coming for a visit from Calgary a day earlier thn expected, I just kind of forgot to schedule this post in time for this morning.

This week at Christmas Card Challenge #31 we are paper piecing! I love the look of paper piecing but don't do it often enough and was glad for the chance to be challenged with this technique for the challenge. What I like about the CCC challenges is that you don't have to create a card using the technique or inspiration given each week as long as you make a Christmas card. But for me the fun is in the challenge. So here is my card for the paper piecing challenge.


I just love this Stampavie "Mice Under the Mistletoe" stamp!  I used my Spectrum Noir markers to colour three layers for the mice, and to cut out the rug and their clothes from the Simple Stories "Handmade Holiday" 6 x 6 pad. The Spectrum Noir markers are also used to create a little more depth on the paper pierced clothes. I combined the use of MFT "Rounded Banners" and Spellbinder's Labels Twenty for the red matting of the shortened "Rounded Banners" used on the white.

I'm writing this while one of my grand-daughter sleeps a few feet away from me. Grandchildren are so wonderful to have, and I wish they lived closer to me, or I to them.

Thank you so much for checking out my DT inspirational card for Christmas Card Challenge #31.
You can also check out the other DT challenge submissions on their blogs below.

Alanna -  DT coordinator 
Sabrina - That's me!
Sparkle-- Owner

Happy creating everyone!


CAS(E) This Sketch (2)

Playing along again with CAS(E) This Sketch:


I inadvertently CASEd one of the challenge designers... Whoops!

Thanks for peeking!


{Supplies}
  • Cardstock: Stamper's Select White and Pure Poppy (Papertrey Ink)
  • Stamps: Vintage Picnic Sentiments (Papertrey Ink)
  • Ink: Memento Tuxedo Black (Tsukineko)
  • Dies: Love Letters (WPlus9 Design Studio)
  • Other Tools: Airmail French washi tape (Freckled Fawn)

CAS(E) This Sketch and Simon Says Stamp

Quickly posting this to enter into Simon Says Stamp: Summer Fruits challenge.


I used the CAS(E) This Sketch layout.

I stamped the distressed chicken wire with Fine Linen ink on a Fine Linen card base. I love these distressed stamps from My Favorite Things! The lovely blueberries from WPlus9 were inked with Blueberry Sky and Chipped Sapphire inks.

Thanks for peeking!


{Supplies}
  • Cardstock: Fine Linen and Stamper's Select White (Papertrey Ink)
  • Stamps: Distressed Background Blocks (My Favorite Things), Fresh Picked (WPlus9 Design Studio)
  • Ink: Blueberry Sky and Fine Linen (Papertrey Ink), Chipped Sapphire Tim Holtz Distress Ink (Ranger)
  • Dies: Fresh Picked (WPlus9 Design Studio)

PTI Blog Hop

Gold is not something I use very often but it does pack a fancy punch!


Quilled Elegance was the perfect set to apply to PTI's blog hop this month: A Touch of Gold.

I kept it simple to make the gold really pop, adding just a touch of Fresh Snow ink around the edges of the card base.

I am also submitting this into CAS-ual Fridays: Over the Edge challenge.


{Supplies--all Papertrey Ink unless noted}
  • Cardstock: Ocean Tides, Vellum, gold (?)
  • Stamps: Quilled Elegance
  • Ink: Versamark (Tsukineko), Fresh Snow
  • Other Tools: gold embossing powder (Filigree)

"My Summer Days" Mini - made with library cards

-Library cards, clear plastic, washi tape, a corner punch, some ribbon & flowers make a really cute mini!

I have something fun to show you today. What do you get when you have a bunch of library cards to use up, some clear plastic sheets, some fun patterned washi tape, a few flowers, and some old paper to use, all thrown into the ring to use?

This!


A cute little mini!

Perfect to carry in your purse, back pack, car, etc. and ready to use when the moment strikes. This mini measures 5 1/8" W x 3 1/4" H with the library cards used for pages at 5" W x 3" H. I won't show you a photo of each page, but I will show you a few additional photos below, and then there is a short video that shows more details as I explain about the mini created. 


A fun thing to add to this project might be a journaling pen attached to a ribbon and stuck in the coil!

Here is the video walk through for you.


Oh, I almost forgot to let you know that to bind the mini, I used a Zutter Bind-It-All and 3/4" spiral binding.

Thank you for letting me share this fun project with you. Are you ready to gather a bunch of odds and ends together and make your own Summer Days mini now? Have fun!


Christmas Card Challenge #30 - Inspirational Photo

-a beautiful inspirational photo for this challenge

Welcome everyone!

This is my first posting for the weekly Christmas Card Challenge. I'm excited to once again be on a DT, and working with the talented DT on the CCC blog.

When I saw this photo for the CCC #30, my first thought was, "How can I think of snow in the middle of June?" (plus it rarely snows here in Victoria, BC). But once I really looked and saw all the beautiful traditional colours and traditional things of Christmas, it inspired so many ideas to go with. This is what I ended up designing for this challenge.


This is the first time I tried to create a card that is a more literal depiction of an inspirational photo. But I loved the photo and thought how beautiful it would look on a Christmas card. So, why not make a scene like that of the photo. I used my Cricut to cut out the house, fence, and lamp post with the "Heritage" cartridge. And even though the May Arts Holly Ribbon is not to scale, I still like the overall look. I punched out some silver and red dots (ball ornaments) and stuck them on. The silver metallic ink from Color Box is used to stamp the sentiment from Woodware Craft Collection "Heartfelt Christmas Wish".

Here is the card again from some different angles so you can better see how it is constructed with all the layers.


Well, that's it for my inspirational DT submission. Hope you enjoy checking out the Christmas Card Challenge blog and all the DT inspirational cards.

Below are the links to checkout the DT's creations and descriptions of their creations. Hop on over to have a peek at their designs.

Alanna -  DT coordinator 
Sabrina - That's me!
Sparkle-- Owner

Happy Christmas card making!


Handmade Tassel Tutorial with Sabrina

- Fun and so easy to make...

I wish to thank all that requested this tutorial. Some of you have been waiting a long time, and I apologized for not taking care of this sooner.

I've made several projects using my handmade tassels on minis, printer trays/shadowboxes, hand made boxes, cards and more. I just have a scrapbook layout left to use them on...lol. Any way all the information is is the video for you. But, before you watch I just want to let you know that there are a couple of times when I end up out of frame. Please just keep watching and you'll find that you haven't missed anything important. This is my first close up tutorial, and I'm not used to the tiny working space as a result.

Here it is.


If you have any further questions, email me and I'll get back to you.

Have fun making tassels!


On the Mend

No particular challenge that I'm participating in here, I just wanted to play with my Sentiment Signs stamp set. Tried a few different ink combos but wasn't too excited about any of them except this:


I used Summer Sunrise, Terracotta Tile and Canyon Clay (inside towards outside). The card base and patterned paper were inked with Tea Dye, distressed and sewn. I love how soft and peaceful this looks

I added some Mini Blooms stamping but wish it didn't look so Christmas-y.  ;)  Perhaps if I had stamped off on scrap paper ... Hindsight... 

Thanks for peeking!


{Supplies--all Papertrey Ink unless noted}
  • Cardstock: Simply Chartreuse, Stamper's Select White
  • Patterned Paper: Autumn Abundance
  • Stamps: Sentiment Signs, Mini Blooms
  • Ink: Summer Sunrise, Terracotta Tile, Canyon Clay, Simply Chartreuse, Tea Dye Tim Holtz Distress Ink (Ranger)
  • Dies: Stitched Borders - Rectangle (Li'l Inkers)
  • Other Tools: Canyon Clay bitty dot ribbon, sewing machine/thread, Tonic distresser (Ranger)

PTI Make It Monday, CASE Study and Freshly Made Sketches

Betsy Veldman has the most fabulous tutorial at this week's Make It Monday! Unfortunately, I didn't select the best stamp image to reproduce it. My inking doesn't show! I'll try this technique again.  ;)


I selected my colors from this week's CASE Study and used the sketch from Freshly Made Sketches.

As mentioned, my attempt at Betsy's vellum inking technique fell short due to the image I chose but I swear there's Orange Zest ink on there!  :)

I did a bit of inking on the wooden brad as well as around the Kraft cardstock.

Thanks for peeking!


{Supplies--all Papertrey Ink unless noted}
  • Cardstock: Summer Sunrise, Kraft, Orange Zest, Hawaiian Shores, Vellum
  • Stamps: Embellishments, Harvest Berries, Lattice (Hero Arts/Studio Calico)
  • Ink: Versamark (Tsukineko), Dark Chocolate, (Orange Zest), Walnut StainTim Holtz Distress Ink (Ranger)
  • Dies: Heart border, Harvest Berries
  • Other Tools: white embossing powder (Filigree), Opaque White Mister Huey Mist (Studio Calico), seam binding, Rustic Jute twine, wooden brad (?), Uniball white gel pen (Signo)

Redo

I wasn't happy with the colors I chose for my Father's Day card here and tried a do-over.


I'm still not 100% sure about it but I'm happy to keep playing with my stamps! ;)


{Supplies}
  • Cardstock: Kraft (Papertrey Ink)
  • Stamps: My Island (Waltzingmouse Stamps), Sketched Shapes and Father Knows Best (both Papertrey Ink)
  • Ink: Soft Stone, Smokey Shadow (both Papertrey Ink), Memento Tuxedo Black, Brilliance Lightning Black and Versamark (Tsukineko)
  • Other Tools: white embossing powder (Filigree), black rhinestones (dollar store)

July Vintage Double Layout - Enchantment - Mother & Daughter

-my 2nd daughter, third child of 5, has been a Mom now for 6 years and I wanted to capture those motherhood years in one layout

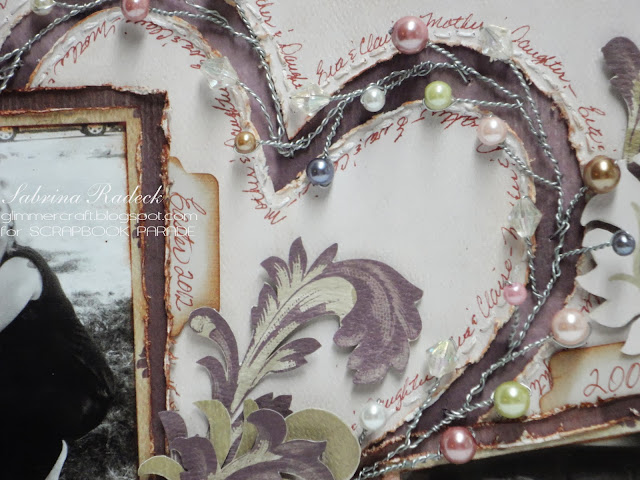
Our July vintage layout is a feminine layout in comparison to June's masculine one. The fun we will have in creating this layout is using beads and wire to create our own heart shaped beaded sprig. We are using the 'Enchantment' collection from the retired Upsy Daisy company that we saved for a project just like this one.


There is a lot of stitching around the edges of the lighter paper, the heart holes and the heart cutouts themselves.


Here you can see the heart shaped beaded sprig made with beads and silver floral wire.


The fussy cutting all built up is the focus here in this shot.


And the smaller heart details are seen in this photo. Whoops! I see that a piece of backing from a dimensional got stuck in under the wire! lol  Next...


...both hearts, outside and inside, have hand written text around them to act as a decorating element as well as giving a little info.


And lastly, this photo shows how I attached the wire hearts. Little pieces of chipboard on the back help to keep the wire from tearing the paper. I will be covering this up with another sheet after the class is completed.

So I hope you enjoyed seeing this vintage layout, and are inspired to create something a little different and unique yourself.

Happy Papercrafting!


Happy Father's Day

I whipped up a quick card for the father of my children, who dreams of all things tropical!


I used 3 different Waltzingmouse sets here:  Man of the Hour (love!), My Island, and Woodgrain (that banner fit perfectly over the Man of the Hour sentiment!). My guy is simple, and the paradisaical stamping put a smile on his face. ;)

Happy Father's Day, daddies!


{Supplies}
  • Cardstock: Kraft (Papertrey Ink)
  • Stamps: Man of the Hour, My Island, Woodgrain (all Waltzingmouse)
  • Ink: Classic Kraft and Dark Chocolate (both Papertrey Ink), Versamark and Memento Tuxedo Black (both Tsukineko)
  • Other Tools: clear embossing powder (Filigree)

CASE Study Challenge #145 - Feel Better

- needed to make a quick card...so sometimes I find a sketch on a challenge blog to use when I'm in a hurry.

Hello blog friends! Today I'm posting for the challenge over at Case Study #145 with Lisa Spangler's card as our inspiration.

I just completed a vintage double layout that is scheduled to post for Monday morning. I had a few leftover bits from it that I though would make a beautiful card for my Mom, who hasn't been well for a long time now. I love so many of the DT inspirational cards. They are wonderful! So here's the card I created.


The photo to the left is the CASE study card of Lisa Spangler.

The paper I used is a very light Mauve on which I stamped and heat embossed in white the JustRite Cling Vintage Alphabet Soup Background stamp. I inked the edges with Tim Holtz Mulled Lavender and popped up the remaining damask pattern that I had fussy cut out of another paper in this collection (Upsy Daisy Enchanted). I created a little tag using Spellbinder's Labels 28 and stamped a little sentiment on it.

I then made a tiny little tassel using white embroidery floss and attached it to the the tag and popped it up over the damask piece. For the final touch I added some pearls.

The next three photos just show the card form different angles to get a better view.


I had fun making this card, I just wish it was for a more pleasant purpose.

Thank you for checking in to see my entry for this challenge.

Have a good day, and happy papercrafting everyone!


Supplies used:

Paper: Upsy Daisy 'Enchanted' collection (no longer avail)
Stamp: JustRite Vintage Alphabet Soup Background Stamp
Ink: VersaMark, Tim Holtz Milled Lavender
Die: Spellbinder's Labels 28
white embossing powder
pearls
white embroidery floss

July Christmas Club Cards - Rustic Vintage

-a change in style for July

Hello everyone!

I'm posting my July Christmas Club Class cards today. Last time we went a lot more toward CAS for our June cards, but for July we are going for a kind of rustic vintage look. And these are the four cards.


The designer paper used for these cards are "Yultide" from Authentique's Festive collection, and "Handmade Holidays" from Simple Stories along with some Bazzill Kraft, Palo Verde and Cinnabar (one of my favorites).

The 'Santa' card is from the Handmade Holidays, with portions cut out and overlapped, popped up, etc.


The 'Santa' stamp is by My Favorite Things - Inspired by Christmas. I stamped it using Memento Rich Cocoa, and then took a nib and VersaFine Vintage Sepia and filled in a few of the shadowy areas. The part that says "making a list & checking it twice" is cut out from the paper and attached on the right directly onto the card with a dimensional in the center, lifting it up toward the left of the piece.

The strip that says " Santa's List" is also cut out from another part and attached.

Here's a close up.


The card with the sleigh, which is also from the same MFT stamp set, uses the Athentique's Festive Yuletide; both sides.


If this card looks familiar to you it's because I entered it into a challenge a few days ago. It's hard to tell in this photo, but I used a different embossing powder by Stampendous Vintage Aged Ivory Enamel. I love the gold flecks in it.

The next card is an elaborate one with many layers and ribbons etc.


For this card I used Viva Inka Gold, in Indian Yellow, around the edges of every piece. The stamps are again from MFT Inspired by Christmas. Maybe in the next photo you can better read the sentiment which is heat embossed with gold.


In this next photo you can see how thick the card is. It's a card that would have to have a box made for it and given in person.


For the final card, you can see the faux stitching...


and the crackled a circular die cut of a cardinal on the Yuletide paper. This can be done using Crackle Accents from Ranger, but as this takes time to dry, in class we are using three layers of UTEE (Ultra Thick Embossing Enamel), and cracking it after cooling it in the freezer for a few minutes. Once it's cracked, ink it with Tim Holtz Vintage Photo and a blending tool. Wipe the excess off and the cracks are darkened and the piece looks antique.


Almost forgot to mention the three Hot Chocolate Liquid Pearls just under the sentiment. The last photo, again shows the layering of the card.


Well, that's it for the Christmas Club July Class cards. Christmas is just six moths away. Hard to believe isn't it.

Have a great day, and happy cardmaking!