Showing posts with label Educator Class. Show all posts

Another Spellbinders Layered Foliage Card


I love anything that is layered! Layers on cards, layers in scrapbooking, layers in stamping, and layers in die cutting. Especially if the dies layer to create an image of sorts.

With this Special Edition Spellbinders Layered Foliage die, Scrapbook Essentials BC is have a class to create these two cards.


SPELLBINDERS LAYERED FOLIAGE EDUCATOR CLASS

WHEN: Wednesday, August 29th
TIME: 6:00 - 8:30
COST: $38 + GST (includes the exclusive die only available through retailers valued at $20)

Contact Stacey at sbebc2011@gmail.com  or  778-533-4290 to reserve your spot

We have such a beautiful and very versatile Spellbinders Special Edition die set to offer you for this class. You can not buy this die online, only through retail. So we are offering you a class on how to use this die for more than just green foliage, and how to create a see through pop up for your cards.The see though panel technique is one you can use with any die cut shapes!

Because of the detailed work involved in the layering of these pieces, we are offering you the die set before class so that you can do your homework die cutting and assembly of foliage pieces 2 weeks before class. You must pay for your class in order to receive your die set.

PLEASE BRING TO CLASS: Completed HOMEWORK, Scissors (small and large), scoring tool, ruler, bone folder, mini-glue dots, liquid glue (with very fine tip if possible or a bunch of toothpicks), black foam squares, white foam squares. If you feel you may need your die cutting machine and plates for more die cutting, feel free to bring it, but you should not need it because you should have completed all your die cutting homework. 

OK, so now we will have a closer look. I love how the two shades of pink with gold work to create something very special.


See how the only things popped up are the sentiment, and the pink matted background for the foliage arrangement.


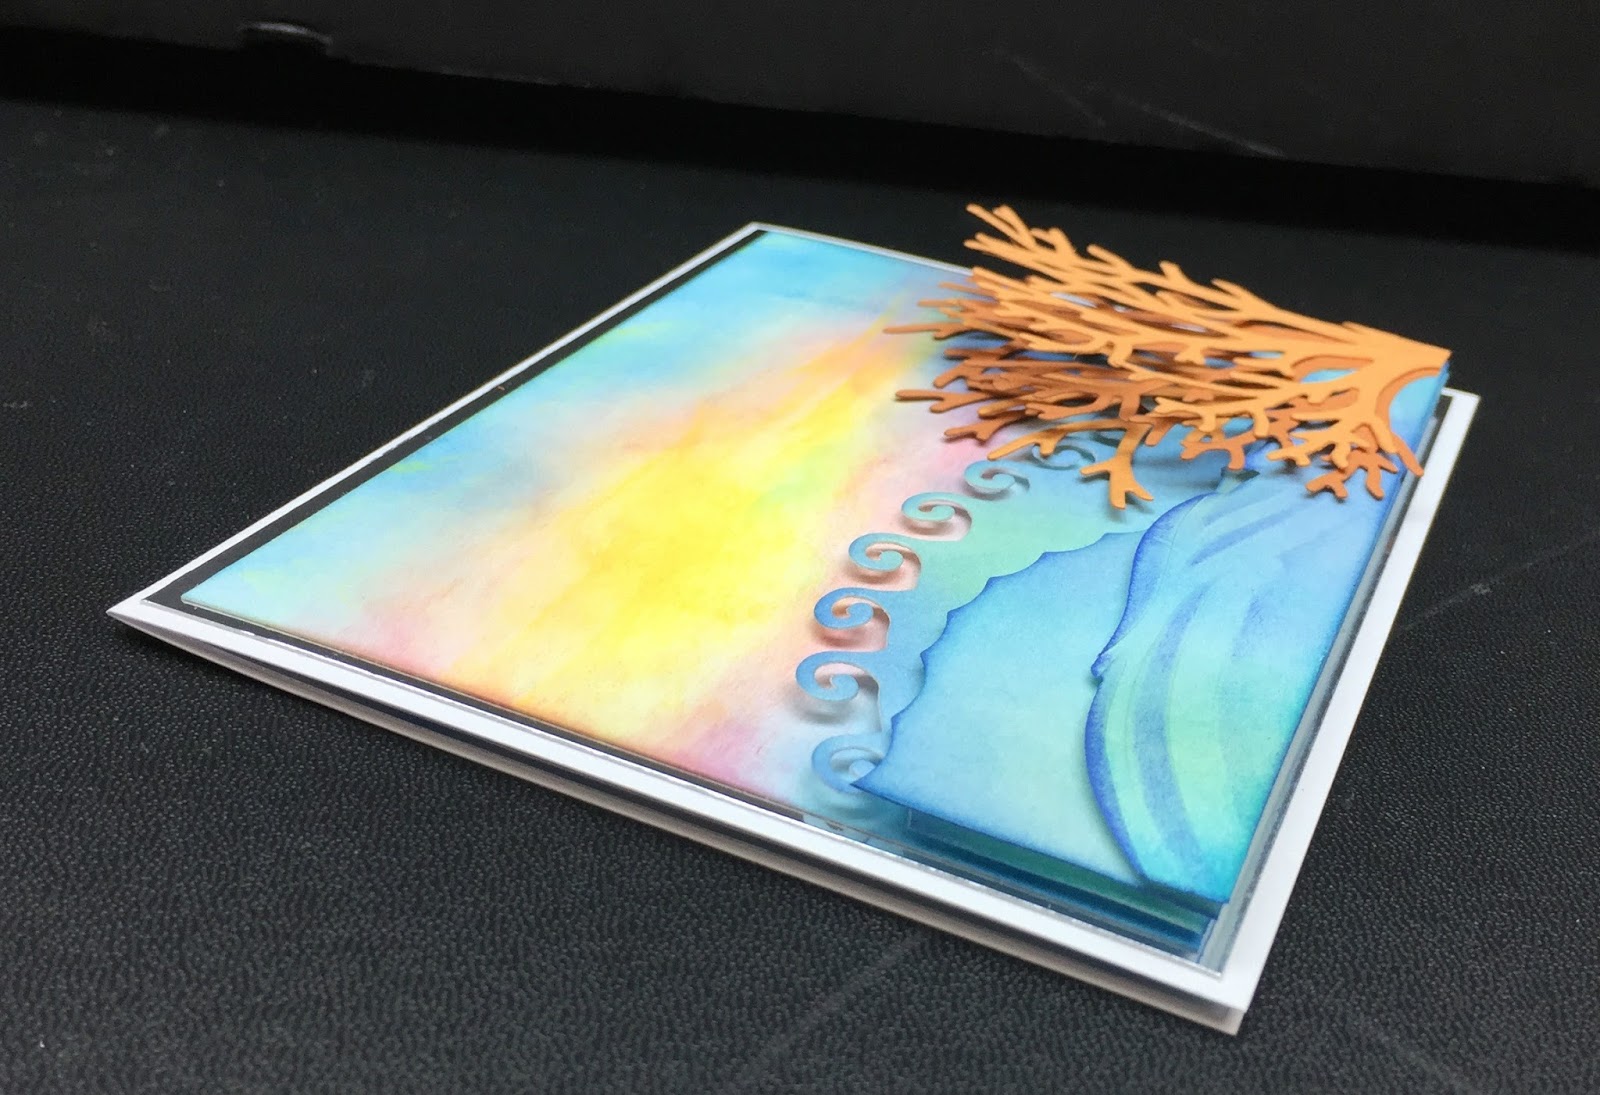
Next we have a very tropical looking card. Almost looks jungle-like.

These assembled die cuts are arranged to be over lapping, but still leaving space to see through. The edges are cut and then popped up to create this lovely coloured relief where you seemingly look into something that makes you think tropical waters.


A closer look at the overlapping die cuts.


The side view, to show you the layering of this card.


This will be a class that will show you something new to create and repeat with other die cuts.

Happy creating!


Spellbinders Geranium & Leaves Card Class


Hello Spellbinders enthusiasts!

Today I am showing you the cards we will be making in my 17th Spellbinders Educator class. I can't believe that we have had that many Spellbinder Educator classes already!  This is one of our September classes, using the Geranium & Leaves die set.


SPELLBINDERS EDUCATOR CLASS # 17

GERANIUM & LEAVES CLASS
WHEN: Monday, September 17th
TIME: 6:00 - 8:30 pm (may go a little longer)
COST: $42 + GST (includes $26.95 die)
Contact Stacey at sbebc2011@gmail.com  or  778-533-4290 to reserve your spot

Join us in this class to create not only these two cards, but learn other ways to use this die set. Geraniums come in different colours, which makes working with the die a lot of fun. The geranium leaves can be used in a crunch as lily pads and other types of broad round leaves. The additional long fern and other leaf helps in making floral or leaf arrangements on your projects.
PLEASE BRING TO CLASS: Your die cutting machine and plates, 3 in 1 tool or paper piercer, Stylus tool (like a paper piercer with a ball at the end) thick dense foam for flower shaping, 3 - 6 toothpicks, white gesso (if you have), dble sided adhesive tape, black foam tape or squares, ink blending tool, one of these ink pads - TH Distress in either Weathered Wood or Hickory Smoke, or Memento Gray Flannel, non-stick graft mat, & wipes. Bring a note book and pencil to write down ideas and tips for using this die. If you do not have some of these items, I will have mine there that can be borrowed.


Looking more closely at each of the cards you can see the details like the white centres of each blossom. I used NUVO Glossy White with a tiny drop in the centre and then took a toothpick to spread it out.


Here you can see the details a little closer. See the veining of the Geranium leaves?


In this side view you can see the white sentiment stamped piece is on the black card base with the circle die cut black piece popped up over it to also show an 1/8" border around it.


The next card did not quite turn out as I envisioned it, but is still a beautiful card with the leaves all being gray like the background, and the blossoms pop right out because of their coral colour against the gray.


I used a toothpick again as my brush, but used white thick gesso this time.


I love the "Happy Birthday" peeking out between the blossoms. Here is a closer look.


Did you notice the brushed on silver around the Geranium leaves? This was accomplished using NUVO Mousse and a brush. In real life you can see the metallic shimmer better.

Below is a side view and the only thing pooped up is the heat embossed sentiment strip.


I am looking forward to seeing everyone in class to make these cards.

Happy creating!


Spellbinders Class - Botanical Basket


Hello everyone!

Have you looked at the Spellbinders Botanical Basket die set? It is a sweet die set that you can create a lot of different layouts with. Scrapbook Essentials BC is having another Spellbinders Educator class in August. These are the cards we will be creating.


SPELLBINDERS EDUCATOR CLASS #17- Botanical Basket (S4-651)
DATE: Wednesday, August 29th
TIME: 6:00 - 8:30pm
COST: $45 + GST (includes $26.95 die set)

This fun little die set can be used in many ways! We will have fun clustering groups of die cuts to create these three cards. An ivy covered sign with blooms, a hanging basket of ivy and blooms, and ivy filled corners are our creations for these cards. We will also be layering some of the die cuts to give more dimension to the cards. These will be a joy to give or receive.

PLEASE BRING TO CLASS: Die Cutting machine with plates and shims if needed, Spellbinders 3 in 1 tool or paper piercer to poke out die cuts, paper trimmer, scissors, double sided adhesive, foam tape or squares, mini-glue dots, liquid glue, Buttercup Liquid Pearls OR Auburn Pearl NUVO Crystal Drops, non-stick craft mat & wipes for wiping glue off fingers.

Here is a closer look at the cards we will be making.

I love this colour combo. The sign is created with 4 layers, and three different greens are used for the die cut leaves.


Here is a closer look at the sign with ivy & blooms.


The side view shows the layering on the card.


This second card also has a favourite colour combo - aqua blue, green & gold. This card has a little basket with ivy & blooms from the same die set.


I tried getting the basket to show more, but then the ivy did not look right. So we do not see much of the gold foil basket.


Side view below shows the layering of the card pieces. The gold foil basket has four layers to make it thick and stand out a bit from the card.


The last card is a quick and easy card. Just die cut 4 in 2 different greens and assemble as you see here.


Here is a closer look at the two top corners.


The only thing popped up on this card is the little sentiment piece.


Well that's it for these three cards.  So glad you stopped by to have a look. Have fun with your Spellbinders Botanical Basket die set.


Spellbinders Educators Class - Botanical Heart Pair


SPELLBINDERS EDUCATOR PROGRAM # 15 - BOTANICAL HEART
WHEN: Wednesday, August 8th
TIME: 6:00 - 8:30
COST: $45 + GST (includes $27 die)
Contact Stacey at sbebc2011@gmail.com  or  778-533-4290 to reserve your spot

For this class we will be making three cards! Two of them will come together quickly so there will be time to make three. We get to add to our collection of beautiful dies with this class using the Botanical Heart (S4-641) and use some old faithfuls with it (Square Nestibilities LG (S4-126)). I know how you love to play with gold foot and there will be plenty of that too! And who doesn't love the favourite monochromatic or White on White card so perfect for weddings, or other very special occasions.

PLEASE BRING TO CLASS: die cutting machine and plates, tool-in-one, paper trimmer, scissors, ruler & pencil, double sided adhesive tape, white 3D foam tape & squares, mini-glue dots, liquid glue (fine tip or toothpicks), NUVO Glitter Drops - White Blizzard or Sitckles Star Dust, and your large square dies if you have some at home. (Spellbinders Square Classic Nestibilities LG(S4-126)) Do not worry if you do not have any square dies, as there will be some there to use if needed.

Every so often I can not resist making a white on white card, and when using a heart die, the inclination is even stronger. Great for a wedding card, or another special occasion to express love or fondness.


Another thing I like to do with hearts, is use foil cardstock. On this next card I put the ribbon at the top with the die work at the bottom. Three layers of square frames with the botanical heart inside, and the elaborate heart filigree frame die cut out of gold foil.


Since this die has the heart centre, we had to make a simple card focusing on just that. Two hearts, one in a bright purple and one in a bright pink, both topped with the gold foil botanical heart.


Looking forward to the fun we will have in class.

Hope you are inspired with the Spellbinders Botanical Heart die.

Happy creating!


Spellbinders Educator Class - Layered Foliage Exclusive Die Set


I am excited to share with you today a class we are having at Scrapbook Essential BC using the exclusive die Layered Foliage!


WHEN: Saturday, July 14th
TIME: 10:00 - 2:00
COST: $38 + GST (includes the exclusive die only available through retailers valued at $20)


Contact Stacey at sbebc2011@gmail.com  or  778-533-4290 to reserve your spot

We are really doing something different for this Spellbinders Educator class. Not only will you be able to get an exclusive layering die set, but we are going to learn a little about working with the beautiful NUVO Mousse as well. You may have seen them in Stacey's store. Because of the details involved in this class we will only be making one larger card. We will be layering die cuts to create some beautiful die cut pieces. You are going to enjoy all the possibilities with both this beautiful layered die set and the versatile Mousse.

PLEASE BRING TO CLASS: die cutting machine and plates, tool-in-one, wax paper (in case you need it), scissors, non-stick craft mat, 1/2" or 3/8" washi tape that you are not crazy about (will be wasted), a NUVO Double Sided Brush (or a stencil brush will work if you have one), a 6" ruler (12" is fine if that is all you have), hand wipes, liquid glue (fine tip or a few tooth picks), mini-glue dots, double sided adhesive, & NUVO Crystals Drops-Periwinkle. If you have your own NUVO Mousse Powder Blue and a palette knife, please bring them to class (there will be some there if you do not wish to purchase your own)


Let's have a closer look at this card. First the side view to see the layers of the card.


These next two close ups focus on the NUVO Powder Blue Mousse applied to the card base edge, the frame of the sentiment, and the stripes on the background. Love that penalized or metallic look.


Here is a closer look at how I layered the die cuts. Some were used with out layering and others where only two layers where used rather than three.


I am so looking forward to teaching this class, because of the new product we will be playing with. Both the dies and Mousse.

Hope to see you there!


Spellbinders Educator #13 - A2 Waves Border Dies


Welcome. Today we are having a look at another Spellbinders Educator class, and two very different cards at that.


Spellbinders Educator Class # 13
WHEN: Wednesday. May 30th
TIME: 6:00pm - 8:30pm
COST: $42.00 plus GST (includes $25 die)
Contact Stacey to register at sbebc2011@gmail.com  or  778-533-4290

A blast from the past with past class dies and two totally different cards created in this class. The die for this class is the A2 Waves Border die set (S4-788). We are going have some fun getting our fingers dirty as we blend ink colours together. For those of you that took the Four Seasons Spellbinders class, we will also be using the tree die for this card. With the Wave Border dies we will create three layers of waves with ink blended card stock to create the sunset waves scene.

For our second card we will be using another past die, Graceful Fans (S4-703) and also use a new die, Petite Double Bow & Flowers (S3-314). It is a die that is available for you to order if you would like one - cost is $20.95. For class the Petitie Double Bow pieces will be die cut for you. 
If you do not have the extra dies used in this class, there will be ones there for you to use.
PLEASE BRING TO CLASS: your Platinum/or other die cutting machine, die cutting plates and rubber emboss pad, with blue plate (for the Platinum), Four Seasons Tree (S4-840) die, Graceful Fans (S4-703) die, All-in-one tool or piercing tool, non-stick craft mat, ink blending tools, white 3D foam tape, white pop ups; Ink pads Distress - Cracked Pistachio, Mermaid Lagoon, Blueprint Sketch or like colours; Oxide - Wild Honey, Worn Lipstick, Salty Ocean, or like colours; Liquid glue, and double sided adhesive tape.

A closer look reveals the there wave layers and the coral created for the Four Seasons Tree.


You can add a sentiment where ever you wish to. Below is a side view revealing the layering.


This second card the focus is on another past die, the Graceful Fans, and the new Petite Double Bow and Flowers die.


I love using bow dies with double sided paper because you get the sneak peek of the underside colouring.

Here is a closer look at the cute double bow.


The side view shows how everything is layered and popped up.


Hope to see you in class!

So this post brings us to the end of May for classes that are scheduled. You will not see too many post over the next two to three weeks as I will be visiting my eldest son in Phoenix! Excited to see him and his family, but not so excited about the hot weather they are already having. I will try to have a couple of posts prescheduled for you on some other creative works.

Happy creating! And Happy Easter, too!