M O M -- Happy Mother's Day Card

Like this card, I planned this from start to finish. I love it!

My mom gave me the idea of using scrap paper to put together cards, which is what she did here. I found a spare envelope and matched the card size to it.

*without flash

*with flash

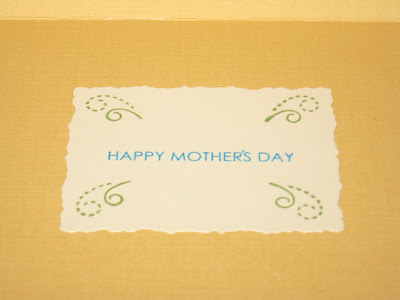
*the inside

All the stamps are from Papertrey Ink's Women of Life set.

Here's how I did it:
  1. I spaced out where I would need to heat emboss the flowers on the cream-colored cardstock in relation to the ribbon placement (drawn pencil line). After inking with VersaMark, I used Whisper's Enchanted Gold embossing powder. Usually I'm not a big fan of the Whisper brand, but this color worked out well.
  2. I stamped the stems and leaves using a Memento Dewdrop in Bamboo Leaves.
  3. I pierced the centers of the 4 smaller flowers and added the brads.
  4. I tied bows through the blue buttons (2 larger flowers) with brown baker's twine (I used Martha Stewart but that's obviously not necessary). My first preference was to use hemp, but I couldn't find my spool. I then used a hot glue gun to apply the buttons to flower centers.
  5. I added the dragonfly brad (same brand as the other brads but I can't recall which brand that is!).
  6. Ribbon applied, tied in a simple knot and trimmed. It matches the brads on purpose! Well, it almost matches.
  7. I attached the finished masterpiece to the yellow textured cardstock card.
  8. I clipped the brad backings off the MOM letters (dollar store!) and glue-gunned it to the card. The only thing I wish I could change about this card is the spacing between the M O M letters. Unfortunately, cooled hot glue gun glue is unforgiving.
The interior of the card:
  1. I used Spellbinders Nestabilities Deckled Rectangles for my sentiment piece.
  2. The sentiment stamp was done by using Scotch tape over the dots while inking (Memento Dewdrop in Bahama Blue, or was it Danube Blue?), then removing the tape before stamping (a little tip I learned here).
  3. I then used the little "leaves" in each corner using the same Bamboo Leaves ink.
  4. Adhered to inside of card.

An Array of Thank You Cards

[Dana writing for Sabrina who is currently internet-less! *gasp*]
I entered my mother's craft room, which we share, to find piles of paper scraps everywhere. She had decided to use them up by making Thank You cards. Below are some of her creations:


Since she has done this, Nichole of {capture the moment} has issued a similar challenge to her design team. This was such an amazing coincidence that I had to enter the link to this post in Mister Linky. Mom's name is now attached to Nichole's blog!

Mother Happy Birthday

My usual method of card creation is a "fly by the seat of my pants" type of frenzy. The following card is the first one I actually planned through from beginning to end BEFORE I started. The only thing I didn't know is what or who the card would be for. It was a lot of work but I love it so much that my next card is also planned out from beginning to end!


I'm so proud of myself! ;)

My mom thought of making a card to fit a standard letter-sized envelope and everything flowed from there.

I've been having so much fun with my Copics that I knew that I wanted to color in a stamp. From there, I played with several paper color schemes. I had new ribbons that I was dying to use.

The sentiment is from Papertrey Ink's Women of Life collection.

Card Measurements: [to be added... I forgot them at mom's place!]

My mom's bday card will be no surprise to her but oh well!

Scrapbook in a Purse


What a fabulously beautiful idea!! See here for how Becky Jensen made this!

Just Married


This is a wedding gift project that I helped Dana with. She is quite busy with 3 little children and Christmas preparations, and then suddenly this wedding comes up. Since this wedding took place in December, I thought the traditional Christmas wedding colours of white and red would be a good choice, and added grey to the colour scheme.

To add a little colour and wedding whimsy, I used clear stamp swirls from The Paper Company Studio - Flourish, using Dew Drop's Memento Rhubarb Stalk ink just under the edge of the light grey paper to create a flourish border of sorts. Also, using a little tule for a wintery wedding look, I created gathered cricles of tule to place behind circle title on the left page and the center heart button on the right page. The rose I cut out from an old Valentines card. To help the bride, I wrote the required picture size on pieces of painters tape that can be easily removed without leaving a residue.

Mass-Produced Thank You Postcards

Helped Dana out here:


Wedding Gift: Thank You Postcards

As a wedding gift, I thought to create a stack of Thank You cards for them to send out. I captured only a few here that I deemed worthy of note.

This one I used a double-inking technique I found on Nichole's blog here. It turned out beautifully, if I do say so myself! The stamp set I used is from Papertrey Ink (Out on a Limb revised edition).

This card utilized my copics and spica markers (shown below). It's a lot of fun coloring in stamps, but it's time-consuming.


The stamp didn't work very well: wood-mounted negative background stamps tend to be imperfect, but I liked this one nonetheless.

Season's Greetings

'Tis the Season Merry Christmas

Celebrate the Magic of Christmas

Joy (2)

Forever & Always

This pic is a little bright but you get the idea...

I used Martha Stewart's Around the Page punches called Topiary for the patterned "fuzzy" paper overlay. The sentiment is a rub-on to which I added strings of black and pearl embellishments. There are also little pearls at the junction of the punches. The bow is done on cream heart-patterned ribbon with a giant black gem brad wrapped around the center and hot glue gunned to the card. The main part of the card is done on Bazzill's pearlescent paper (String of Pearls). I love that stuff!


The sentiment is an epoxy sticker that says:
It is the things in common that make relationships enjoyable, but it's the little differences that make them interesting.
I love it!

The congratulations is embossed in black.

Magnet Boards!


Check out how to make this at HowDoesShe!

'Tis the Season

Again, sorry for the picture quality.

I had to redo this card several times but for different reasons.

First, I have to say that I DO NOT recommend the Martha Stewart Circle Cutter. I was SUPER excited to get this product but was tragically disappointed in it. I had my paper taped down over a cutting surface, just as the YouTube video indicated, and held the frame firmly in place but the circle cutter kept moving on me or the spinning part in the middle would suddenly become impossible to move with the cutter. (Not to mention that I sliced three fingers trying to get the safety cap off the blade even though I had taken pains to be careful!) I had to redo circles over and over. This tool has resigned me to Cricut circles.

Anyway, the Christmas tree stamp I used is from Papertrey Ink's Tree Trimming Trio. I'm in love, as you may have discovered, with Papertrey Ink stamp sets! It was stamped on a 4 1/4" circle of DCWV Christmas paper using a Memento Dewdrop in Bamboo Leaves. This circle was inked a bit around the edge and then pop-dotted (3D foam dots) over a brown 4 3/8" circle that had the edges distressed by the Tim Holtz tool here. It's a very subtle effect (the 2 circles) and I'm still deciding if I like it or not.

I can't remember the brand of brads I used for the tree ornaments... I put all my brad's into storage receptacles.

The card was inked around the exterior before I placed the circles, sentiment and bow on it.

Amazing Free Template Downloads!

I love, love, LOVE Nichole's company, Papertrey Ink, and blog {capture the moment}. She's compiled the free downloads she's offered over the years HERE!

Crocheted Flowers!

I found this while doing this post and just had to dedicate an entire post to it!

Since I'm fond of knitting (though it has, along with cross-stitching, joined the ranks of hobbies-to-do-when-the-kids-are-older-and-I-have-more-time-and-by-some-miracle-I-become-more-organized), I'm incredibly excited to attempt crocheting flower embellishments! I've never crocheted before but I'm assured by many people, including my sister, Eva, that it is quite simple.

Find the miracle of creating these flowers here at {capture the moment}!

Holiday Card Holder

Check out StampTV's latest video on turning an empty Kleenex box into useful storage!!

Cards I Love!

One thing that all aspiring creators do is search the web for ideas and inspiration. I got the following card pics from one of my fav blogs: {capture the moment}.

This card was created in anticipation of, obviously, Valentine's Day.

And I love this part of a different card:

And this card is adorable!

So is this card part!


I'm actually really surprised how in love I am with the cards using their furniture stamp set:


I'm partial to topiaries...

I love this 3D effect!

This is a totally sweet idea!!

I love this vellum flower!

This is simple, yet gorgeous!

I love the subtle background on this (same link as above)!

I love the petal edges in this (same link as above)!

This ribbon through the side is SO cool!


The following is from the blog of another designer:

I think this card is too wide (too much stuff on the left) but what I love about the card is the strips of glitter! I know exactly how I could do the same. I also love that the sentiment could be similarly replicated using handwriting with a VersaMark pen!