Sharing Spellbinders Sample Cards - Other Tuscany Strip Cards


Today I am sharing the last of the cards I made for the Spellbinders reveal at Scrapbook Essentials BC open house March 11th. both of the cards today use the 'Tuscany Strip' die.

This first one, in soft coral and cream colours, also uses the stamp and die from the 'Feather' set (SDS-038). I wanted everyone to see that you do not have be into colouring in order to use stamps and die sets like this. I just used a coral ink to stamp the image, and then die cut it.


The second card for today, uses just the 'Tuscany Strip' die. You will note that the top strip layer has ribbon woven in and out of the die cut pattern on this beautiful paper.


On the small Labels Eight die I stamped above, the little stem of leaves from the same stamp set as the first card, which adds a bit of a finishing touch to the sentiment.


Both of these cards are A7 (5" x 7").

If you would like to order any, or both, of these sets. just let Stacey from Scrapbook Essentials BC know. If she doesn't have it in the store, she can order it for you. (sbe2011@gmail.com)

Hope you are inspired to create today,


Sharing Spellbinders Sample Cards - Feather


Sharing another Spellbinders card with you today from the Spellbinders reveal a couple of weeks ago. This one combines two different sets - Feather (SDS-038) and the featured die for the first Spellbinders Educator class, Tuscany Strip (S4-655). I decided to cut away a part of the card and glue two die cut Tuscany Strips, one on the front and one from behind on the inside to give the space a little more strength and a more finished look on the inside.


Here is a closer look at the coloured feather. It was quite fun to colour this feather, flowers, and the little ladybugs. I used Spectrum Noir to colour the feather, but a person could use colouring pencils, watercolour, etc., or an ink resist technique.


It will be fun to try different colours for future feather colouring. Below are the Spellbinders product used.


Hope you enjoyed the card and are inspired to try any of these products for your creations.

Happy creating!


Gift Bag Punch Board 'B' Class


This is the fourth of our Punch board series classes; the second Gift Bag Punch Board class. I had a blast putting this together and creating these containers. I know you will get just as much enjoyment creating these, too. It's going to be 2 1/2 hours of fun!


Gift Bag Punch Board Class 'B'

When: Saturday, April 22nd
Time: 2:00 - 4:30
Cost: $25 + GST...
Where:
3730 Grange Road Studio


For this second class with the Gift Bag Punch Board we will be creating a Bakers Box which will hold a ton of cookies, or up to three muffins or cupcakes depending on their size. There will be a sweet little Back Pack box/bag, and a Star bag, and Milk Carton box. These also will hold many different kinds of gifts. Also will create a couple of Rosebud Cups to add Smarties, M&Ms, Cadbury Easter Eggs, and more, with a little banner to label with a persons name or a little sentiment. In order to make these, we will learn how to create an octagon from a square piece of cardstock!

Please bring to class: Your Gift Bag Punch Board, 12 x 12 score board, paper trimmer, scissors, bone folder, double sided adhesive tape (Scor tape/Sookwang is the best for these kinds of projects), liquid glue, and a non-stick mat for when we use liquid glue.

Each project close up

This is the box that can hold some great baked goods, or whatever else you wish to put inside.


This star shaped bag is great for some kind of odd shaped items like finger nail polish, lollipops, those round ball like lip balms, certain shapes of  perfume or cologne bottles, etc., or just to hold a bunch of candies or chocolates.


This little back pack is great gift packaging for a little back to school gift, a teacher gift, or even a graduation gift.


Milk carton gift packaging can be created to any height that you wish, and can hold a lot of stuff from a ton of candy to candles, and more.


These sweet little rosebud cups are great for table decoration for any kind of dinner or celebration and hold a surprising amount of candies, chocolate eggs, or mints.


What did I tell you...2 1/2 hours of fun, right! See you in class.


Spectrum Noir Class #3 - Pinks & Turquoises


Our third Spectrum Noir class! I'm a little busy typing up instructions for a few classes so I am not saying much, and just copying and pasting the post from Scrapbook Essentials. We are going to have even more fun in this class, so see you there!


Spectrum Noir #3 - Pinks & Turquoise

When: Saturday, April 22nd
Time: 10:00 - 12:30
Cost: $25 + GST...
Where:
3730 Grange Road Studio


This class brings us half way through the beginner series for Spectrum Noir. We have learned a lot and are getting comfortable using these amazing markers. In this third class we will be introducing Pinks and Turquoise into our colour collection and colouring a pink Flamingo with some background features and a turquoise butterfly with background features. Some of the techniques for this class will include how to make feathers on a bird, a couple of tips when colouring with water, and filling in more of a background watercolour look.

Remember to bring your homework from the last class for Show & Tell. There will be a surprise for those that do their homework and spend two hours practicing before this class.

Please bring to class: All your Neutral, Green, Yellow, Blue & Cool Gray markers to class along with your Pink & Turquoise markers. You will need your double sided adhesive tape, scissors, and 3D Foam squares to assemble your cards.

To substitute Copic Markers for the colours we are using - RV06, E81, BG10, BG11, BG15, BG49, E47, YG01, YG99, & BG72.

Stampendous 'Flamingo'


Penny Black 'Butterfly Party'


My practice sheet...(sorry editing went wrong)


Keep on colouring, and happy creating!


Sharing Spellbinders Sample Cards - Owl


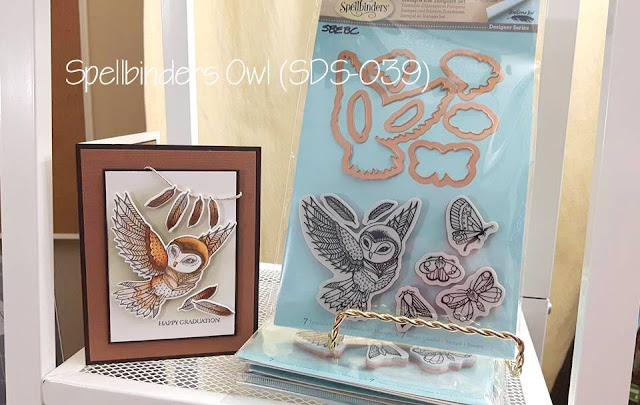
OK, today we are back to me sharing the sample cards I made for the Spellbinders Educator reveal a week ago. Today's is the "Owl" (SDS-039). Such a sweet owl, don't you think? You will have to forgive the non-Spellbinders sentiment this time. I enjoyed colouring this image, and had fun with the little extra feathers. It's so nice to have the dies for each item in the stamp set.


Here is the card when it was on display at the reveal. It is now on display at Scrapbook Essentials BC in the new Spellbinders section of the store.


Here is a closer look at the owl...


...and the side view to see the layering of this card. Of course you don't have to pop up all the layers I did, I just like the overall effect.


If you like colouring, whether it be with alcohol markers, colouring pencils, or watercolour pencils, this is a fun stamp and dies set! And, I know that there are 2 or 3 at Scrapbook Essentials BC, waiting for you to add to your repertoire and write you name on it.

Thank you for stopping by to have a look today. Happy colouring!


Spellbinders Canada Educator


G45 Vintage Hollywood Tall Card


This is an interruption of the Spellbinders Educator series of posts. As you all know, not only do I love Spellbinders, but I also love the gorgeous Graphic 45 papers. Today I want to participate in the Graphic 45 Cards & Tags Contest. While working on a mini album for one of my daughters using the "Vintage Hollywood" collection, I was inspired to stop work on it to create this card. I just never got around to posting it. So now is a great time to do that.

I knew the moment I saw this image on the "Silver Screen" sheet, that I would end up fussy cutting out and create a tall card with it. I also used the "Star Studded" paper for the backdrop of the image. This card is 4"w x 9 /14"h, and fits into a business size 10 envelope.

Here are a couple of close ups...

...one thing I wish I had done was to take a gold coloured alcohol marker to the rhinestones.


Next is the side view showing you how I layered the card.


For the inside...(the card base and writing space is a cream cardstock, but doesn't show that well in this photo)


I wish you could see it in real life, because all the rhinestones really glitter with every movement and angle of the card. I would like to try making this card again and try adding a subtle hint of colour to the image and see what that would look like.

Thank you for stopping by to have a look. Happy creating!


#NationalCraftMonth


Sharing Spellbinders Sample Cards - Snail


I had said, a while back, that I would share with you the sample cards I created for the Spellbinders Canada Educator reveal. This one, titled "Snail" is a great one for those that love to colour with Spectrum Noir or Copics, watercolour or regular colour pencils, or traditional water colouring.


I had planned to go over the dots with white liquid pearls, but forgot to do that as it was very late at night when I made this card the night before the reveal. I always love colouring and watch as the image slowly comes to life with colour.


I love how Spellbinders combines and packages the stamp set with dies. It make it so easy to put together your card or layered image for other projects such as shadow boxes or framed home décor items.

If you would like this set contact Stacey at sbebc2011@gmail.com to purchase it.


First Spellbinders Educator Class - Tuscany Strip


Today's post is all about our first Scrapbook Essentials BC Spellbinders Educator Class. Here are the two cards we will be making.


This class is filling up quickly, so reserve your spot before it's full. Contact Stacey - sbebc2011@gmail.com

Spellbinders Educator Class # 1 

When: Wednesday, April 12th

Time: 3:30 - 5:30pm  OR   6:30 - 8:30pm

Cost: $35.00 + GST (INCLUDES THE $20 DIE)


We are so excited to share with you classes featuring Spellbinders product. For our first class we will be using the Tuscany Strip (S4-655) to create two lovely cards. The cost of the class includes the die for each of you to add to your Spellbinders Die collection. In each Spellbinders class we will discuss different creative ways you can use each die and a few die cutting tips. Because you will each be receiving your own die, you will need to bring your die cutting machine to class. If you need to use the one in the store, just let us know. For those of you that attended the March 11th open house, you saw a few cards created using this die in different ways.

Please bring to class: Die cutting machine (you can order the Platinum 6 (PE-100) for a nice portable machine from Stacey), die brush if you have one (or order from Stacey "Tool-In-One" T-001), scissors, double sided adhesive tape, mini-glue dots, & white 3D Foam Squares (the white foam tape is easier to use in this class).


On this card I did not include a stamped sentiment leaving it so that you can stamp whatever greeting or sentiment you prefer to use on the card.


This 5 1/2" square card is all about mitering and will be fun to do.


Here is a photo of the Tuscany Strip die you will each receive in class.


We will discuss many ways this die can be used as we create the two cards in class. Looking forward to seeing you in class!


This next photo is the die that will be used in our second Spellbinders Educator class in May.

Graceful Fans


Exciting News!


Hello everyone!

Today, I will be sharing some pretty exciting news for those of you that have not yet heard about it, and over the next few days be posting further about it all.

Yesterday, Scrapbook Essentials BC made a big announcement and reveal at their Bi-annual Open House. It is all about the Spellbinders Canada Educator program! I was one of 10 store instructors across Canada chosen to participate in the program!! Of course, I am super excited.

This is what Stacey posted on the Scrapbook Essentials Facebook page.

"So....we announced our special reveal today at our Open House. Wow! Was it ever hard not to tell people before today. But we are so glad we didn't as we were able to tell so many people in person at the same time.

While at the Creativation show in Phoenix, I learned about a NEW program that was in the works with Spellbinders. This NEW program was for CANADA and is the Canadian Educator Program. The instant I heard about this program, I thought of Sabrina right away. So....I filled out an application, gathered testimonials, and had Sabrina put together a profile, included all of her social media links and submitted her application. Anticipation almost got the best of me waiting a few weeks....and then the news arrived. Sabrina was one of the 10 maximum candidates to represent Spellbinders Canada as a Spellbinders Canadian Educator! She will be teaching exclusively through our studio and is the only Educator on Vancouver Island. Classes will be held monthly and will focus on the latest products offered through Spellbinders.
We are so excited about this new addition to the studio and are thrilled to be representing Spellbinders Canada!"
 Here are some of the photos from the reveal...

 
 Me at the display table...


Here are a couple of the cards I created using these newly released stamps and dies by Spellbinders.

 Isn't that owl adorable?

I was surprised by the cake Stacey ordered...


 It was wonderful to be able to share with everyone all the great products from Spellbinders with everyone and answer their questions. I myself am so excited that I now want a Prizm along with a ton of other product.


This will be great as a portable die cutting & emboss tool to take to crops for those smaller dies!

Over the next few days you will see posts related to the rest of the cards made for this reveal as well as the first Spellbinders class in April! I look forward to many more Spellbinders classes and representing Spellbinders as a Canadian Spellbinders Educator.

Happy creating everyone!