Vintage Layout - Masculine - with Sabrina

I just love creating masculine vintage layouts! And as I was asked to start up the vintage layout classes at Scrapbook Parade, so I thought I'd start off with one.

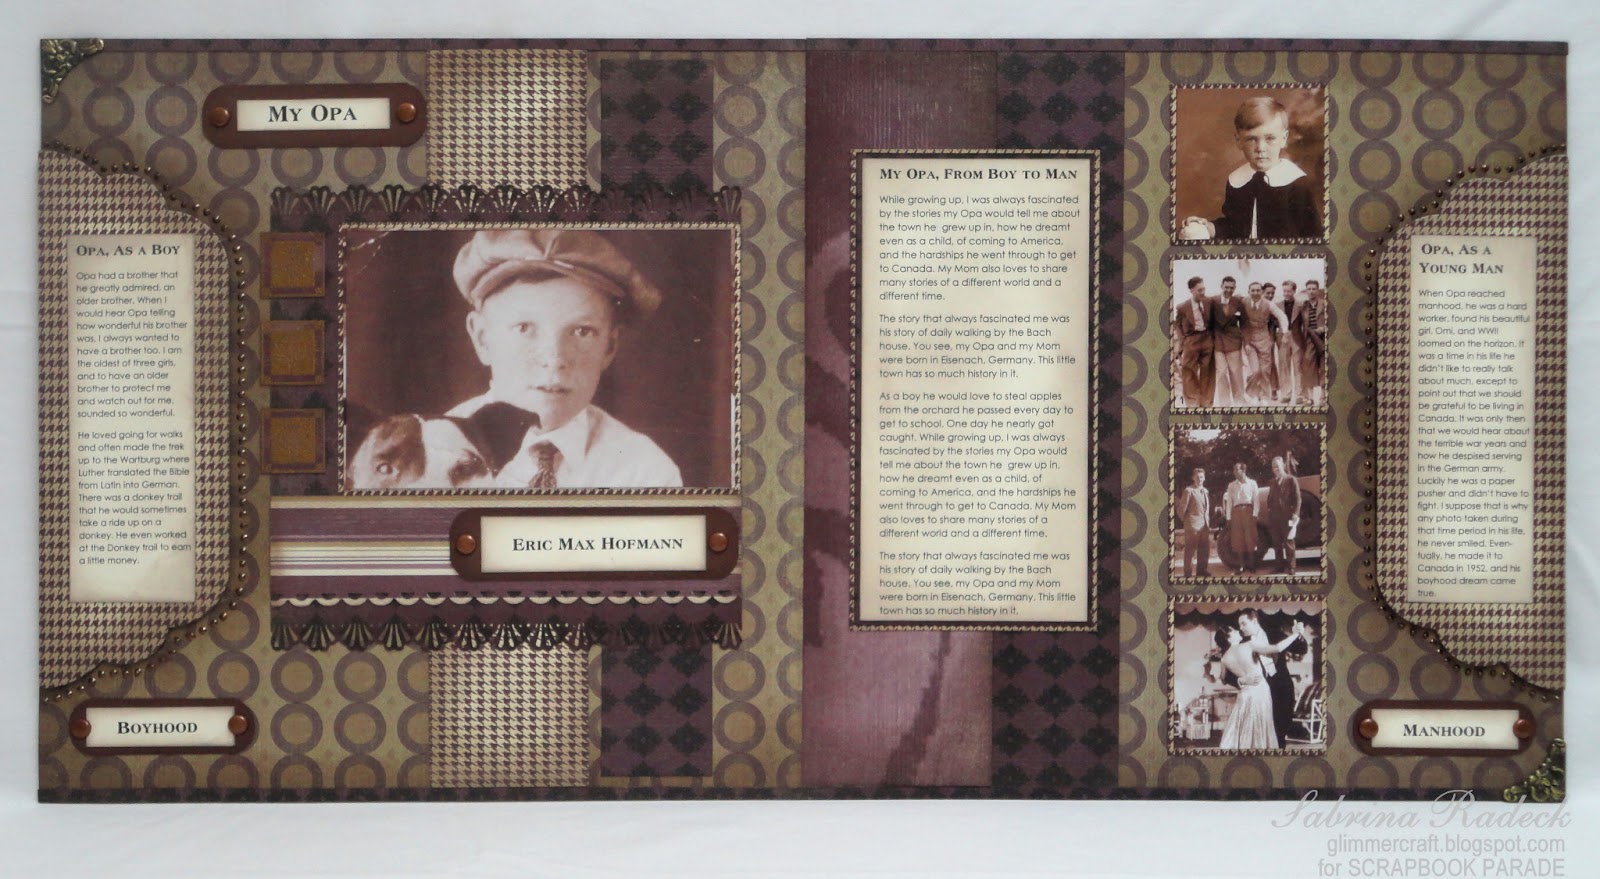
Now, I have to tell you that these photos are not of my Opa/Grandfather. I have a lot of work to do in getting the old photos I have scanned, etc., so I just found some photos online and attached them using removable double sided tape so that I can replace these with the real ones. What I wrote, I did very quickly, and will rewrite. But this gives you and idea of the page layout.

Here are some close ups.

This is the left side.

The right side. Both sides use half of a Grand Labels 11.


This shows the gold embossed "inchies", Dark Chocolate Liquid Pearls, the title plates, the vintage metal corner, etc.


This shows the border punches (Martha Stewart Deco Fan & Fiskars Apron Lace) and layers of papers, as well as the name plate.


In case you are wondering, these papers are from the retired Upsy Daisy company and their Enchanted collection, and are no longer available.

Thank you for stopping by to have a look at this masculine vintage layout for a February end of month class. And for those of you here in Victoria that plan to take the class, the list of things needed for class are at the very end of this post.

Have a great day everyone! And happy crafting!


This is what you will need for this class.
-paper trimmer (be sure your blade is sharp for this paper)
-ruler
-pencil
-ink blending tool
-Pumice Stone ink pad
-splat mat
-Dark Chocolate Liquid Pearls
-1/8" Scor Tape
-black marker
-small corner rounder
-boarder punch (I used Martha Stewart's Deco Fan)
-paper piercer OR exactor knife and a self-healing mat
-something to wipe and clean your hands with


Valentine Cards

Red, white, black, pink & gray...The colours most often used in making Valentine cards. So what will we be making with these colours? Check it out.


Which one of these is your favorite? Lets have a closer look at each of them, shall we.


Every paper piece is edged in black ink on this card, with the exeption of the labels fourteen piece. That way we don't see the white core of the paper on the black. It really makes the paper pop more, too.


On this card I took a laser cut chipboard key and heat embossed it with silver on both sides. I also made a velum cardstock tag heat embossing the tag stamp in white. Oh, and guess what? You see that bow on the card? It reaaly isn't a bow! I came up with a way to make what looks like a bow without any tying and twisting! All the cards in this class use this methood if it has what looks like a bow on it.


 This is a close up of the velum tag.


Red Polk-a-dots! I have a fondness for polk-a-dots even though I don't use them often. This card is loaded with pearls! Let's have a closer look, shall we.


I don't know if you can see it very well, but the heart  is actually three hearts folded and glued together.


This is my favorite of these cards. It's so bold, don't you think? A couple of close ups for this card. The first shows the Labels six frame.


The next one shows more of the rosettes, stamped hearts, and my no tie bow!


So there you have it! I look forward to seeing all of your Valentine cards, too.

For those of you here in Victoria that are taking this class, the list of what to bring is at the very end of this post.

Thank you for stopping by, and have a great day!


This what you will need to bring to this class:
-paper trimmer
-scissors
-ruler& pencil
-dbl sided adhesive
-1/8" & 1/2" Scor tape
-quick dry glue
-dimensionals (pop-dots)
-black marker &/or small black ink pad like a dew drop
-a
bright deep red ink pad with ink blending tool-hole punch
-white Opal Liquid Pearl (Platinum will work too)
-Tiny Heart Stamp - if you have Valentine stamps the chances are you will have one tiny little heart stamp in there somewhere. Please bring that to class along with a clear acrylic block and a bright deep red ink pad. You are welcome to bring any of your Valentine stamps that might want to use. 


WRMK - Grandma's Kitchen - Double Double Layout


This is my second month in teaching the Double Double layout class. This month we will be using the Grandma's Kitchen paper collection from We R Memory Keepers. These papers have a very nice colour pallet and lend themselves well to many crafting styles.

Here is the first double page layout.


I think I may have gotten a little carried away with the stamping, but it is such a cute stamp. The next few photos are close up detail shots.


Like the way I fussy cut my stamped title?


Now for the next layout.


Detail close ups for this layout are next.


So that's it for the details. I must apologize for the blurry photos, They didn't look blurry on the camera screen....

There will be a second Double Double class using more of the paper collection.

Thank you for checking in today, and hope you have a wonderful day.

For those of you in Victoria taking this class, the list of things to bring is at the very end of this post.


This is what you will need for this class:
-paper trimmer
-scissors
-fussy cutting scissors if you have them
-pencil & ruler
-corner rounder
-dbl sided adhesive
-quick dry glue
-brown ink pad (not too dark. Memenoto Rich Cocoa is too dark. I used VersaFine Vintage Sepia. So something like that colour)
-Pumice Stone ink & Ink blending tool
-black &/or brown journaling pen
-dimensionals (pop-dots)
-Splat mat
-small hole punch


Valentine Treat Holders

Hello everyone! And Happy New Year to you all. May the new year be filled with wonderful crafting experineces and lots of crafting gifts for all those special days in the year ahead.

These are treat holders that have been around for a few years. But, every so often these fun to make ideas are great to recreate and bring back. Scrapbook Parade is having this fun class in February. They are even including the treats!

Here are the five that we will be making. I even have a list of some more treat holders to make for Easter. I came across an old list with sketches for a whole bunch of packaging ideas, so be sure to check in for some further treat holder ideas when it gets closer to Easter.


If you have any questions, or want a tutorial on any of these treat boxes, just mention it in your comments. I won't be able to post any tutorials until after the 9th of February, however.

Thank you so much for stopping by, and happy crafting everyone!

For those of you here in Victoria taking the class, the list of things to bring is at the very end of this post.


So this is what you will need to bring to class for this class.
-Score pad
-stylus
-bone folder
-paper trimmer
-scissors
-pencil
-ruler
-regular hole punch & small hole punch
-dbl sided adhesive
-quick dry glue
-clothes pins or clips to hold things in position while glue dries
-white & black gel pens
-White Opal Liquid Pearls (Platinum and Yellow would be fine too)


Dana's Best of 2012

Finally getting around to posting my favorite cards from 2012. I love to review my cards from earlier in the year since I forget about them.

This is one of my all-time favs from 2012. Unique yet CAS.


Another unique CAS:


I love this vivid palette!


Soft, pretty, country charm:


Masculine rustic charm:


Antique CAS:


Love this color palette and the ribbon!


Soft, whimsical CAS:


Festive CAS:


And a couple of my more recent Christmas-flavored cards (click on photo to go to original post):


These cards were amongst my most popular of 2012:


Thanks for visiting! We certainly appreciate all our lovely visitors!