Welcome!
In my last post I mentioned that I was working on a special class project using Graphic 45's 'Princess' collection. With a few delays here and there, I finally have it done for you and share the class details with you today.
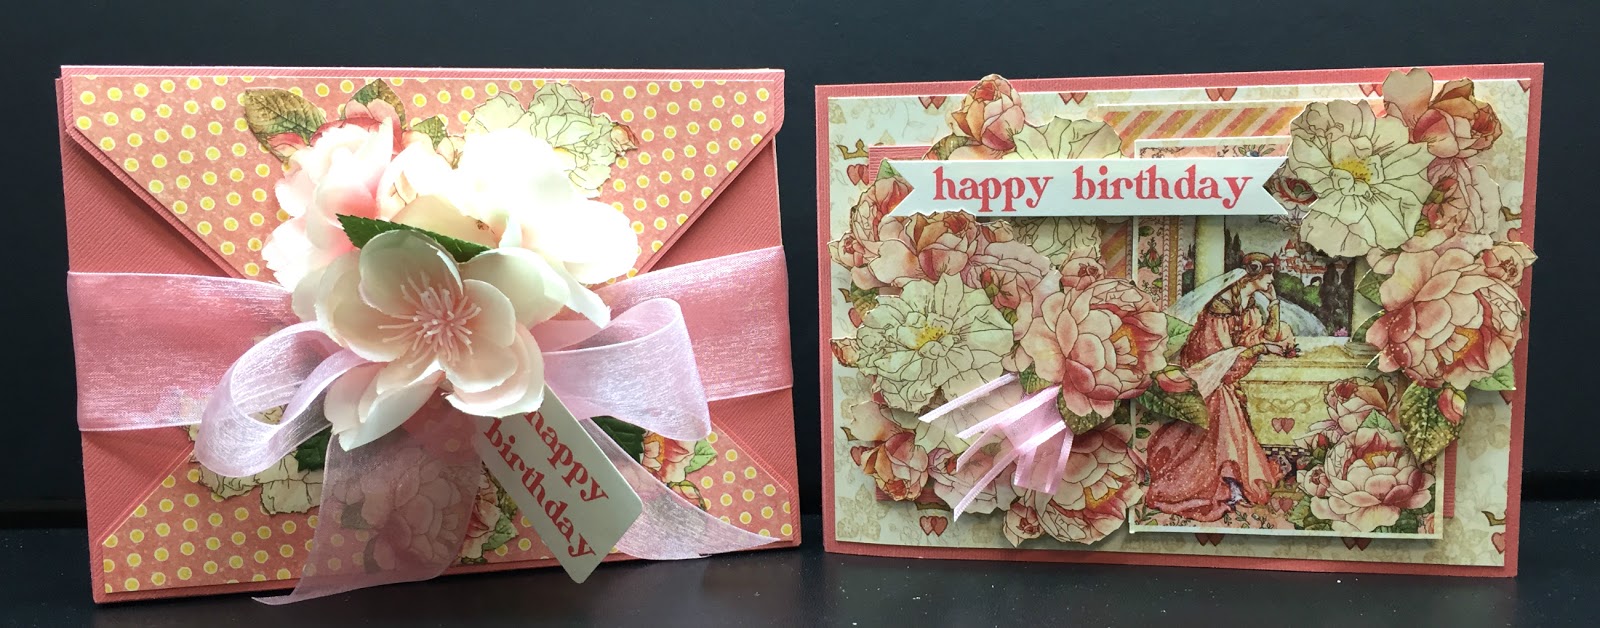
I will begin by showing you the envelope box and the trifold card folded up.

"PRINCESS" ACCORDION TRIFOLD CARD IN ENVELOPE BOX
DATE: Thursday, February 21st
Now, for those that do not live here and can't attend, lets have a closer look at the project. Let's begin with the accordion trifold card.

I must state that I did not take any side view shots to show the layering of this project because there were enough photos with just the straight on shots.
Here is the card as you open it up. (If I was better set up for a video, I would have done that for you)


I think you get a little bit of an idea of the thickness of each panel. Let's have a look at each panel individually, now.


When open, you can see that there would be three more panels on the back of these three. Let's have a look at them as well.

You see the front of the card here (on the right) and a blank cream panel meant for writing on, and the panel on the left of that. Let's look at that panel closer up.

Well, that's it for the card. Hope you liked it. Now we can have a look at the envelope box for this card.

This is not normally the front of an envelope, but because I wanted to make an elaborate closure for the flap, it turns out to be more the front of the box envelope. Here is the actual front.

I fussy cut the entire 'Roses for Royalty' sheet for this project, so those taking the class will have a lot of fussy cutting to do, but I hope that you feel it is worth the effort and time to create a special card for someone.
For those that register, I look forward to seeing you in class. For those that can not attend, I hope you are inspired.
Thank you for stopping by today, and Happy Creating!

In my last post I mentioned that I was working on a special class project using Graphic 45's 'Princess' collection. With a few delays here and there, I finally have it done for you and share the class details with you today.
I will begin by showing you the envelope box and the trifold card folded up.
"PRINCESS" ACCORDION TRIFOLD CARD IN ENVELOPE BOX
DATE: Thursday, February 21st
TIME: 6:00 - 9:00pm
COST: $30.00 + GST
Contact Stacey to register for this class
There are times when you want a real special card to give, and we feel this card is in that category. Using the feminine and beautiful Graphic 45 'Princess' paper, we will create an accordion trifold card that can be proudly displayed. We will also create a beautiful envelope box to give the card in, and to store the card in as a keepsake.
The sample has been made up as a birthday card, but can be made as a Valentine card, Mother's Day card, Thank You card, a card of encouragement, and more. This card can be given to any woman or girl at any age and be well appreciated.
There is plenty of fussy cutting HOMEWORK which will be ready for pick up the evening of Tuesday, February 12th.
PLEASE BRING TO CLASS: Homework, craft mat, scissors, bone folder, double sided adhesive tape, liquid glue, white foam tape (& squares too if you wish, but the tape will work best for a lot of this project) OPTIONAL: something that is about 3/4" thick that is no more than 7" wide, like a notebook or paperback, a foam pad, or a stamp cleaning pad, etc. This will be used to insert into the envelope box as we create it to make assembly easier.
___________________
Now, for those that do not live here and can't attend, lets have a closer look at the project. Let's begin with the accordion trifold card.

I must state that I did not take any side view shots to show the layering of this project because there were enough photos with just the straight on shots.
Here is the card as you open it up. (If I was better set up for a video, I would have done that for you)


I think you get a little bit of an idea of the thickness of each panel. Let's have a look at each panel individually, now.


When open, you can see that there would be three more panels on the back of these three. Let's have a look at them as well.

You see the front of the card here (on the right) and a blank cream panel meant for writing on, and the panel on the left of that. Let's look at that panel closer up.

Well, that's it for the card. Hope you liked it. Now we can have a look at the envelope box for this card.

This is not normally the front of an envelope, but because I wanted to make an elaborate closure for the flap, it turns out to be more the front of the box envelope. Here is the actual front.

I fussy cut the entire 'Roses for Royalty' sheet for this project, so those taking the class will have a lot of fussy cutting to do, but I hope that you feel it is worth the effort and time to create a special card for someone.
For those that register, I look forward to seeing you in class. For those that can not attend, I hope you are inspired.
Thank you for stopping by today, and Happy Creating!


No comments:
Post a Comment