Papertrey Ink 5th Anniversary: Day 4

Today's festivities include fav color combos from Papertrey Ink's design team. I chose to work with Jessica Witty's combination of Canyon Clay, Dark Chocolate, Aqua Mist and Harvest Gold, using inspiration from Nichole Heady and Maile Belles (photos below).


It's very difficult to tell, but the Dark Chocolate frame was impressed with the Canvas side of the Linen & Canvas impression plate. I'm thinking I should have impressed the card base with the Linen side... maybe letterpressing it even? Ah, well. Nothing wrong with simple. ;)

The only PTI buttons I don't own are the Harvest Gold ones. So I colored a Lemon Tart button with a Harvest Gold trio Copic. Adds some interest, anyway.


{Supplies--all Papertrey Ink unless noted}
  • Cardstock: Canyon Clay, Dark Chocolate, Stamper's Select White
  • Stamps: Iconic Images, Embellishments
  • Ink: Aqua Mist, Walnut Stain Tim Holtz Distress Ink (Ranger)
  • Dies: Mat Stack 4, Fillable Frames 7
  • Other Tools: Linen & Canvas impression plate, Lemon Tart button/Harvest Gold trio Copic, brown embroidery thread, ink blending foam (Inkssentials)

PTI 5th Anniversary: Day 2 (Card 3)

Phew! I got all the PTI 5th anniversary day two images that I really wanted to play with done. There is, of course, a few others I'd love to do something with, but we'll see... I think 3 cards in one day shows how much I've neglected my house and kids is plenty!

Here' s what I did with Maile's awesome image:


I used a few of the smaller stones from my son's little rock "collection" on the front step to keep my card shut. Much easier to see the image that I placed on the inside of the card.

I started with a Royal Velvet card base and used a Spellbinder circle to cut out a window. I spritzed the front with Pearl Glimmer Mist, rounded the corners and stamped a few splotches with the Grunge Me set and Platinum Planet ink.

The image was colored with Royal Velvet and New Leaf Copic trios. I traced over the Hello with the Sakura Clear Star gel pen and added a strip of tiny rhinestones. The Peapod twine is from The Twinery.


{Supplies--all Papertrey Ink unless noted}
  • Cardstock: Royal Velvet, Stamper's Select White
  • Stamps: Grunge Me
  • Image: PTI 5th Anniversary images
  • Ink: Brilliance Platinum Planet (Tsukineko)
  • Dies: Circles (Spellbinders)
  • Copics: Royal Velvet/New Leaf trios
  • Twine: Peapod (The Twinery)
  • Other Tools: 1-3/4" circle punch (Marvy Uchida), Pearl Glimmer Mist (Tattered Angels), Corner Chomper (We R Memory Keepers), rhinestone strip (Recollections)

PTI 5th Anniversary: Day 2 (Card 2)

I immediately thought of ruffled ribbon after seeing Dawn's cute birthday image at the Papertrey Ink 5th Anniversary: Day 2 challenge. Narrowly making it in time to use this week's Freshly Made Sketch, I created this:


Since I don't seem to own any sewing needles, I was about to resort to ruffling some grosgrain ribbon using a craft needle and thread when I recalled Laurie's sweet little saddlestitch ribbon trick! Perfect!

After punching a 1-3/4" circle out of my Scor-tape adhesive sheet (this is how I make my own Glubers!), I pulled one of the threads on a length of ribbon to achieve a ruffled look. I carefully laid it around the edge of my adhesive circle and voila! I punched out Dawn's image and, after running it through my Xyron, laid it over top. After doing this, I realized that I should have put a thick dimensional adhesive in the center to sort of support the whole thing but it worked alright without.

The rest of the card involved a scalloped border die, more ribbon, my scoreboard and the Sakura Stardust gel pen. After assembling this over PTI's By the Numbers patterned paper, something was definitely missing. I decided that sparklies would solve the problem. I was able to tuck the rhinestone flourish just under the ruffles and then colored it with my RV14 Copic to give it some color.

Thanks for stopping by!


{Supplies--all Papertrey Ink unless noted}
  • Cardstock: Stamper's Select White
  • Patterned Paper: By the Numbers
  • Image: PTI's 5th Anniversary graphics
  • Dies: medium scalloped border
  • Ribbon: Aqua saddlestitch
  • Other Tools: 1-3/4" circle punch (Marvy Uchida), rhinestone flourish (dollar store), RV14 Copic, Stardust gel pen (Sakura), scoreboard (Martha Stewart), iRock/1 teensy rhinestone (Imaginisce)

Papertrey Ink 5th Anniversary: Day 2

I dropped the ball yesterday by not playing along with PTI's Day 1 challenge... I even forgot to comment! Not that I've won anything from them yet but never hurts! ;)

Today's challenge over on Nichole's blog is to use a graphic from the free download on a project. So many lovely ones to choose from! I went with Melissa Bickford's LOVE but I'm hoping to come back with ones using Dawn and Maile's images, as well!


More Glimmer Mist, again. The stuff is impossible to resist once you start using it! ;)

I've also been doing a lot of CAS... It really is my favorite look!

Thanks for taking a peek!


{Supplies--all Papertrey Ink unless noted}
  • Cardstock: Stamper's Select White (as well as some generic white scraps I had)
  • Image: PTI's 5th Anniversary graphics
  • Dies: Fleur de Lis Squares (Spellbinders)
  • Other Tools: Viva Pink Glimmer Mist (Tattered Angels)

Paper Smooches SPARKS and Young Crafter's Unite

After making this card, I decided I wanted to make a whole set of cards with the Paper Smooches "thanks so much" sentiment. While cutting out the letters took a bit of patience, I loved the overall effect. So I stamped a bunch of "thanks" and have been cutting them out here and there during evenings spent with the hubs. I still don't have enough for a "set" but decided to play around with some of what I had.

Using the Paper Smooches SPARKS inspiration photo and the Young Crafter's Unite sketch (graphics below), I made this somewhat masculine card:


I don't know why I'm addicted to Glimmer Mist lately, but since I was basing this card on the previous, it seemed to go along. (Be prepared for more!)

Having recently organized them, I pulled out my long-neglected embossing folders for this project. My teensy supply of Sizzix folders have been overlooked the most and I felt this particular one suited my ideas.

I may be playing with this sketch again... Plenty one can do with it!

Thanks for peeking!


{Supplies}
  • Cardstock: Stamper's Select White, Kraft and Hawaiian Shores (both Papertrey Ink)
  • Stamps: Chit Chat (Paper Smooches)
  • Ink: Memento Tuxedo Black (Tsukineko), Smokey Shadow (Papertrey Ink)
  • Dies: Seeing Stars (Papertrey Ink), Tattered Banners (Tim Holtz Sizzix)
  • Other Tools: Bricked embossing folder (Tim Holtz Sizzix), Key Lime Pie Glimmer Mist (Tattered Angels), corrugated cardboard, paper crimper (Fiskars), star brad (Recollections)

Caught Unawares

I'm very much in the mood for scrapbooking lately. So yesterday, when I made reference to a project I would be posting today, that is what I had in mind to do.

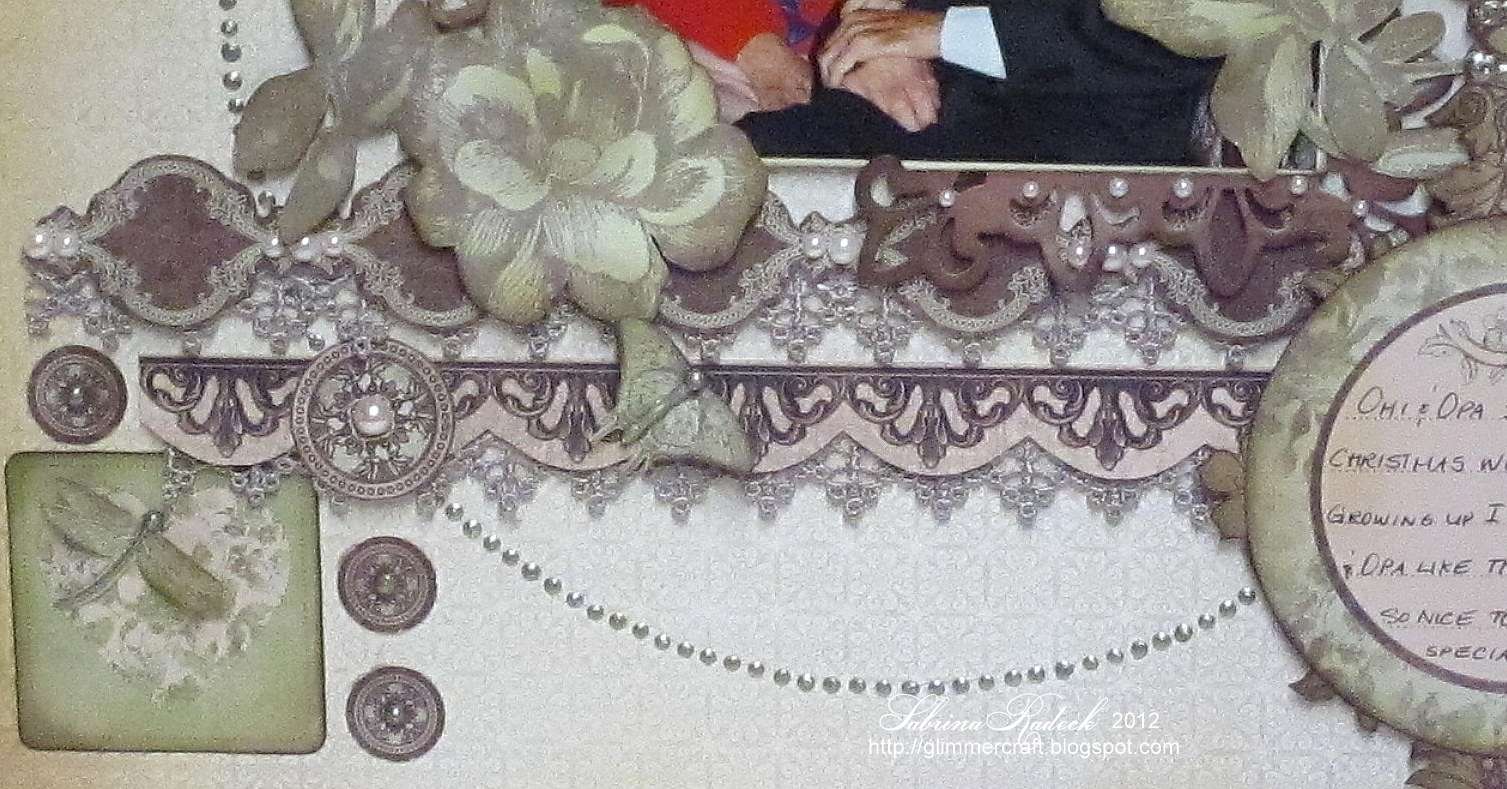
In going through my photos I came across one of my grandparents. It was a picture that one of my sisters had taken on a Christmas Eve many years ago. They have passed on since then, 10 and 7 years ago. So when I came across this rare photo of them cuddling, unaware of being observed and a photo being taken, I had to scrapbook it. I rarely saw (at least from what I can recall) the two of them show affection when others were around. And that makes this photo very special to me. Especially since in their last years I was too far away to visit, a student with little income. I couldn't even make it to either of the funerals. My Grandfather died when he was 90, and my Grandmother three years later at 94.

I wanted to make a special page for this photo, and this is what I came up with. I apologize for the pixilated image, I've been having problems with that lately.


I spent hours cutting up pages of designer paper, but it was worth it. Here are some close ups of the work on the page.


No stamping or Spellbinders, (whoops, I did use 2 Spellbinders Fleur De Lis Pendant cuts behind photo added later 2-5-2012) just all hand cut with scissors (so everything else was cut with scissors or paper slicer), a lot of ink distressing, and Liquid Pearls and pearls.

So there you have it. I won't be posting for the rest of this week, unless I end up with more time that I thought, but I have commitments that will keep me from crafting this week. I'll be back as soon as possible though. Thank you for stopping by today! And have a great week!


The Last One!

 Yesterday I posted 2 out of three remaining Valentine cards to be made. This is my third and last one. This one was also made using scraps with the exception of the card base. I stamped another Penny Black Hedgehog on a piece of white scrap and coloured it using my Prismacolor pencils. I had a few left over cut out little stamped hearts from this Valentine project.


Because the little hedgehog blended in somewhat with the kraft background, I used Brilliance White ink and created a highlighted area to lace it on, thereby helping it to stand out a bit more.

This was another lickity-split card to put together.  I'm already starting on a bit bigger of a project with a fair bit of detail work. I hope to have it ready to post for tomorrow. Hopefully, that is.  And, remember that I would love to hear about how you organize and store your extra die cuts, stamped pieces you didn't end up using, cutouts, etc.

Thank you for stopping by again, and hope that you have a great weekend!


All From Scraps & Leftover Die Cuts

Here are two of three more Valentine cards I need. I am so excited about these cards because every piece, with the exception of the card base, all came from scraps and leftover items- like unused die cuts- from previous projects.

I am in the process of reorganizing my craft area and had bits and pieces from past projects in one box, and some in a bag in another box, and so on. In gathering these die cut pieces all together from hear and there and everywhere, I was amazed at all that I had! I did not know, for instance, that I have an awful lot of hearts, circles, butterflies, ovals, and a multitude of other shapes and die cuts all ready to be used! I am still trying work out a good organized storage system for it all. I might make a couple of postings on the subject at a later date.

But lets get to my easily made and quickly put together cards! I had so much fun making a Skinny and Tall card for a Scrabookers Challenge, I wanted to make another one. I even used the leftover stamped circles cut out from the frames made for that card. The little hearts came from a project some time in 2010, and even the ribbon is three scrap pieces! ...all carefully joined under one of the circles, and one tied into the little bow.

The long black and gray damask banner on red is popped up with dimensionals, as are the circles, and then the little red hearts.

This second card is again all made from scraps & leftovers. Even the red gingham on white and red was already assembled from these cards, because I had first made them the wrong size. You know, one of those, whoops. And I used leftover leaves I had made for this project. The white die cut oval and red heart are some 2010 extras.


It felt good to be taking from the scraps rather than adding to them! I am going to check out all my previous die cut pieces with every card from now on. I have enough to make at the very least, 50 cards! Maybe more!

Thank you for stopping by today. I would love to hear how you organize all your little leftover die cut pieces to use later on!


Playing in Paradise, Lily Pad Cards and Moxie Fab

How fun is it to play with hearts?!

My card incorporates challenges from Playing in Paradise, Lily Pad Cards and Moxie Fab Cool Tools Die-Cutting (all graphics below).


The large heart wasn't as fanned out on this side so here's the other...


I die cut pages from an old phone book, sewed them together and spritzed them with Candlelight Glimmer Mist. The largest heart was sewn to the front panel and the whole thing spritzed with Viva Pink Glimmer Mist. The line of hearts is meant to represent thought bubbles... Hope it worked! ;)


{Supplies--all Papertrey Ink unless noted}
  • Cardstock: Stamper's Select White
  • Patterned Paper: phone book ;)
  • Stamps: Fillable Frames #2
  • Ink: Raspberry Fizz
  • Dies: Heart Prints
  • Glimmer Mist: Candlelight, Viva Pink (Tattered Angels)
  • Other Tools: Corner Chomper (We R Memory Keepers), sewing machine/thread

LOVE - Colour Create Challenge #89 DT Submission

It's time again for another Colour Create Challenge!

Shanna chose for challenge #89 the colours light brown, dark brown, and either white or cream, with the option of hearts. And, for the month of February, we will be having a surprise candy package for one lucky winner!!

This turned out to be a fun challenge for me as I tried to come up with a way to make a valentine card using only browns and cream. Once I put my mind to it, I suddenly got an idea and I think it worked!


After ink distressing the edges I stamped the sentiment where I wanted it.Then placing my heart mask over it, I continued to ink distress/blend around the little heart. Then I stamped four different hearts using two different brown inks double stamping them or ghost stamping - which ever you call it. I also stamped a flourish on the patterned light brown DP to add a little extra detail.

This card inspired me to do a little more stamping than I usually do. If you haven't tried this technique in a while why not try masking and ghosting and see what you come up with!

Be sure to check out the other DT inspirational projects at Colour Create, and join in on the fun!
Till next time...Happy crafting!!


TOOLS & SUPPLIES

STAMPS: American Crafts Stampp Collection-Thanks, Craft Smart-Damask Heart, Craft Smart-Flower Heart, Inkadinkado-Chelsea Sentiments, Flourishes-Tag Lines, Hero Arts-Fabulous Flourish Woodblock
INKS: VersaFine Vintage Sepia, Tim Holt's Distress-Dark Walnut
SPELLBINDERS: Labels Fourteen
Ribbon
Dimensionals
Ink Blending Tool


( http://colourcreateadmin.blogspot.com/2012/01/sabrinas-challenge-89-card.html )