Spellbinders Educator Class #11 - Poppies


Due to a problem getting the Poppy Dies, we are switching Spellbinders #10 and #11 to give these Poppy dies time to arrive. SO WHAT USED TO BE # 10 IS NOW #11 AND WHAT USED TO BE #11 IS NOW #10. Some sort of delay with the manufacturer... SO if you saw the change of numbers &  dates, now you know why.

This class will only produce two cards because of the detail work and the letterpress technique which is new to most of the people that take classes from me.

I love how they turned out, and I know that you will have a lot of fun making these too!


SPELLBINDERS EDUCATOR CLASS #11

WHEN: Wednesday, February 28th
TIME: 6:00 - 8:30
COST: $45.00 + GST (includes $28 die)
To register for the class, contact Stacey - sbebc2011@gmail.com or 778-533-4290.
We all love Poppies, and that is what we get to work with from Spellbinders! A beautiful Poppy die set (S4-815), and they have a few different ones! So if you like Poppies, ask Stacey about these beautiful dies.
What will we do with these dies in class? I will introduce you to using die cuts to create a 'letterpress' look. Great technique to use in a number of ways. And of course we have to maximize the use of the die by assembling all the parts to create beautiful Poppies.
As these techniques are a little time consuming, we will only have time to make two cards in class, but you will go home with some fun techniques to use as well as the die set!
PLEASE BRING TO CLASS: Die cutting machine with all of your plates, rubber embossing mat, your die set if you already have it before class, scissors, double sided adhesive tape, liquid glue, Glossy Accents, a couple of Q-Tips, Buttercup Liquid Pearls, & Oxide Fired Brick (will have mine if you need to borrow it). And you will also need Distress Bundled Sage and Tattered Rose (forgot to put this on the list for scrapbook Essentials BC)

I really love how the California Poppy on grey turned out!

And now for the Letterpress technique! This is a real fun technique that can make some pretty incredible cards. I am keeping it simple for this class as it will be a new technique for most taking the class. (I think I got a little carried away with the sequins though)

Looking forward to seeing you in class!

Happy creating!


Spellbinders Educator Class #10 - Four Seasons Tree


I had so much fun playing with these die sets, and know that you will too! These are the three cards that we will make in class-


SPELLBINDERS EDUCATOR CLASS #10
WHEN: Wednesday, January 24th
TIME: 6:00 - 8:30
COST: $40.00 + GST (includes $25 die)

To register for the class, contact Stacey - sbebc2011@gmail.com or 778-533-4290.


This is a class where we will get only a taste of the possibilities with the sponsored dies/s for February. Yes, just a taste. Because there is the main die, a tree, and then there are four coordinating dies that go along with the tree. One for each season! Imagine what you can all create with this die set! You will receive the tree as the class die, and if you wish to have your own Spring Canopy (S4-841) you may order it from Stacey. Here are the other coordinating dies - Summer Canopy (S4-842), Autumn Canopy (S4-843), & Winter Canopy (S4-844).
Stacey has the Tree, the Spring Canopy, and Winter die sets in the store!
We will create three 5" x 7" cards - a sympathy card in black & white with a layered tree, and on the other two have some fun with ink blending. The latter two would be great for adults and children alike!

PLEASE BRING TO CLASS: die cutting machine and only your die cutting plates this time, any of the dies that you get before class, craft mat, All-in-One tool, ink blending tools, white 3D Foam tape, double sided adhesive tape, liquid glue (matte if you have), scissors, 6 Q-Tips, and the following ink pads - OXIDE - Salty Ocean or Sky Blue, Peeled Paint, Wild Honey, Worn Lipstick, Fired Brick, DISTRESS - Gathered Twigs, & Bundled Sage. (I will have mine there if anyone needs one or two of these colours). Bring stamp cleaner and a cloth or baby wipes, too.
Looking forward to the fun we will have.

Here is a little closer look at the cards.


I thought that this die would make a good sympathy card, so I decided on black and white, and old school sympathy card. I used the Pierced Square die as the black mat behind the tree and hand wrote the sentiment.


This card is more cheerful, and shows what you can do with inks until you get a canopy die. I know some of you, like myself, will have to buy one die at a time. But that does not limit what you can do with the tree die. (However the bird house and birds are from the Spring Canopy die set. You could always used something else until you get any of the canopy dies)


I do love the little birds and birdhouse!


For this card we will use the Spring Canopy and colour all the elements of the canopy.


So cheerful! Makes me want spring to come right after Christmas! L.O.L.


So these are the tree cards we will make in class. I know that you will all have great fun creating with the Four Seasons Tree die and all the Canopies!

(Sorry again for the poof photo quality)

Happy Creating!


Watercolour Pencil Class - Penny Black "Live it Up"


Time for another Watercolour Pencil class!

This time we will be focusing on two different ways to create a sky with a few fluffy clouds. (Again apologies for the photos)


WHEN: Saturday, January 20th
WHERE: Langford Legion Hall
TIME: 10:00 - 12:00
COST:
$25.00 + GST

To register for the class, contact Stacey - sbebc2011@gmail.com or 778-533-4290.

We are going to have some fun with this class! Basic cloud and sky techniques will be the focus of this class, as well as how to use colour to give shape/dimension to objects. You will be introduced to the "Stomping" technique, to create clouds, on the 'tip to tip' Pearl Embossed hot air balloon scene, and on the other you will use your pencils to colour on the paper with colour saturation, before using your water brushes.

PLEASE BRING TO CLASS - All your watercolour Pencils, Aqua Brushes or traditional watercolour brushes, a jar with water, paper towel, a plastic lid or watercolour pallet, washi-tape or watercolour tape or masking tape, your wood cutting board with handle, and heat tool. Always bring to watercolour pencil classes your craft knife or pencil sharpener, and a NOTEBOOK to write down tips and things you learn. A good idea to bring to every class you attend.


A great little stamp set for this class. There are only a limited number of these stamp sets available, as the wholesaler has discontinued them, So if you haven't already purchased this stamp set from Stacey, be sure to contact her before they are gone!

See you all in class Ladies! Happy creating!


New Series of Classes For the New Year - MISTI & Introducing Altenew Stamps


I am very excited to share with you a new series of classes for 2018! In this series of classes we will be combining two things. Tips and trips on using your MISTI or Tonic Stamping Platform, and layered stamping using the gorgeous Altenew flower stamps!

You will have to forgive the poor quality of the photos. I took them in the evening, and the lighting in my new place is not good for taking photos. I am working on what I can do to improve them again for you, but in the mean time please be patient with the images.

Here are the cards we will be making in our very first class!


CLASS INFO

When: Wednesday, January 10th
Time: 6:00 - 8:30
Cost: $40.00 + GST (includes $24 stamp set)

To register for the class, contact Stacey - sbebc2011@gmail.com or 778-533-4290.

I am so excited to share with you so many new things using your MISTI. We will mainly focus on layered stamping for the MISTI series of classes, and I will introduce you to some wonderful stamps from a fairly new company - Altenew. For all of the MISTI classes it will be up to you to bring your MISTI or Tonic Stamping Platform to each class along with your ink pads. I will always give the colours for the class, but you choose how light, bright or dark you want to go with your choice of ink pads.
For our first class we will be using the "Bold Blossom" stamp set from Altenew, and we will make three cards. You will learn how to maximize your MISTI with layered stamping with some tips and tricks in each class, There will be tips on how to stamp a masked strip and also how to mask and overlap flowers and leaves.
See you there!
PLEASE BRING TO CLASS - MISTI or Tonic Stamping Platform, Washi-tape or masking tape, stamp cleaner and cloth, double sided adhesive tape, Sea Breeze Nuvo Jewel Drops, Pale Periwinkle Nuvo Jewel Drops, Glossy Accents or liquid glue, tweezers, pen, ruler, pencil and notepad, 3 x 3 post-it pad, scissors, white 3D Foam Squares or Foam Tape and the following ink pad colours:
Black, a pale yellow, pale peach, and dark pink, pale blue/turquoise, a pool-like colour, and a deep teal/turquoise, a mid olive-like green and a little darker version of green, a pale pink, mid pink and dark pink.

NOTE ON THE INK PADS - Since the focus of the class is how to maximize your MISTI or Stamping Platform tool and introduce you to layered stamping and Altenew stamps, we are not focusing on what ink pads or specific colours to bring to class. As long as your ink pads are water based dye inks, you will be fine. You can even pick different colours from the ones that I used. And, you do not need to have three different colours to use layered stamps. You can use just one colour to get three different tones, or even just two. Your ink pads do not even need to be from the same company. So feel free to choose your colours and ink pads from what you have at home.

If you have a problem choosing, you can always contact Stacey at the store/studio for some help.

OK, now on to the card close ups!


In addition to the Altenew Bold Blossom stamp. I also used their 'Super Script' stamp set. Love this set!


This simple card looks so beautiful with the layered stamped flower.


Next, I will be showing how you can mask and stamp a strip and later cut it up and pop up that strip from the card piece.


I decided to deliberately stamp the sentiment vertically, which you can tell by the roses, but I see that overtime someone puts the card back they go with a horizontal placement, making the flowers look a little off. Perhaps my idea was not such a good one... The added bit of doily adds just the right touch.


For the third and last card in this class...

Sorry about the poor quality of the photo...

I will have to admit here that I cased this card for class created by Dana Smakula from Pinterest.


So there you have the cards we will make in class...or hope to make. We may just get the stamping done and the simpler cards put together...will see what time allows.

Looking forward to seeing you there!


Altenew Majestic Mistletoe


Last month, well before the Christmas rush started, I had started to make these Christmas cards that I am posting for you today. I got to a certain point for their assembly, and then it had be put on hold as life got in the way with classes, new class samples needed, and helping with our church Christmas dinner. It wasn't until Monday evening that I was able to complete putting the cards together, address them and send them off. I had planned to make more like these with different sentiments, colours and layouts, but with time constraints ended up going through all my old class leftovers hunting for Christmas cards to send of to those that lived the furthest away, and of course paying more to send them because they were thick cards. That was why I wanted to make these cards...


Oh well, that is how life works sometimes.

I was very excited to use this Altenew stamp set...Majestic Mistletoe...


...and the Tim Holtz Tonic Stamping Platform for the first time!


This is a great tool (like the MISTI) to use for layered stamping! Still getting used to using and working with the tool, but I really encourage you to use yours or consider getting one.

Here is one of the cards close up.


To create the snow I used NUVO Crystal Drops Simply White.

I was a little disappointed however, that the drops I added over the stamped images took on the ink colour. But the overall effect I really like, and an added bonus...they dry real quick!

Things I would have done differently now that I have learned more...

  1. I would have waited to stamp and emboss the sentiment until after stamping the layers for the mistletoe (I had stamped and embossed the sentiment in the centre, first)
  2. I later learned about stamping and embossing sentiments twice to make them stand out and be a little smoother, and will do that in the future
  3. I already knew that one should test a product before using it, but I did not test how the NUVO drops would work on stamped images


I love the stamping platform tool for these reasons

  1. great for mass producing stamped cards
  2. great for lining up when using layered stamps
  3. great for stamping multiple times in the exact same spot for darkening your ink colour or for better ink coverage of a stamped sentiment
  4. great for double heat embossing


I look forward to getting more proficient at using this tool. And need I say that I love my newfound Altenew! Love all the flower stamps and sentiments they have!! It will take me a while to get them all! LOL

The MISTI & Altenew class that were recently posted on the Scrapbook Essentials BC Facebook page, were created after I made these cards. I will post that class for you over the next few days.

I ended up using these cards for local mailing, and am happy to say that I got all 45 cards mailed. Now I just have a few to give out in person.

Till next time, happy creating!


Favourites of 2017 # 7 - Personal Projects


I decided at this point to skip over the proposed sharing of Project Class favourites, and go right to my favourite creations that were not created for a class. Some are personal creations, and others are samples that are in the Scrapbook Essentials BC store and studio.

The first favourite I will re-share with you is the Graphic 45 Vintage Hollywood Tall Card. It is on display at the store. Here is the posting of the card. You can see some close ups there.


I like it enough that after all this time at the store, I might just ask for it back. L.O.L.

I love how the following card turned out. It is a Spellbinder stamp & die set, and the Spectrum Noir colouring turned out beautifully on this card. More details here.  I might ask to get this one back too, so that I can use it. I have the perfect person to give it to.


This next one is another Spellbinders stamp and die set creation. Details seen here. 


Using the same stamp and die set, along with the Tuscany die strip, is this card; a favourite as well. View post here.


In March of 2017 I posted a project that took me some time. It is an Album specially created for one of my daughters. I just sent it to her in December for her birthday, and she loved it. You can view all of the photos and a video tour of the project here.


I know that my plan is posting projects not for classes here today, but this did not fit in any of the other categories so I am including it here today. 

I created a big project for a series of classes where we complied and created this album using the Heartfelt Creation's Album and the flip fold page attachments along with the gorgeous Graphic 45 Nature's Sketchbook. View all the photos here.


OK, back to personal projects.

Next comes a birthday card that I made for another of my daughters from a paper collection I have had for a very long time. Included in the post that day was also another Portrait of a Lady card that I was able to quickly put together from scraps and left over fussy cutting. Here they both found are.

Daughter's Birthday card...


And another card needed quickly...


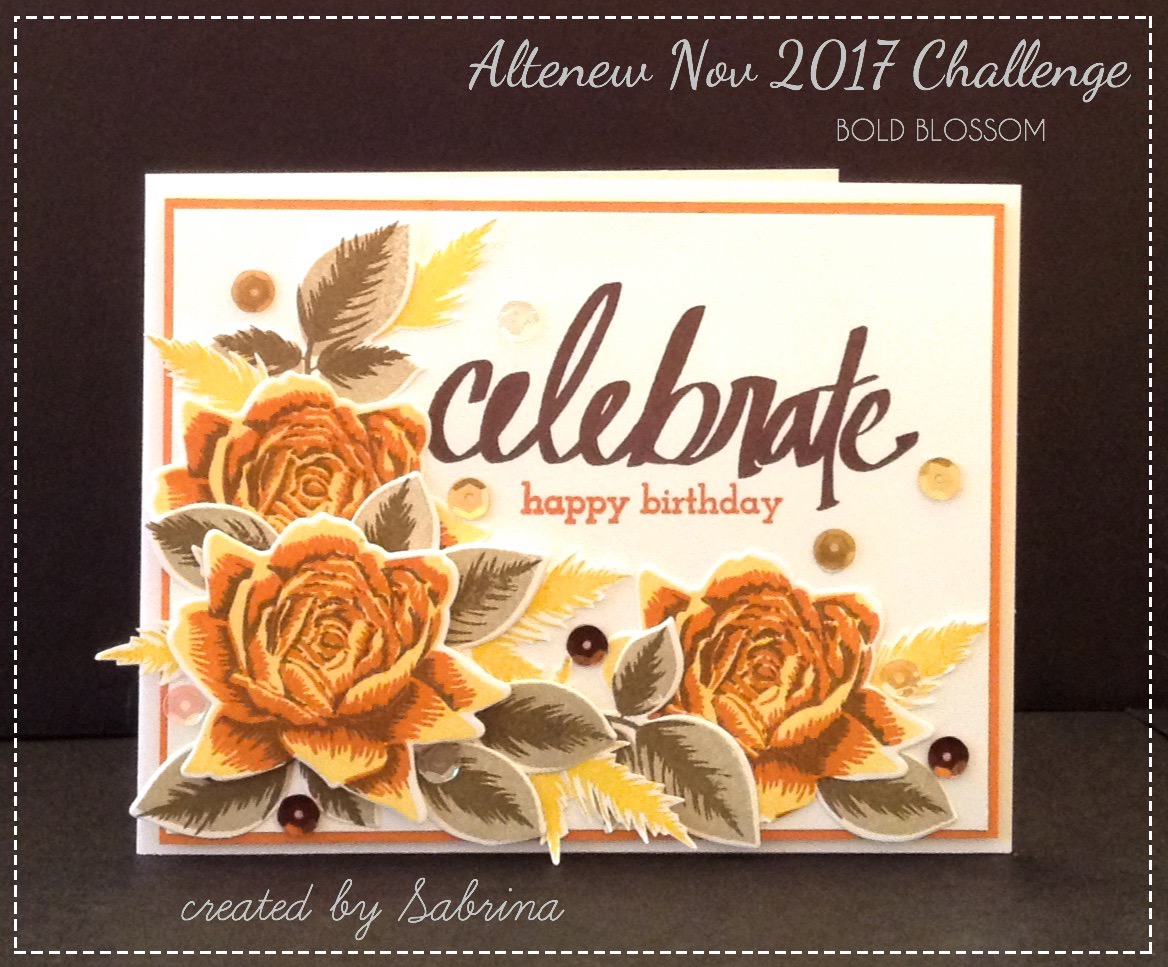
Next come a couple of cards I created after my discovery of Altenew! This is the first stamp stet that I purchased and created two cards with the same set. One for the October Altenew Card Challenge, and one just to see if I could make it into a Christmas card.


More Altenew Christmas cards created using the Majestic Mistletoe stamp set. I made 8 of these with the intention of making 16 more. Eight in a non-traditional grans and peach colouring, and another 8 in grays and Aqua colours. Unfortunately these last 16 did not make it into production except for the gold embossing of the sentiments.

Here are the ones I did get done in traditional colours, and the post you can view here.


I also found some real cute Christmas paper this year that I just had to get and create with. I made several different cards using these cute papers, but maybe because I have been working on Christmas projects and classes since July, it was easier to pick a favourite from this bunch of cards (all on different posts). View this post here.


Then there is another Spellbinder card that I created to help inspire people to participate in a Spellbinders contest held at the store. I love this card, and hope to pick it up the first time I get back to teaching classes at the studio this month. View post and photos here.


So, that is it for my 2017 favourites of the year. I thank you for understanding that when you make hundreds of cards/projects a year, it is difficult to narrow it down to just a handful of favourites to review with you. So thank you for coming back over the past seven days to view them all.

I look forward to the classes and projects to be created for and in this new year.

Happy Creating!