KITS ARE NOW SOLD OUT (I haven't even finished kitting them yet!)
Hi Everyone!
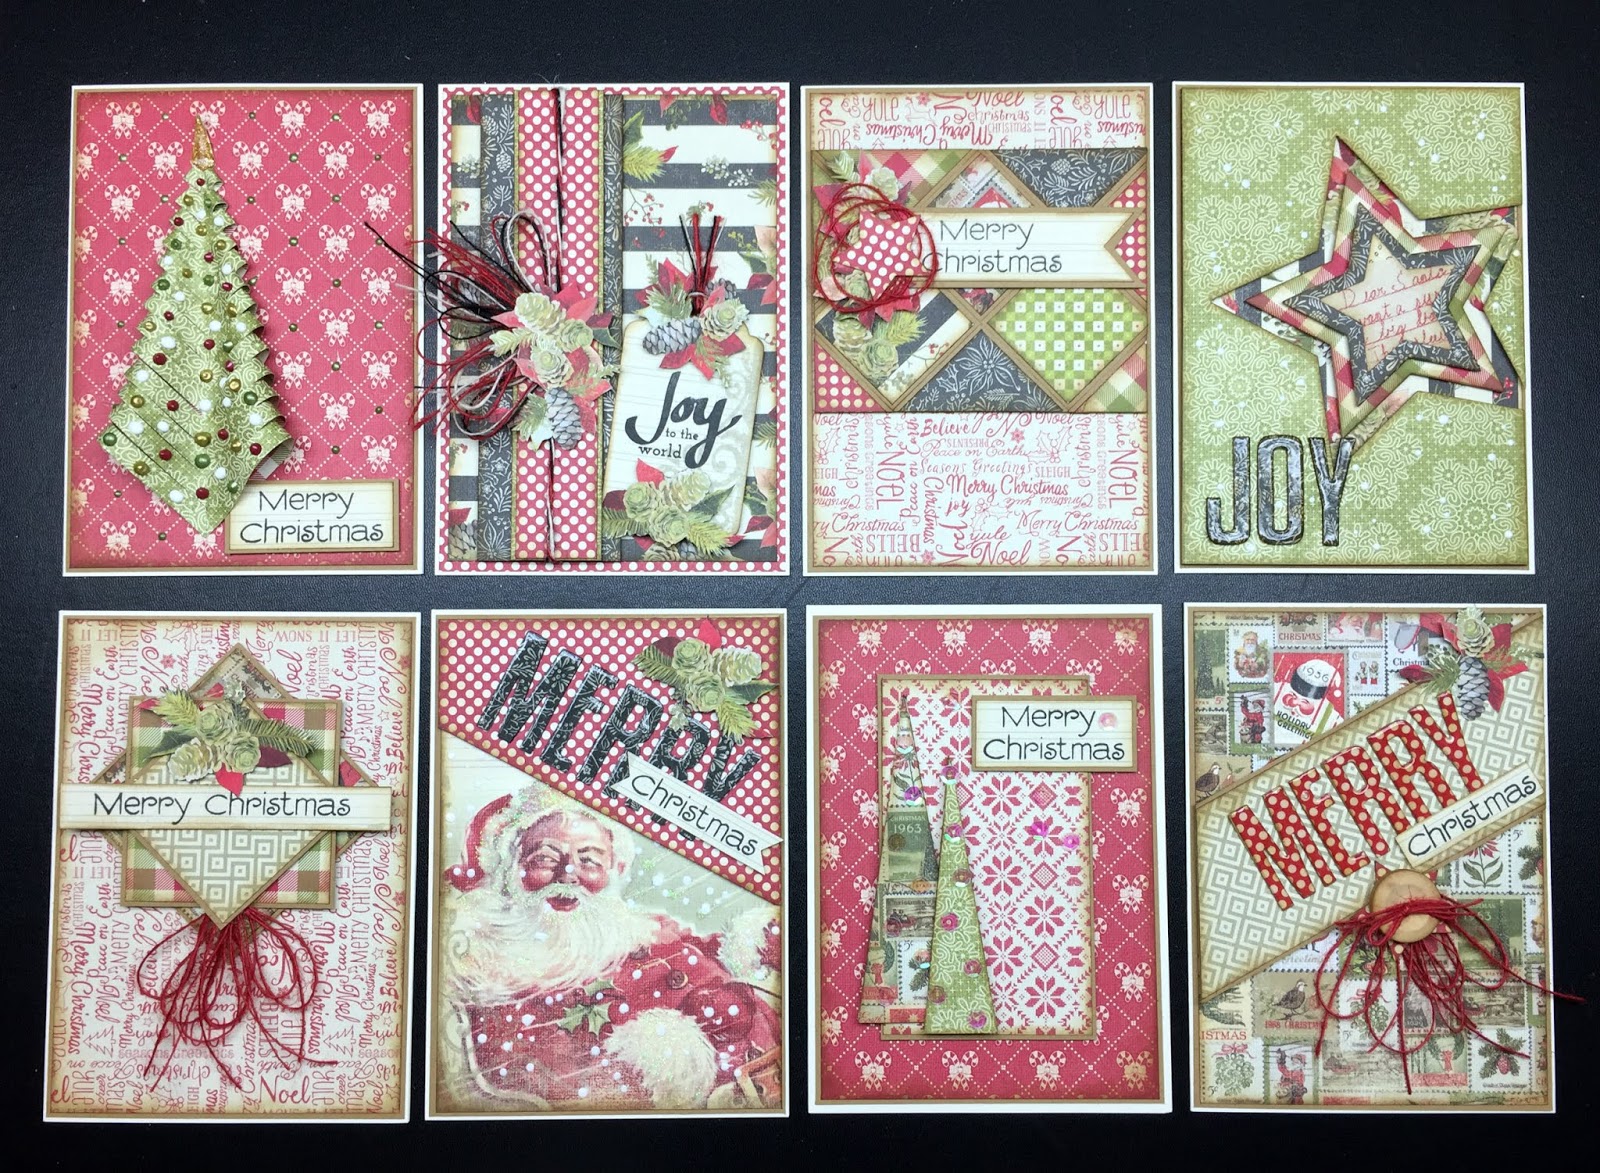
Just wanting to share with you a new card kit I have put together for Scrapbook Essentials BC. My first Christmas card kit of the year.

Vintage Christmas - Card Kit #8
$35 + GST (SOLD OUT)
Contact Stacey at sbebc2011@gmail.com or 778-533-4290 to reserve your spot
Can't attend all the Christmas card classes, and you would like to get your allotment of Christmas cards made? Well, we have a kit for you to help you get some of your handmade cards done!
Get creative with paper! With this set of cards you will be creative with paper in the cutting, folding, quilting, and fussy cutting. All the sentiments will be stamped for you, all the die cuts will be done for you, and all the twine, wood button & sequins are included in your kit. As are the instructions to help you with all your paper fun. You will even have enough paper left to make another 1 0r 2 cards of your own design! These are all 5 x 7 cards and the card bases and envelopes are part of the kit too.
Please Note - the products used to complete these cards that are NOT included in the kit are: NUVO Drops - Simply White or Glossy White, Autumn Red, Bottle Green, Metallic Bright Gold, & Glitter Drops - Honey Gold, White Blizzard, or Glossy Accents.
Kits will by available by the end of August.
Since there are 8 cards to go through, you may want to get your favourite beverage and get all comfy so you can browse through at your leisure.

I love how this looped tree turned out. The kit has instructions on how to make this tree. It was my first time making it, and I can see using this idea again. Here are some other views of the card.

Adding the little green drops on the red paper is a great little touch. This can be don on any grid-like paper.


This card works well using dots and stripes.

The fussy cut pieces really contribute making the appealing with the die cut tag.

You know me, I love layers and dimension. So in the photo below, you get an idea on how I did it on this card.

For this next card, I had started out to do something different, but in the end changed it to quilting squares. I did, however, forget to do the stitching. Any way, normally I would not have matted each square, I would have placed them on a single mat spacing them apart. I ended up putting them on a single piece.

Let's have a look at the embellishment.

Always fun working with small, and even tiny, squares.

This next card is not a new idea, but looks good with the paper layers and white NUVO drops.

The word "Joy" is made with 2 layers of black cardstock and then topped with the printed black paper and covered with Glossy Accents.
It has always been a good technique with die cutting layers like this. The NUVO drops look good too.

You can see how the layers are done for this card in the next photo.

Again, lots of layers and dimension for this next card. It adds to the appeal of the card even with it's simple design.

Three twine bows, a sentiment, and a popped up fussy cut pinecone cluster give the card it's appeal on the popped up layers. Here is a closer look.

From the side view you can more easily see how the layering is done.

This next simple card is jazzed up with Glossy Accented letters, white drops for the snow, and glitter added to Santa's hair & beard, and the fur on his cap and coat.

Here is a closer look at the top part of the card.

In the photo below, hopefully you can see where I added the glitter drops. Rather than cover his entire beard, I followed some of the lines, creating the motion of his wind swept beard.

In the side view you can see that the top portion of the card is popped up, as is the fussy cut cluster of pinecones.

This is a design that we often see, but is always effective and enjoyed. Each tree is double layered with pop up foam in-between. The clear sequins add a touch of Christmas sparkle.

A closer look...

It is from the side view that you can see more of the details.


The last card of the kit, is again a simple card. But with the large die cut letters, the wood button and red twine embellishments, the card is appealing.

A closer look.... Again that little fussy cut pinecone cluster really helps.

In this next photo you can see the star behind the wood button that has had the edges inked.

The side view reveals the layering (and the fact that I missed a bit of glue on the letter 'M').

Well, these are the 8 cards of the kit. Now I just have to finish putting the kits together! I hope that those of you that purchase this kit, will enjoy your time creating them. There is my email on the instructions, should you need assistance.
Happy Creating Everyone!

Hi Everyone!
Just wanting to share with you a new card kit I have put together for Scrapbook Essentials BC. My first Christmas card kit of the year.
Vintage Christmas - Card Kit #8
$35 + GST (SOLD OUT)
Contact Stacey at sbebc2011@gmail.com or 778-533-4290 to reserve your spot
Can't attend all the Christmas card classes, and you would like to get your allotment of Christmas cards made? Well, we have a kit for you to help you get some of your handmade cards done!
Get creative with paper! With this set of cards you will be creative with paper in the cutting, folding, quilting, and fussy cutting. All the sentiments will be stamped for you, all the die cuts will be done for you, and all the twine, wood button & sequins are included in your kit. As are the instructions to help you with all your paper fun. You will even have enough paper left to make another 1 0r 2 cards of your own design! These are all 5 x 7 cards and the card bases and envelopes are part of the kit too.
Please Note - the products used to complete these cards that are NOT included in the kit are: NUVO Drops - Simply White or Glossy White, Autumn Red, Bottle Green, Metallic Bright Gold, & Glitter Drops - Honey Gold, White Blizzard, or Glossy Accents.
Kits will by available by the end of August.
Since there are 8 cards to go through, you may want to get your favourite beverage and get all comfy so you can browse through at your leisure.

I love how this looped tree turned out. The kit has instructions on how to make this tree. It was my first time making it, and I can see using this idea again. Here are some other views of the card.

Adding the little green drops on the red paper is a great little touch. This can be don on any grid-like paper.


This card works well using dots and stripes.

The fussy cut pieces really contribute making the appealing with the die cut tag.

You know me, I love layers and dimension. So in the photo below, you get an idea on how I did it on this card.

For this next card, I had started out to do something different, but in the end changed it to quilting squares. I did, however, forget to do the stitching. Any way, normally I would not have matted each square, I would have placed them on a single mat spacing them apart. I ended up putting them on a single piece.

Let's have a look at the embellishment.

Always fun working with small, and even tiny, squares.

This next card is not a new idea, but looks good with the paper layers and white NUVO drops.

The word "Joy" is made with 2 layers of black cardstock and then topped with the printed black paper and covered with Glossy Accents.
It has always been a good technique with die cutting layers like this. The NUVO drops look good too.

You can see how the layers are done for this card in the next photo.

Again, lots of layers and dimension for this next card. It adds to the appeal of the card even with it's simple design.

Three twine bows, a sentiment, and a popped up fussy cut pinecone cluster give the card it's appeal on the popped up layers. Here is a closer look.

From the side view you can more easily see how the layering is done.

This next simple card is jazzed up with Glossy Accented letters, white drops for the snow, and glitter added to Santa's hair & beard, and the fur on his cap and coat.

Here is a closer look at the top part of the card.

In the photo below, hopefully you can see where I added the glitter drops. Rather than cover his entire beard, I followed some of the lines, creating the motion of his wind swept beard.

In the side view you can see that the top portion of the card is popped up, as is the fussy cut cluster of pinecones.

This is a design that we often see, but is always effective and enjoyed. Each tree is double layered with pop up foam in-between. The clear sequins add a touch of Christmas sparkle.

A closer look...

It is from the side view that you can see more of the details.


A closer look.... Again that little fussy cut pinecone cluster really helps.

In this next photo you can see the star behind the wood button that has had the edges inked.

The side view reveals the layering (and the fact that I missed a bit of glue on the letter 'M').

Well, these are the 8 cards of the kit. Now I just have to finish putting the kits together! I hope that those of you that purchase this kit, will enjoy your time creating them. There is my email on the instructions, should you need assistance.
Happy Creating Everyone!


No comments:
Post a Comment