Showing posts with label holidays - thanksgiving. Show all posts

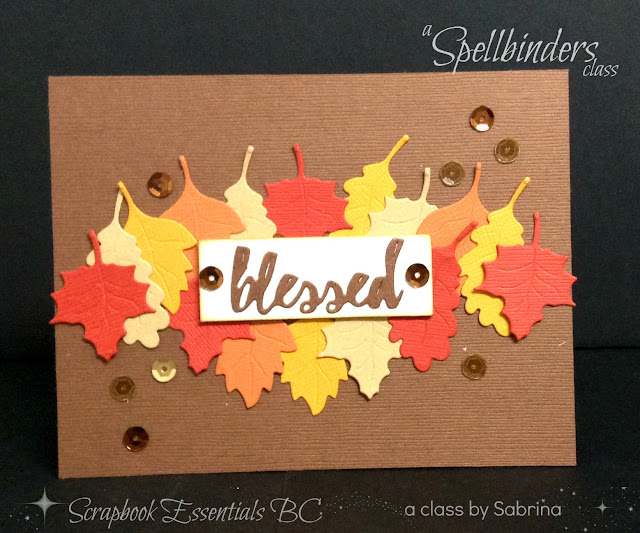
Spellbinders Educator #7 Class - Fall Leaves


Hello everyone!

Some of you may be wondering why nothing much has been posted of late. Well there are a few reasons why. First, summer months usually are fewer posts due to people vacationing, etc. so we have fewer classes. Second, I am currently in the middle of a move, which does not give me much time to create classes and posts.

New Schedule of Classes

With my move, I will be living further from the Scrapbook Essentials BC Store & Studio. I have been teaching anywhere from 8 to 12 classes a month, and it has become too much for me. So I am taking a break with this move, and will be teaching only 3 to 4 classes per month for a while. Besides, driving from Sidney to Victoria means I need to cut down the number of classes anyway.

Now, on to the Spellbinders Educator #7 Class - Fall Leaves


October is a great time of the year for giving cards that use the beautiful Fall colours. Great for masculine cards too! Everyone will receive the Fall Leaves (S3-270) die set that includes words as well! And, we will be using the Floral Embossing Folder (SES-007) and creating a dual tone through an inking technique. Because it is easy to die-cut a bunch of leaves, we will have time to create three cards this time!

Please bring to class: die cutting machine, (if you have a Prizm, you might like to bring it as well), Tool 'n One, a medium to dark brown ink pad and ink blending tool, double-sided adhesive tape (Sookwang), mini-glue dots, black foam squares or tape, scissors, scotch tape, and liquid glue.

Date: Wednesday, October 25th
Time: 6:00 - 8:00
Cost: $45.00
RSVP: sbebc2011@gmail.com or 778-533-4290

ONLY 7 spots available!

Here is a closer look at each individual card.


Looking forward to seeing you all there! This is a great little die set!!

Happy creating!


My US Thanksgiving in Phoenx Folio & A Christmas Folio For Sale


It's me again!

OK, just to warn you, this is a real long post, showing you two Seasonal Flip Folios. I'm showing you my Thanksgiving one to you, so that I can also share one I made using scraps of Christmas DSP. That one is without photos and is for sale, and this one will show you the photo layout for the empty Christmas Folio.

In December (2015) I completed a new Flip Folio Project of my US Thanksgiving celebration with my eldest son in Phoenix.

Here are just a small portion of the photos. (I don't know what the colours will be like for you, but on my computer they are showing awfully bright and not at their true colours - Soft Suede, Cajun Craze, & Hello Honey)


It measures 8 1/2"w x 6"h x 5/8"thick.


For some of my more recent flip folios, I'm doing a lot more stamping on them than I eve used to, and using less designer paper. You can see that I used a number of different stamp sets for this folio. But if you make one, you can of course choose how you want to proceed with yours; less stampin & more DSP or more stamping and less DSP.

Hope you are inspired to create a Flip Folio for your photos.

FOR SALE

Now I will show you the Christmas one that I have up for sale. It's almost identical, using a little more DSP, and is ready for you add your 3 1/2" x 5 1/2", Wallet size, 4" x 6" & 5" x 7" photos! You can use the above photo layout for most of this Christmas Folio.

I left the year off after Merry Christmas, so that you can either stamp it in or write it in.


Rather than the elastic (ran out) and magnets, I used velcro throughout. Within the stitched area is space for a 5' x 7' photo, or a collage of smaller ones.


Tried to get a close up of the details of stamping on the flap. Didn't show up too well.


Next you see the flap open ready for either square or wallet sized photos.


When the bottom flap is opened it reveals two booklets, and the center set of accordion pages.


We'll be going through those accordion pages, and the first one had a green pocket large enough for a 4" x 6" photo, with a tag that can be pulled out from behind it. The tag is great for square photos, or 4 portrait wallet sized photos.


When you flip that page to the left, there is space for one wallet sized and one 5 1/2 x 3 1/2 sized photo that tuck under the stamped oval nicely. On the right side (holly) you can make a collage of smaller photos or place three landscape and one portrait wallet photos as you see in the Thanksgiving folio.


Detail shot...


When you flip the next page to the left, you see another velcro flap on the left. Within the stitching area you can place a collage of smaller photos or position a 4 x 6 photo.


Flip up the flap and see space for your choice of photo arrangement with a journaling spot.


On the right there is a narrow band of red. On this you can place five 1 7/8" photos.


Next we close the pages turned to the original position and start turning pages to the right. When we turn the first page to the right, a double page spread is revealed. the two flaps, tucked into the ribbon, holds landscape wallet sized photos. Not to say you can't place portrait ones there, you just have fewer photos on the flaps then.


Here you see the flaps open...


Turning the next page to the right, you see another flap on the left and a large mat on the right. The left is a decorative flap; on the right you place any sized photo/s you like.


Here is a close up of the flap details...


When you lift up the flap you can create a nice little layout, or add two large photos.


Turning the last flap on the left, is a layout for three 5 1/2 x 3 1/2 photos (as per the Thanksgiving Folio). One of these photos will have to be cut in half because it is centered on the fold, so be sure you use a photo where that will work.


Now we go back to the bottom flap that reveal two booklets. The one on the right is to add a couple of photos to, and the one on the left has a space for a wallet sized photo on the cover. However, on the inside it has paper pages to write about your Christmas happenings.


Photos...


Journaling...


So, that's it for this flip folio. I had the Christmas Flip Folio up for sale at the Vendor market last week, but it did not sell. So if any of my viewers are interested in purchasing it, it is still for sale.

$30.00 if you can pick it up at my place or when I'm at the Crops at the Legion
$40.00 if I need to ship it to you.

Let me know if you are interested.


Thank you for letting me share these with you today, and Happy Creating!


Autumn & Thanksgiving - Spectrum Noir Fun Club October

I love the beautiful Autumn colours, and with now being able to use markers it makes it so much more fun to create Autumn and Thanksgiving cards!

So for October's Spectrum Noir Fun Club class we are doing just that. These are the two images we'll be colouring and making cards from.


For this class we will practise blending with different colours (yellow with greens, oranges and browns), colouring sentiment labels, and giving an ink distressed look using our markers rather than the favorite TH Ink Distress blending.

We use My Favorite Things Inspired by Autumn stamps for both of these cards, as well as JustRite Antique Autumn Tags One.


I also used Hot Chocolate Liquid Pearls on this card. Here is the card again from a couple of different angles.


The Spectrum Noir markers used for this card are : CT2, CT4, GB5, OR1, TN7, DG2, CG2, EB2, EB1, CG1& TN8, and of course a palette.
This next card has pumpkins - another favorite Fall image.


For this card I dry embossed the Capers green cardstock with Spellbinder's M-Bossabilities Flora.

The pumpkin stamp is a single one, so I masked to get three pumpkins. And I have to say that I like my first colouring of the pumpkins on my class practise sheet than I do the one ones on the card. Since that happens often, maybe I should colour my card image first and then the practise one.

You can see the edges of the pumpkin paper has been distress with the markers using EB2 and the Blender pen.

Here is the card again from a couple of different angles.


The markers used for this card are: CT2, CT4, GB5, OR1, TN7, CG2, DG2, DG4, CG10 EB2, EB1, CG1, TN8, CT1,  and the Blender pen and a palette.

Here is the practise sheet for my class.


It was great of you to stop in for a peek.

Happy colouring!