CAS(E), CR84FN and Playing in Paradise

It's been awhile since I played along with Scrapbooker's Paradise but found the nautical challenge irresistible.


I used the colors from the current CR84FN challenge and the sketch from CAS(E) This Sketch.

I double-stamped the sentiment to give it that slightly shadowed look.

Thanks for peeking!


{Supplies}
  • Cardstock: Vintage Cream (Papertrey Ink)
  • Patterned Paper: (Making Memories)
  • Stamps: Guiding Light (Flourishes), Beautiful Butterflies (Papertrey Ink)
  • Ink: Brushed Corduroy and Pumice Stone Tim Holtz Distress Ink (Ranger), Soft Stone (Papertrey Ink)
  • Dies: Deckled Ovals (Spellbinders)
  • Other Tools: jute twine (Papertrey Ink), Kraft and Fine Linen buttons (Papertrey Ink)

Shaped Christmas Cards - Scrapbook Parade Nov Stay-at-home Retreat

Hello blogfriends! So nice of you to stop by.

Today I have three shaped Christmas cards using Fancy Pants "Home For Christmas" and the Grand Calibur with Grand Nestablilities Labels One, Eleven & Twenty-three. This was so fun for me to create because not only did I get to use thesethings, but some of the papers from this collection somehow made me think of some of the Eastern European cards I have seen over the years and decided to let them inspire the cards I created for the Stay-at-Home Retreat at Scrapbook Parade toward the end of November.


In this first photo you see them out of their boxes. The next one shows them inside their boxes.


Now You can see them each indivisually. This first one is made with the Grand Labels One.


...And this one using Grand Labels Eleven


...And the last using Grand Labels Twenty-three.


 In this one the ink blended Santa circle is not so orange, but a deeper red in real life.

I so look forward to this class. It's one that requires a little time, I tend to like that because it makes the project more special to me when I work on all the little details.

Thank you so much for stopping by to have a look and leave your comment. We love to read what you have to say.

Tomorrow I teach two classes on how to make these Christmas crackers, so sometime this week I will post a tutorial on how to make them, just as I promised.


For those of you attending class below is a list of things you will need -


This is what you’ll need in class:
-Paper trimmer

-scissors
-one of the following inks: Pumice Stone or Frayed Burlap
-ink blending tool
-Gold Liquid Pearls
-one of the following Stickles: Diamond, Icicle, or Star Dust
-one of the following Stickles: Ruby Slipper or Burgundy, Frosted Lace Stickles
-White Enamel Accents,
a variety of border punches (no deep edge ones)

-double sided adhesive
-quick dry glue
-thin & thick pop-dots
-bone folder
-white gel pen
-splat mat (non stick mat)

WHEN: Saturday, November 24th
TIME: 9:00 – 12:00
COST: $35.00
Beginners through Advanced


Thank you again!


Echo Park ''Very Merry Christmas'' - The Last of the Christmas in July Series Class (#5)


At Scrapbook Parade we started a series of classes for Christmas in July and titled the series ''Christmas in July Series''. The goal was three card classes and two project classes. This posting is for the last of the series, our 5th class, on November 17th. It is a card class.

For these cards I used some of the paper from Echo Park's  ''Very Merry Christmas'' collection.


I had so many ideas for using this paper it was difficult to keep it down to 5, to keep it simple for class, and to make sure most were mailable! Any way, these are they, and as usual I have individual photos of each card for you to view.


On the Harlequin, or diamond, pattern I applied Star Dust Stickles on those diamonds that would show through the oval die cut in front. The same on the snowflake I cut out of one of the papers. On the brown Upsy Daisy brads I applied Ruby Slipper Stickles. I really like the green damask.

This next photo shows the same card form the side in hopes you can see all the layers.


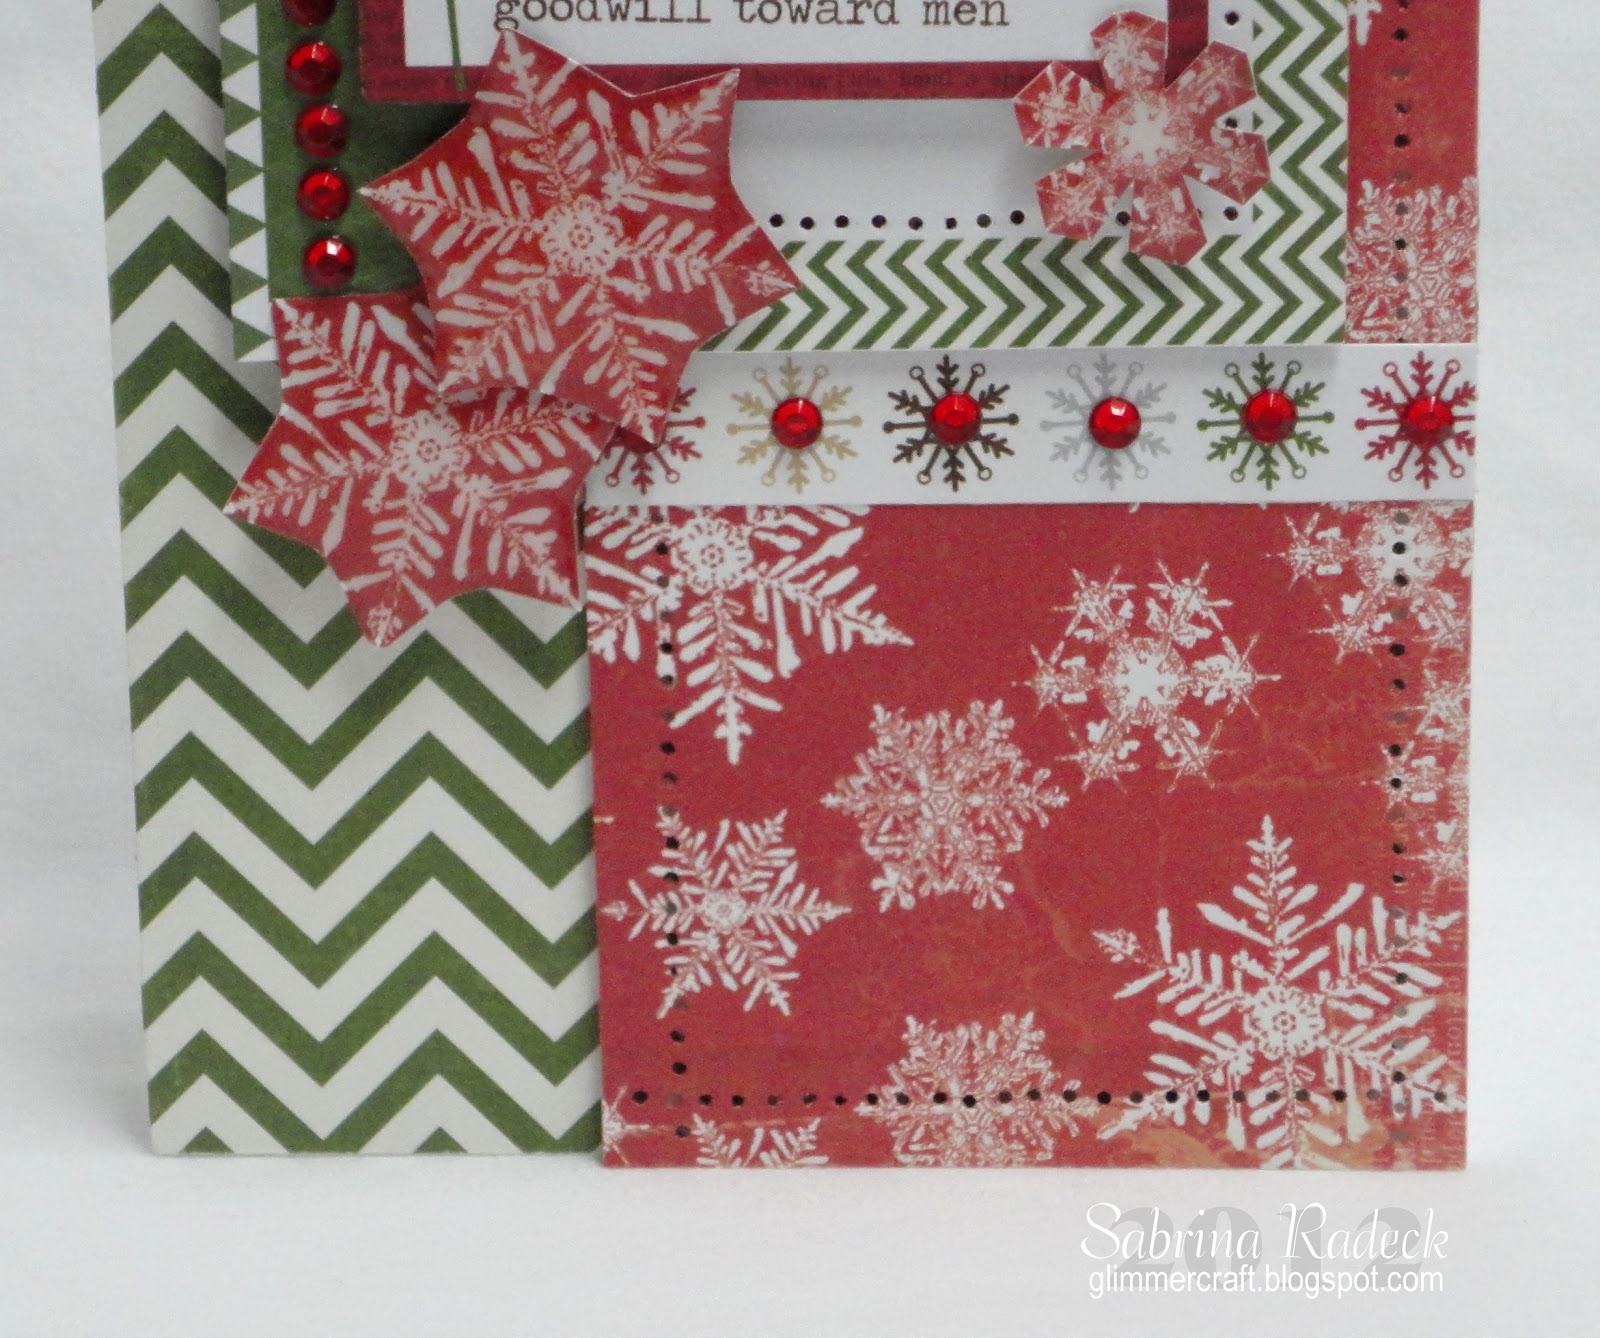
Next we have the other of the two thickly layered cards.


This one features quite a bit of bling, Glossy Accents and paper piercing. Oh, and layers too. Again I cut out some snowflakes, and these ones I covered with Glossy Accents instead of Stickles.

This photo shows the layers...


...and this one a closer look at the paper piercing.


Next we have a quick and easy card using the papers without any popping up of layers.

You can't tell from the photo, but I have Star Dust Stickles on the tree lights and Glossy Accents on the tree ornaments. You can barely see the Star Dust Stickles around the frame of the tree, but you can see the line around on the green damask paper.

Next is one also has no popped up layers, but has a little more work involved.


I cut the little coloured snowflakes out of a narrow strip on the ''Journaling'' sheet and attached them to the square brown Upsy Daisy brads. They fit on so perfectly! Then I added a red jewel in the center of each. Out of the Bazzill Bitter Chocolate cardstock I die cut using Spellbinders Blossom Four and traced the inside edge of the die with a white dotted line, adding the same white dotted line around the red paper edges.I added the diagonal stripe strip and the ''Better Not Pout'' card. I brought out the text a bit by adding Glossy Accents on the text. Some letters more successfully than others, I might add.

Last is What I think is my favorite. I only used one of the journaling cards for this card and the rest is all white and red cardstock.


The folder used to emboss is Spellbinders M-Bossabilities ''Holiday Magic'' (EL-014). I love how it looks like wind blowing snowflakes around. On the Winter Wonderland journaling card I filled in the word Winter with Star Dust Stickles and added the red jewel in the 'o'. I especially like the snowball looking brads from Upsy Daisy. They are just right for this card.

So there you have the cards that are the last of this series of classes. We still have other Christmas card classes coming up , so keep an eye open for them.

Thank you so much for stopping by to have a peek, and hope you are inspired while making your Christmas cards.

For those of you attending this class, here is what you'll need to bring -


#5 Christmas In July Class-Cards
This is what you’ll need to bring to class:
-Paper trimmer

-scissors
-paper piercer and pad
-Stickles -Star Dust, Ruby Slippers or Xmas Red 
-ink of your choice and blending tool if you wish (not required)
-Glossy Accents
-double sided adhesive
-quick dry glue
-pop ups – thin & thick if you can
-white gel pen
-ruler
WHEN:  Saturday, November 17th
TIME:  9:30 – 12:30 OR 1:30 – 4:30
COST:  $30.00


Thank you again!


Colour Series - Mysterious Gray - Scrapbook Parade Class

This set of cards demonstrates the use of colour and pattern with two differing gray shades. And since I have a class tomorrow to get ready for and three classes on Wednesday, I'm not taking too much time to write about them. I'm just posting the photos, and may come back to add a few lines.


I just realized that I forgot to take a photo of the dark pink and gray card on the right in the back. Since they are at the store already, I'll take my camera there and get one to add later.


Kraft Christmas Gift Giving Set

It's always so rewarding to take something very basic, like a kraft bag, and beautify it. Though I must say, I think I went over board with the Stickles on this project. I'm not usually one for a lot of sparkle, but when it comes to Christmas I do sometimes get carried away. Sparkle and Christmas just go together for me.

Any way this is a kraft set made up into a Christmas gift giving set. A kraft bag, a kraft card base, and a matching gift tag.


This set is for a Scrapbook Parade class held November 13th. The next photo shows a close up of the tag.


...and now the poinsettia...


Here is the card.


Has anyone noticed all the Spellbinder die cuts involved for this project? There is a lot of die cutting in store to prepare for this project...what was I thinking? lol... It will be worth it though, because we always have fun in class putting everything together.

Those of you that may take this class, you don't have to apply Stickles to everything like I did. I'd leave them off of the poinsettias if I did this again.

Thank you for stopping by to have a look at this project. I hope that you are inspired to beautify your own bags, making your own gift giving sets.


Tools & Supplies:

Spellbinders - 2012 Snowflake Pendant(S4-286), Create A Flake (S4-222), Layered Poinsettia (S5-055), Labels Twenty-Eight (S5-127)
Snowflake Punch - Martha Stewart
Stickles - Diamond & Star Dust

CAS-ual Fridays and CAS(E) This Sketch

I love the current sketch over at CAS(E) This Sketch and thought it would go well with the challenge at CAS-ual Fridays which invites us to place an element over the side of our card.

I finally created my first Christmas card of the season!


My white gel pen was not cooperating but this was a fun and easy card to make.  ;)

It's difficult to tell, but I impressed the poinsettia with PTI's Canvas impression plate and used a glue pen and Prisma glitter in the center.

Thanks for peeking!


{Supplies}
  • Cardstock: Scarlet Jewel and Autumn Rose (Papertrey Ink)
  • Stamps: Year of Flowers: Poinsettia (Papertrey Ink), Christmas Sampler (Paper Smooches)
  • Ink: Versamark (Tsukineko)
  • Dies: Year of Flowers: Poinsettia (Papertrey Ink)
  • Other Tools: Canvas impression plate (Papertrey Ink), white embossing powder (Filigree), Signo white gel pen (Uniball), Opaque White Mister Huey mist (Studio Calico), glitter (Prisma), W3 Copic

Friends

I actually made this card last week for the recent White challenge at A Blog Named Hero but didn't have a chance to photograph it in time. (I went to Arizona this weekend--LOVE the landscape and pleasant temps!--to visit with family.)

Anyway, this card also fits A Blog Named Hero's current challenge: CAS. Hooray!


Thanks for peeking!


{Supplies}
  • Cardstock: Stamper's Select White (PTI)
  • Stamps: Friends are Treasures (Hero Arts)
  • Ink: Pure Poppy and New Leaf (PTI), Spiced Marmalade Tim Holtz Distress Ink (Ranger), Memento Dandelion, Blue Danube, Grape Jelly and Tuxedo Black (Tsukineko)
  • Other Tools: flower (Kaisercraft), Corner Chomper (We R Memory Keepers), rhinestones/iRock (Imaginisce), sewing machine/thread

A Tiny Thanksgiving Card

I made up a quick little card for my mother-in-law who threw this year's family Thanksgiving feast.


I was so excited when Papertrey Ink came out with dies for their Autumn Abundance stamp set. I am seriously rethinking, though, the drabness of these colors... Ah, well.


{Supplies--all Papertrey Ink unless noted}
  • Cardstock: Rustic White
  • Stamps: Autumn Abundance
  • Ink: Memento Rich Cocoa (Tsukineko)
  • Dies: Autumn Abundance
  • Other Tools: Book Print impression plate, Copics

Waltzingmouse CAS

I've been excited to play with this mini-stamp set from Waltzingmouse since I first saw it! I'm not big into puns but I couldn't resist this giant, juicy-looking strawberry...


I struggled with the stamping process here as the ink that collected on the stamp base transferred to the card. :( I'm not sure if these stamps just aren't "cut" as deep or if I was pressing much too hard. Will be careful in future.

I was really excited to dress up this card with a funky die-cut frame... I'm really quite proud of myself! ;)

I'm hooking this up to Moxie Fab's Thank You card challenge.

Thanks for peeking!


{Supplies--all Papertrey Ink unless noted}
  • Cardstock: Stamper's Select White
  • Patterned Paper: New Leaf gingham
  • Stamps: Big Berries - Strawberries (Waltzingmouse)
  • Ink: Memento Tuxedo Black (Tsukineko), Pure Poppy, New Leaf
  • Dies: Circles and Grand Circles (Spellbinders)

Kaisercraft Christmas Advent Calendar - Scrapbook Parade Class


I recently mentioned that I was working on a Kaisercraft Christmas Advent Calendar and was having some difficulties in getting the project completed. I won't go into the details of all the problems I had in getting this completed. And even though I've taken photos and am posting it, the calendar really isn't completed but at least it isn't too noticeable.


This is what the calendar looks like once you assemble it. I then spray painted it with an ivory colour to go with just 4 of the Kaisercraft Turtle Dove paper collection. Beautiful papers....


I used a lot of gold Liquid Pearl with Frosted Lace and Diamond Stickles, as well as Glossy Accents to add to the images of the paper. Here are a few close ups to view a few details.


Here you can see the Frosted Lace I used on the fur trim of Santa's cap, and the Diamond Stickles on the 2 trees I cut out and popped up on the bottom left corner behind the figurines. On the right I added the holly and berries from Kaisercraft's Twig & Berry collection.

The next shots show a close up of some of the little drawers. Some have yet to be embellished.


On the "Merry Christmas" you can see some more Diamond Stickles, but you can't see the Glossy Accents on the letters which look quite nice.


I wish I had a circle punch that fit the size of the little numbered circles. It would have made it so much easier than hand cutting them out.

The little figurines I purchased at a dollar store. What a find that was. I just realized that I forgot to take a photo or two of the back! I'll have to take one and add it later.

I have a second one that I purchased to make for myself. I want to make it with blues, silver and white with a nativity scene, but I doubt that I will get to it this year.

If you plan on making an Advent calendar yourself this year, I hope that your project will run smoother than mine did, and that you'll have fun working on yours. Thanks you for stopping by, and when I get back from my son's wedding in Phoenix this weekend, I'll be back with some more new classes to make and post.