I have desperately wanted better card photographs and thought the answer was a better camera. Well, renowned card-maker Ashley Cannon Newell is sharing a papercrafting photography "lecture series" on her blog!! Squeeeeeeeeeee!
Day 1
Day 2
Day 3
Merci
I couldn't tell which picture was better so, lucky you, I've included them both. ;)

This is a thank you card that I made up before a trip to thank my host for letting us stay with them. I then proceeded to leave the card at home. Guess it'll have to be mailed once I get home!

A very simple card. After impressing the purple cardstock with PTI's In Bloom impression plate, I filled in the flower petal grooves with my Sakura stardust gel pen. A few rhinestones within the flower centers and voila! I stamped the sentiment from Mega Mixed Messages with Starlite Silver Brilliance Dewdrop ink but didn't do a very good job of it and had to go over it with a silver gel pen. Thus its imperfection.
A fun detail is the silver foil cardstock that my mom gave me. I'm not sure where it's from.
{Supplies--all PTI unless noted}
- Cardstock: Lavender Moon, Plum Pudding, silver foil (unknown origin)
- Stamps: Mega Mixed Messages
- Ink: Starlite Silver Memento Dewdrop
- Other tools: In Bloom impression plate, rhinestones (dollar store)
On Your Wedding Day

I made this card for my sister-in-law's brother-in-law who is getting married the end of this month. I'm so ecstatic for him!
Inspired by Nichole's 2nd card here, I went for simple. I used white shimmer cardstock for the card base and sentiment to make it a little more formal. I had meant to run the top cardstock (Aqua Mist) through my Cuttlebug with the Linen side of the Linen & Canvas impression plate but forgot by the time I'd completed the stamping! Oh well...
I did some masking with this project and was a little disappointed in my result. I masked the large rose image by stamping it on a piece of scrap paper and then placing it in position on the Aqua Mist cardstock. I then stamped the rose bud and leaf images, removed the mask and stamped the rose. I didn't quite align it properly. This was done in Versamark Dazzle: Frost ink to give it a bit of sparkle.
For the bottom right corner of the card, I actually taped off the largest rose petals (perimeter) before inking so that it would appear to be a smaller rose once I stamped it. Why did I bother to go through all that effort when you can't even tell?! Again, oh well.
The sentiment piece was die cut and embossed using Spellbinders Long Deckled Rectangles. The sentiment was stamped with Ocean Tides ink. The ribbon tab was done with a strip of 1/8" silk ribbon over Ocean Tides satin ribbon. I love it!

I found this sentiment from PTI's exclusive 2009 anniversary stamp set, Round & Round, to be just perfect for a new couple.
{Supplies--all PTI unless noted}
- Cardstock: white shimmer, Ocean Tides, Aqua Mist
- Patterned Paper: 2008 Bitty Dot Basics
- Stamps: Year of Flowers: Roses, Round & Round
- Ink: Ocean Tides, Versamark Dazzle: Frost
- Ribbon: Ocean Tides satin, white silk
- Other Tools: Spellbinders Long Deckled Rectangles (sm), A2 Envelope Liner die
Sending You Christmas Joy!
It's the most wonderful time... of the year!
Well, we're not quite there yet but it's time to get started on Christmas cards if you want to be done in plenty of time for Christmas! This first one I've done is for Jill's First Annual Christmas in July Challenge.

I just got this stamp in the clearance section and was so excited to break out my Copics again! The other mediums here include Spicas in the tree ornaments and glitter for the snow on the branches and ground (adhered with a glue pen). Remember that you can click on the picture for a closer look!
The sentiment is from Paptertrey Ink's Vintage Ornaments (Raspberry Suite). It was the only Christmas thing I could find that was small enough to fit in that tiny space but I love it! All that shimmery cardstock is from Papertrey as well.
{Supplies--all PTI unless noted}
- Cardstock: Night Sky shimmer, Gold shimmer, Stamper's Select
- Stamps: Ornaments by Hero Arts, Vintage Ornaments
- Ink: Memento Dewdrop Tuxedo Black (Tsukineko), Pure Poppy (sentiment)
- Ribbon: Gold Tinsel Weave
- Copics: E55, E57, E59
- Spicas: Red, Lemon, Gold, Silver, Clear, Sky Blue, Buttermilk, Lipstick, Pitch Black, Melon, Olive
- Other tools: Spellbinders Labels 8
And the Winner of Glimmer Challenge 1 Is....!
Welcome to the ATC Glimmer Challenge 1 winner post!
First, I want to mention that this new experience of having a challenge was so fun! As each entry came in we became more excited and amazed at the creativity and interpretations of the challenge. I learned from some of you that the biggest part of the challenge was the choice of six colors. I must admit that as I knuckled down to creating my inspirational pieces for this challenge, that I, too, found six colors to be quite challenging at times. For that reason I was amazed that despite the number of colors being outside the comfort zone for most, the entries were imaginative and creative.
Without further ado, the winner of our first Glimmer Challenge is #9, Linda W. of Stitches and Ink!

I love the looped green ribbon, the way Linda focused primarily on the two pinks and the brown and the rest of the colors were included with a hint of them here and there. But, the most amazing part was her genius in creating the lollipop out of that satin cord trim and her Copics! Congratulations, Linda! Especially for working outside your comfort zone! We will send you our blinky code and, once your email address is confirmed, we will send your $25 Papertrey Ink gift certificate.
From Dana: Our honorable mention, goes to... *drumroll* Wait, there's a tie! At least, I couldn't pick between the beautiful cards of Ted from Happily Ever Crafter

and Terri E from ...Just What I Do... Congratulations! I will email you the code for our current blinky. We invite you to display it on your blog with pride!

A big thank you to everyone for participating in our first Glimmer Challenge! We hope to see you enter in our future challenges as well. ATC Glimmer Challenge 2 will be issued by myself on the first Friday of August: August 6th.
Happy crafting!

Quilted Wedding Wishes
I actually have a lot of fun stitching on cards. So when a coworker asked if I could match a card to a quilt she had made for a wedding present, I asked her to bring me some scraps.
Here is the quilt:

The pattern on there is a Gordian Knot.
Here is my card:

The pattern on there is NOT a Gordian Knot... It is, after all, only a card and I'm really "knot" that accomplished... lol
Okay, so it isn't perfect, but you should have seen the first attempt! Actually, only decomposition is gonna see that attempt.
My mom helped me out by doing the majority of the stitching on this one. I loosely adhered the fabric squares on a white mat and we went to work using gray thread. I mounted the "quilt" to a black mat and then onto the gray card.
I stamped the sentiment using Versamark on black cardstock, heat embossed with white powder and then cut out around the words and flourishes. If you click on the photo, you can see that I outlined the letters and flourishes with my Sakura Stardust gel pen. I'm not sure if this is too distracting or not... Perhaps I should have left the letters alone. It's popped up using dimensional adhesives.
I also used the stardust pen around the edge of the black mat.

The sentiment on the interior of the card is from Quilter's Sampler. I knew those stamp sets would come in handy!! I actually got them with this co-worker in mind!
{Supplies--all PTI unless noted}
- Cardstock: True Black, Stamper's Select, generic gray (Smokey Shadow was too dark)
- Stamps: Flourish Greetings (My Sentiments Exactly!), Quilter's Sampler
- Ink: Versamark, Memento Dewdrop Tuxedo Black (Tsukineko)
- Other tools: white embossing powder (Filigree from PTI), sewing machine/gray thread, Sakura Stardust gel pen
Christmas in July Challenge
I can't help it... I keep thinking about getting started on my Christmas cards. I really don't have that many to do and last year, I didn't do too badly at getting the majority of them done in time.
Anyway, when I found this Christmas in July challenge, I felt my Christmas craftiness lean toward the edge... It is time!
Stay tuned for my entry... I will be away from all my crafting supplies for this next week but I still feel I can scrape something together! The prize is a $24 Papertrey Ink gift certificate!
2S4Y - Kazan's Sketch 57 and Color Cue {6}

 This is really exciting for me! Not only did I combine two challenges into one card, but the 2S4Y challenge winner gets to become one of the Design Team and the Color Cue {6} colors are really stunning.
I incorporated an embellishment that I've seen around lately and really wanted to try. I went a step further and created a sheet of them to give to a crafty friend who's lost her mojo (idea from Melissa Bickford who's been creating embellishment sheets galore!).

I impressed the Kraft cardstock with Spellbinders Impressibilities: Circles, added a strip of Berry Sorbet Bitty Box basics bordered with Fiskars Upper Crest punch and attached a strip of lace by taping the ends on the back of the Kraft. I then matted it on Dark Chocolate and Berry Sorbet cardstocks. The embellishments are just circles with the edges distressed with Tim Holtz's tool and damaged a bit further with my finger/thumb nail. Buttons adhered with hot glue gun. The focal piece has a strip of lace tied into the button (large holes, tiny tweezers). ;)

The interior is stamped with PTI's Studio Style stamps (Raspberry Suite): the ribbon spools in Versamark Dazzle (Frost) ink and the sentiment in Dark Chocolate ink.
{Supplies--all PTI unless noted}
- Cardstock: Dark Chocolate, Kraft, Berry Sorbet
- Patterned Paper: 2008 Bitty Box Basics, 2008 Bitty Dot Basics
- Stamps: Studio Style
- Ink: VersaMark Dazzle (Frost), Dark Chocolate
- Buttons: Berry Sorbet, Dark Chocolate, Cream/White assortment
- Other tools: lace (dollar store), Spellbinders Impressibilities: Circles, Spellbinders Nestabilities: Standard Circles (sm and lg), Upper Crest border punch (Fiskars), Tim Holtz paper distresser, hot glue gun
Happy Happy Birthday to My Baby Sister

My baby sister is a welder! I wanted a card that somewhat reflected her personality and while I think it's missing something, this card is pretty close!

I combined black, purple, vibrant teal-blue, kraft and, of course, the foil. The diamond plate pattern is from a Cuttlebug folder and kinda got squashed in transit (these last 2 pics were taken by the birthday girl herself!). The ribbon tabs are flattened as well. Oh well. Those tabs are my favorite part of this card, along with the screw brads! It's hard to tell from the pic but the sentiment is clear heat embossed and that's why it's darker than the border.

{Supplies--all PTI unless noted}
- Cardstock: Plum Pudding, Kraft, A7 cardbase is Recollections brand from Michaels
- Stamps: Fillable Frames #1
- Ink: Hawaiian Shores
- Ribbon: Plum Pudding Swiss Dot, Hawaiian Shores Bitty Dot
- Other tools: Diamond Plate Cuttlebug folder (Provocraft), Fillable Frames #1 die, Upper Crest border punch (Fiskars), Copic Multiliner pen (black border), white gel pen ("stitched" border), screw brads (Recollections brand? from Michaels)
Happily Ever Crafter's Challenge #8: Thank You =)
This card was done with the colors from Ted's Happily Ever Challenged #8 - Old Glory in mind. The red, white and blue are, of course, in honor of the US flag around this year's Independence Day. Thanks for welcoming non-Americans to participate!

I had kept that bit of red plastic mesh packaging on the off chance it would make a good card embellishment. I love it! Good thing I have plenty of it left! I think it was from a dollar store toy or something. You never know what may come in handy!
I started with an A7 white card base (Recollections brand from Michaels). I did a zigzag stitch on some Enchanted Evening cardstock (quite pleased with this!) and then die cut the Dandelion square out (Cuttlebug). I die cut the same die using Pure Poppy cardstock and stamped my sentiment. This is the 2nd time I've used this cute little stamp from Lawn Fawn. ;) It was a free gift with purchase. Then I tied the mesh around the blue mat and tied a white (maybe kinda creamy? Sorry, Ted!) button on with white embroidery floss. I left the ends of the floss kind of long-ish and then pulled the strands apart for a kind of neat effect.
Both the blue mat and the red flower are popped up off of the white.
This card is for my sis-in-law and her husband who hosted our recent boating excursion. A lot of sacrifice and hard work! Love you guys!
{Supplies--all Papertrey Ink unless noted}
- Cardstock: Enchanted Evening, Pure Poppy, white card base/envelope (Recollections)
- Stamps: thank you ;) (Lawn Fawn)
- Ink: Fresh Snow (this was my first time using it and it's MARVELOUS!)
- Fibres: red plastic mesh "packaging" (dollar store), embroidery thread (from Michaels)
- Button: White & Cream assortment
- Other tools: Dandelion die (Cuttlebug - Provocraft), sewing machine
Final Glimmer Challenge 1 Inspiration
Well, the deadline is only 5 days away! Do you have your design in yet? See ATC Glimmer Challenge 1 information here to enter. So without further ado, here is the 6th and final inspirational posting for this challenge.
Lots of ribbon embellishment on this one. to make the ribbon flower you will need double sided adhesive sheet. Spellbinders standard circle die, scallop circle die, tiny pearls, and a flower center (a button, or a pebble as I have used here).
Cut a scalloped circle from a light yellow cardstock and adhere the pebble to the center. Then place a tiny pearl in the center of each scallop (I used light blue pearls) and cut between each scallop down to the pebble. Bend every other strip up toward the center. Put aside for now.
Cut a standard Spellbinder circle from double sided sheet adhesive. Since I used 1" ribbon, I used a standard circle die that measured approx 2" in diameter to cut a circle from the adhesive sheet. Remove backing from one side and begin to loop ribbon around trying to keep the loops the same length. End in the center of the flower.
Attach the ribbon flower where you want it on your card and then attach the yellow flower center made earlier.
Well, with this being the final inspirational card for this challenge, I wish to thank you all for participating and remind you to check in on the 26th to find out who the winner is! Thanks for your participation and happy designing!
Supplies & Tools
Paper - My Minds Eye - Mary Mary "Happy Birthday" Celebrate
- PTI - Lemon Tart, Spring Moss
Lots of ribbon embellishment on this one. to make the ribbon flower you will need double sided adhesive sheet. Spellbinders standard circle die, scallop circle die, tiny pearls, and a flower center (a button, or a pebble as I have used here).

Cut a scalloped circle from a light yellow cardstock and adhere the pebble to the center. Then place a tiny pearl in the center of each scallop (I used light blue pearls) and cut between each scallop down to the pebble. Bend every other strip up toward the center. Put aside for now.
Cut a standard Spellbinder circle from double sided sheet adhesive. Since I used 1" ribbon, I used a standard circle die that measured approx 2" in diameter to cut a circle from the adhesive sheet. Remove backing from one side and begin to loop ribbon around trying to keep the loops the same length. End in the center of the flower.
Attach the ribbon flower where you want it on your card and then attach the yellow flower center made earlier.
Well, with this being the final inspirational card for this challenge, I wish to thank you all for participating and remind you to check in on the 26th to find out who the winner is! Thanks for your participation and happy designing!
Supplies & Tools
Paper - My Minds Eye - Mary Mary "Happy Birthday" Celebrate
- PTI - Lemon Tart, Spring Moss
Thank You For Your Generosity

This week's CAS-tastic challenge asks us to use 3 of the following: stamped (or printed) image, inked edges, masking, paper piercing, lace and/or embossing. This card has a stamped image (does sentiment count?), inked edges, stenciling (does that count as masking?), lace and embossing! That's all but the paper piercing and it was quite by fluke that this card meets the requirements. ;) I found out about this challenge from Ted's blog. :)
We've recently returned from an annual boating trip we take with my in-law's in-laws. I always make it a point to show my appreciation by sending a card (and helping, as much as I can with 3 little ones, clean up after the masses). I made this card with said little ones crawling all over me so I'm a little disappointed that the focal elements ended up crooked.
My goal with this card was to finally use two embellishments I'd yet to break out: my dollar store lace and my Dark Chocolate felt. I have issues with the felt... It's not a very good match to the "PerfectMatch" cardstock. But whatever.
The card is the size of a standard letter envelope and is made with Rustic Cream cardstock. That means it has little flecks of fibre in it, perfect for a country/vintage card. The strip of brown is Dark Chocolate cardstock imprinted with the Tin Types impression plate. I thought the one side really went well with the Library Ledger patterned paper I used.
I used several Spellbinders for the focal piece: the largest possible Long Scalloped Rectangle (Ocean Tides cardstock), the largest Long Rectangles (from the small--Library Ledger patterned paper--and large--Rustic Cream--sets) and a Classic Oval (can't recall whether from the small or large set as I played around with both to find a good size). Each layer is popped up over each other with the bottom scalloped rectangle lying flush on the card.

I did plenty of ink distressing on this card using Tim Holtz Distress Ink in Vintage Photo. On the middle layer, I used a bit of Ocean Tides ink as well since I felt there was too much brown. Can't really tell anyway.
The sentiment, from Signature Greetings, is also in Ocean Tides ink and heat embossed with clear powder.

The little embellishment was made using the same idea my mom came up with on this card of mine. The lace is weaved through the holes of the Eyelet Lace Border die-cut Dark Chocolate felt and laid down behind it. The Ocean Tides button is tied through with Vintage Cream Button Twine and adhered between the felt/lace embelly and the sentiment.
I hope they like it!
{Supplies--all Papertrey Ink unless noted}
- Cardstock: Rustic Cream, Ocean Tides, Dark Chocolate
- Patterned Paper: Library Ledger
- Stamps: Signature Greetings
- Ink: Ocean Tides, Vintage Photo Tim Holtz Distress Ink
- Embellishments: Ocean Tides button, Rustic Cream button twine, Dark Chocolate felt, lace (dollar store)
- Dies, etc.: Spellbinders: Long Scalloped Rectangles, Long Rectangles, Classic Oval; Tin Types impression plate
Happy Birthday Grandma

Inspired by the stitched top on the first CARD of Nichole's post here, I finally pulled out Year of Flowers: Violets and played with some embossing powder: clear on this one, white on my other one.
After cutting out the Plum Pudding flowers, I used a technique I learned about on Maile's site, color with copics that are similar. I actually just used W1 (a warm gray) to color the outer petals and then V99 (a dark violet) on the outermost edges. (On the smaller flower, I only did the W1 on the outermost edges.) The leaves are stamped in Versamark and cut out.
The flower centers are colored with Buttermilk Spica. The large flower has 3 adhesive pearls and is popped up from the card.

The envelope (PTI's Rustic White A2) is lined with Pretty Pastels.
{Supplies--all Papertrey Ink unless otherwise noted}
- Cardstock: Lavender Moon, Plum Pudding, Spring Moss
- Patterned Paper: Pretty Pastels
- Stamps: Year of Flowers, Violets, Delightful Dahlia, Fancy Flourishes
- Ink: Versamark, Versamark Dazzle-Frost
- Other tools: Copics (W1,V99), sewing machine, A2 Envelope Liner die
Super Sized! - Custom Happy 90th Birthday
This was a very fun customized 12" x 12" card to design. The challenge to include things that this gentleman had achieved in his lifetime took some time. I had to search for images that fit the criteria.

I had the images printed in grey scale (black and white) onto cream cardstock. Then after cutting them out I used VersaFine Vintage Sepia ink to ink distress all the edges, mount them onto cream cardstock that also had been ink distressed. I made tabs for each image (click on image for a closer look) and wrote the achievement/life contribution on the tabs. The letters were cut using the Cricut's Storybook cartridge and are shadowed using a dark brown cardstock behind the leathery orange colored cardstock. These too are slightly ink distressed. You can't tell too terribly well on the image that I used a glimmer gel pen around the number 90 to make it bounce off the card more.


The images continued on the inside of the card, where the family and friends will sign to wish this gentleman a Happy 90th!

This card can fit into a 12" x 12" shadow box to display on the wall as a keepsake.
Glimmer Challenge 1 - Inspiration # 5
Want to win a $25 gift certificate for PTI products? 9 DAYS LEFT TO ENTER your creation!
Here is my 5th inspirational post:

The ribbon you see here is actually 2 strips of a narrow ribbon butted up together to make it look like one ribbon strip.
I can hardly wait to see more of your creations inspired by our Glimmer Challenge 1.
 Supplies and Tools
Paper - PTI - Dark Chocolate, Lemon Tart, Hibiscus Burst
- We R Memory Keepers - Little Bird
- Unknown - Mid Blue, Light Pink
Ink - VersaFine - Vintage Sepia
Spellbinders - Big Scallop Squares, Fleur De Lis Pendants, & Standard Circles
Ribbon
Here is my 5th inspirational post:

The ribbon you see here is actually 2 strips of a narrow ribbon butted up together to make it look like one ribbon strip.
I can hardly wait to see more of your creations inspired by our Glimmer Challenge 1.

Paper - PTI - Dark Chocolate, Lemon Tart, Hibiscus Burst
- We R Memory Keepers - Little Bird
- Unknown - Mid Blue, Light Pink
Ink - VersaFine - Vintage Sepia
Spellbinders - Big Scallop Squares, Fleur De Lis Pendants, & Standard Circles
Ribbon
Happy Birthday, Claire!

Anyway, Claire is my sister's daughter. She's a mere month older than my eldest daughter and so it's rather heartbreaking to me that they live so far apart. I would have liked for them to be close. Proximity doesn't have to matter, I suppose. After all, my husband and his siblings were close with their cousins in the US.
I digress.
This card was my 1st use of my new Lawn Fawn set Bake Me a Cake. It is my tradition to use the strings that are used to tie the order together on the first card I use the set(s) with. I am quite pleased with how clever I was, tee hee!
I used the cupcake wrappers as a sort of "button bits" stamp (PTI reference). I used Melon Berry buttons to zing up my Aqua Mist and Hawaiian Shores card with only a hint of New Leaf in the "journaling tag" (Green Boutique paper) and green yarn.
I must draw attention to my first time using Copics to do some stamp shading in each of the cupcake wrappers and under the cake tray. :D
Here is the front of the envelope for the darling 3-year-old to-be:

I used a chisel glue pen inside each of the Outlines Alphabet letters and sprinkled Prisma glitter to give her a nice sparkly surprise.
{Supplies--all PTI unless otherwise noted}
- Cardstock: Aqua Mist, Hawaiian Shores, Stamper's Select
- Patterned Paper: Green Boutique
- Stamps: Bake Me a Cake (Lawn Fawn), Outlines Alphabet
- Ink: Hawaiian Shores, Brilliance Dewdrop Lightning Black, Memento Dewdrop Tuxedo Black, Melon Berry
- Buttons: Melon Berry
- Fibers: blue-green twine/green yarn (Lawn Fawn) ;)
- Other tools: Spellbinders Inverted Scalloped Circles (small), Copics: B00 and W1, We R Memory Keepers Corner Chomper, A2 Envelope Liner die, Prisma glitter
Happy 55th Anniversary!
A co-worker's parents were celebrating their anniversary this weekend which gave me last night! to make the card. Since I was making this card first to try and make a deadline, I didn't get to this one until rather late and the evidence of my fatigue bothers me immensely. :(

Don't get me wrong, there are great things about this card... That ribbon through the felt Eyelet Lace Border is the genius of my mother!
The "55" is too off balance. My intention, when I had drawn my sketch (a miracle), was to have it kind of going off the card. Well, I adhered it before even standing back to gauge the effect and I'm very disappointed. (I also forgot to line the card since it's a dark color...)
I liked the idea of this card but am not sure I like the Smokey Shadow on Smokey Shadow. My mom thought the overall card was too dark but I'm not sure whether I agree or not.
Before placing the elements on the card, I stamped flourishes with Versamark Dazzle ink in Frost, which gives it a shimmery effect. The bottom element is stamped with text from Background Basics: Hearts. I find it exceedingly difficult to stamp backgrounds! Any tips out there? Guess practice makes perfect. I then used ink blending foam to get those soft white edges. I laced the ribbon through the felt "eyelet lace" and then adhered the entire embellishment to the top, wrapping the ends of the ribbon around back.
Before popping this up on the card, I adhered the top element, corner-rounded white Shimmer cardstock.
I stamped the sentiment and added the black "rhinestones."
The "55" piece is stamped on the Shimmer cardstock. Using a glue pen, I kind of colored in the numbers and then sprinkled glitter onto it. The circle was then adhered to the black felt backing and, lamentably, placed hastily on the card.
I forgot to do anything on the interior.
{Supplies--all PTI unless otherwise noted}
- Cardstock: Smokey Shadow, White Shimmer
- Stamps: Background Basics: Hearts (text), Damask Designs (sentiment), Outlines Alphabet, Fancy Flourishes
- Ink: Ocean Tides (sentiment, 55), Memento Tuxedo Black (text), Versamark Dazzle: Frost, Versamagic Cloud White
- Ribbon: Ocean Tides Satin
- Felt: True Black
- Dies: Eyelet Lace Border, Spellbinders Circles (sm), Spellbinders Inverted Scalloped Circles (sm)
- Other tools: We R Memory Keepers Corner Chomper (1/2"), Martha Stewart glitter: Hematite, black "rhinestones" (dollar store)
Glimmer Challenge 1 - Inspiration #4
Hope that you are having fun coming up with your designs for this challenge. We are eagerly watching for the new entries submitted, and are having fun discussing all the entries, and seeing how creative you all are. If you are new to this blog this is about our first challenge. See challenge guidelines here.
This is Inspiration #4:

This is the first time I actually used a sewing machine on a card creation. All my previous posts with stitching are faux stitching. On this card I used a technique as demonstrated by Gina K. where an image goes beyond the Spellbinders frame. This was my first try and I goofed it up a little. But I am eager to try this technique again - and get it right.

If you look closely (click on image to enlarge) you can see the image from the paper pattern that I cut out so that it would extend out passed the borders of the circle Spellbinders die.

You can see here the layers that I popped up from this view of the card. This card is a bit thick and heavy to mail to someone, but I do love layers and dimension.
Look forward to seeing more of your work. Have fun designing!
Supplies and Tools
Paper - We R Memory Keepers - Little Bird
- PTI - Lemon Tart, Sweet Blush, Hibiscus Burst, Spring Moss
- Unknown - Mid blue range
Ink - VersaFine - Vintage Sepia
Spellbinders - Standard Circles
Stamps - The Stamps of Life - Thanks 2 You set #7
5/8" ribbon
rhinestone jewels


Happy Mother's Day Dear Friend
 A little late, I know. This is the Mother's Day card I made for my dear friend, Stef. :) She was making a shaped card and I loved it so much that I had to do one myself.
I did not have good luck with that sentiment on the front. :( I have since mastered the tiny stamps from Delightful Dahlia. :)

{Supplies--all Papertrey Ink unless otherwise specified}
- Cardstock: Spring Moss, Rustic White
- Patterned Paper: Pretty Pastels
- Stamps: Delightful Dahlia, Year of Flowers: Daffodils
- Ink: Lavender Moon, Sweet Blush, Spring Moss
- Ribbon: Lavender Moon Satin
- Other tools: Mat Stack 1 die, Cricut cartridge: Wild Card
Color Cue {5} Challenge
I was, once again, too late by several minutes to enter my card for this Color Cue Challenge.
 Regardless, here it is! I needed a bday card for my father-in-law STAT and so tried to kill 2 birds with one stone on this.

I kind of made this one up as I went along. The strip of "road" is from PTI's Library Ledger paper, a good application if I've ever invented one! The "grass" is Simply Chartreuse cardstock, finely cut along each side. The car is stamped on Vintage Cream cardstock with Memento Rich Cocoa ink and then inked with Aqua Mist. I "vintaged" the car with Tim Holtz Vintage Photo Distress Ink. The car is popped up as well as the license plate and sentiment (Orange Zest ink).
I really love that each button was tied in a different way!
{Supplies--all PTI unless otherwise noted}
- Cardstock: Dark Chocolate, Simply Chartreuse, Vintage Cream
- Patterned Paper: Library Ledger
- Stamps: Enjoy the Ride
- Ink: Orange Zest, Aqua Mist, Tim Holtz Vintage Photo Distress Ink, Memento Rich Cocoa
- Dies: Enjoy the Ride
- Buttons: Dark Chocolate, Orange Zest, Aqua Mist
- Fibers: Vintage Jute Twine
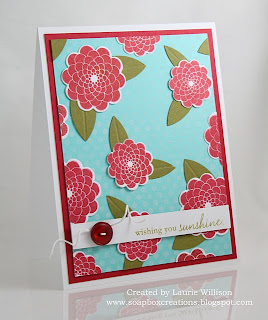
Blog Pimpin': Soapbox Creations
Even though I've seen Laurie plenty of times in the PTI Forum, I never checked out her blog, Soapbox Creations, until today. I'm completely bowled over by her talent! I love everything she's created! I chose a few to feature here (links included before each pic):
This duo can be found here:


This card can be found here:

This simple card is so inspirational to me!


Laurie complains about being a "monochromatic girl" but I love it! See here for this card:

This card shares a unique technique: stamping with the wrong side of the stamp! I love the ruffles, too!

Just like me, Laurie forgot to put the Beautiful Blooms II patterned paper into her cart at the time of that release! Unlike me, she re-created here it in the meantime!
This one has that je ne c'est quoi... I think it's the brown scallops that make this card unique!

And last but not least, there's this:

Thank you for sharing your wonderful talent, Laurie!
This duo can be found here:


This card can be found here:

This simple card is so inspirational to me!

These cards are stunning! I especially love this 1st color combo:


Laurie complains about being a "monochromatic girl" but I love it! See here for this card:

This card shares a unique technique: stamping with the wrong side of the stamp! I love the ruffles, too!

Just like me, Laurie forgot to put the Beautiful Blooms II patterned paper into her cart at the time of that release! Unlike me, she re-created here it in the meantime!

This one has that je ne c'est quoi... I think it's the brown scallops that make this card unique!

And last but not least, there's this:

Thank you for sharing your wonderful talent, Laurie!


