Sabrina's Favorites of Dana's 2011 Designs

Every year we like to post our favorites of the year from each designer. Narrowing it down to the top ten for each of us a bit of a challenge; at least for me it is. It takes me a while to work it down to ten.

Today is my turn, and I'm starting with the top ten of Dana's designs. I'll post mine on the 3rd. These are not in any order by the way.

1)

This my fav of Dana's Christmas cards. I love the colours, all the heat embossing, the layout, sewing, ink distressing, the ribbon, pins...everything! (see card details)

2)

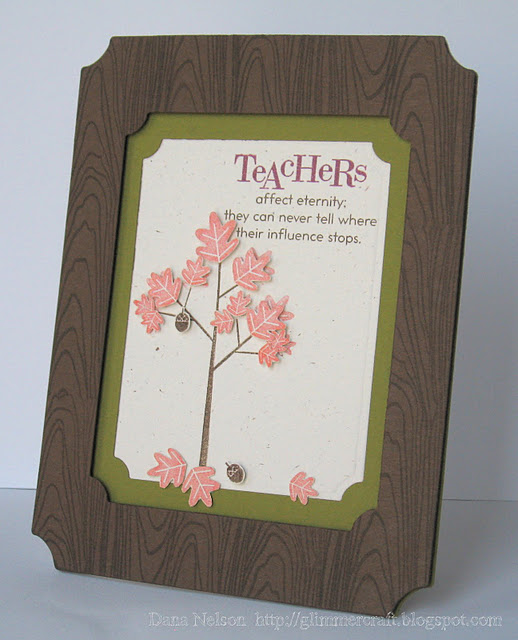
 Dana's home decor project was a hit with me. Something I still haven't tried yet! (see project details)

3)

Window cards always appeal to me and the colours & layout are great! (see card details)

4)

This striking CAS made with itty-bitty scraps just blew me away! (see card details)

5)

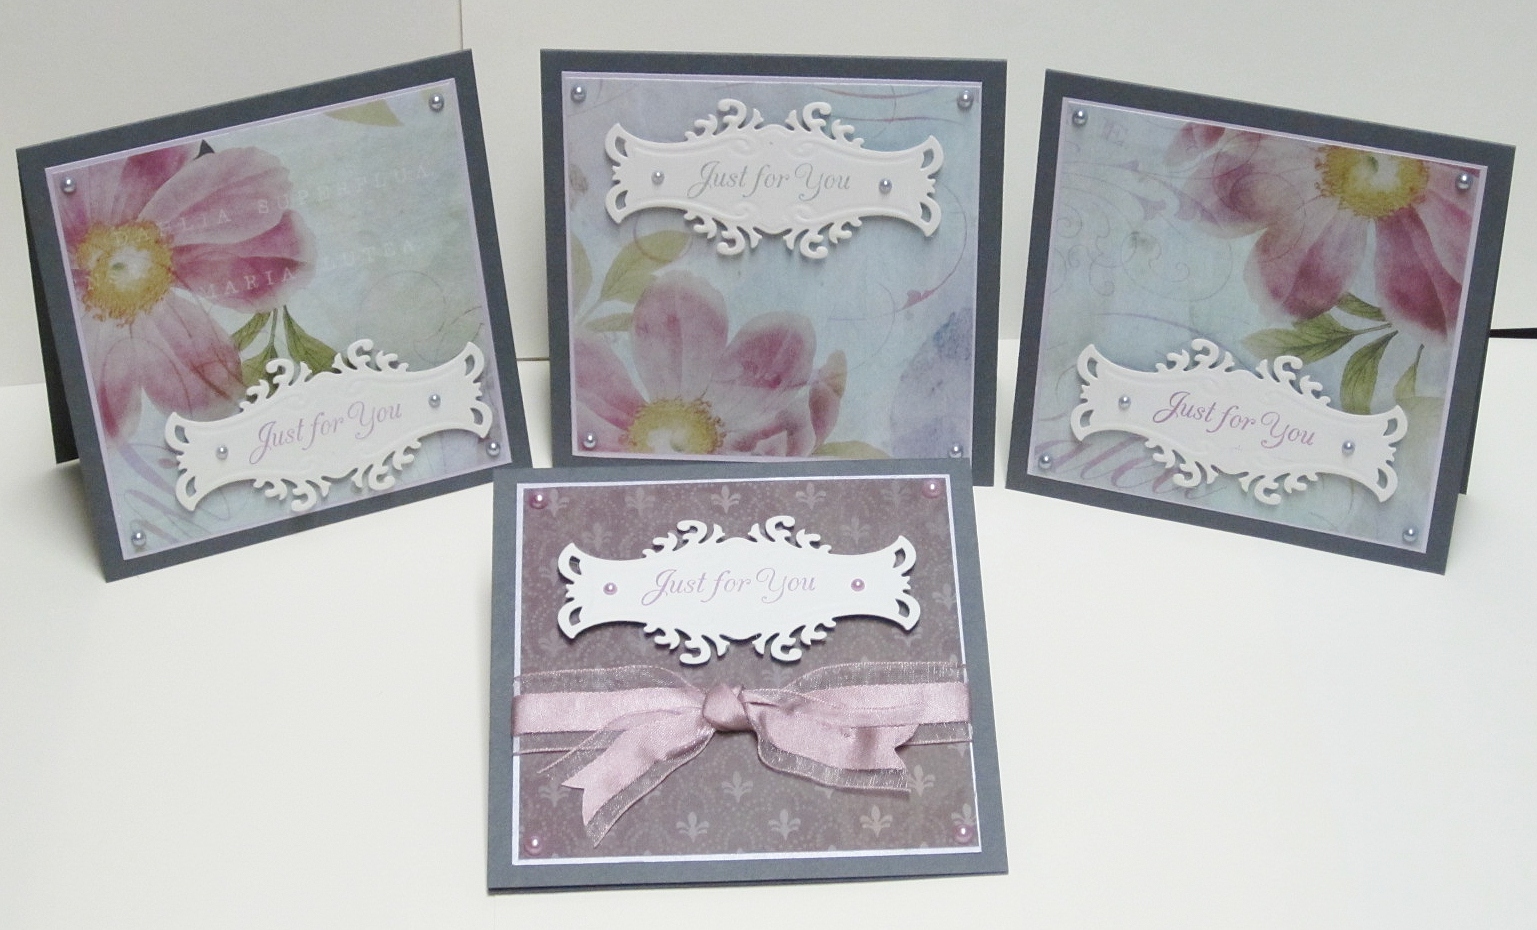
Paper piecing I'm very partial to, as well. I love this card! It appears to be a simple CAS, but the work involved in the details from the layout, to colours, and visual textures are wonderful! (see card details)

6)

Many of my comments include the word 'colour' because I love colours
and notice them practically before anything else. This card has beautiful colours, and with the ink distressing/blending, it gives off a comfy homey feeling too. (see card details)

7)


Again, the colours! But the fact that the tag slides out from the buttons is a great stroke of genius! (see card details)

 8)

This one is so very striking! I love how Dana ink distressed the edges of the red, darkening it even more. Then there is the paper piecing i so like, and the drop shadow created using a Copic marker. (see card details)

9)

Have you noticed how good Dana is with CAS? The machine stitched path of the rainbow of butterflies is just gorgeous! (see card details)

10)
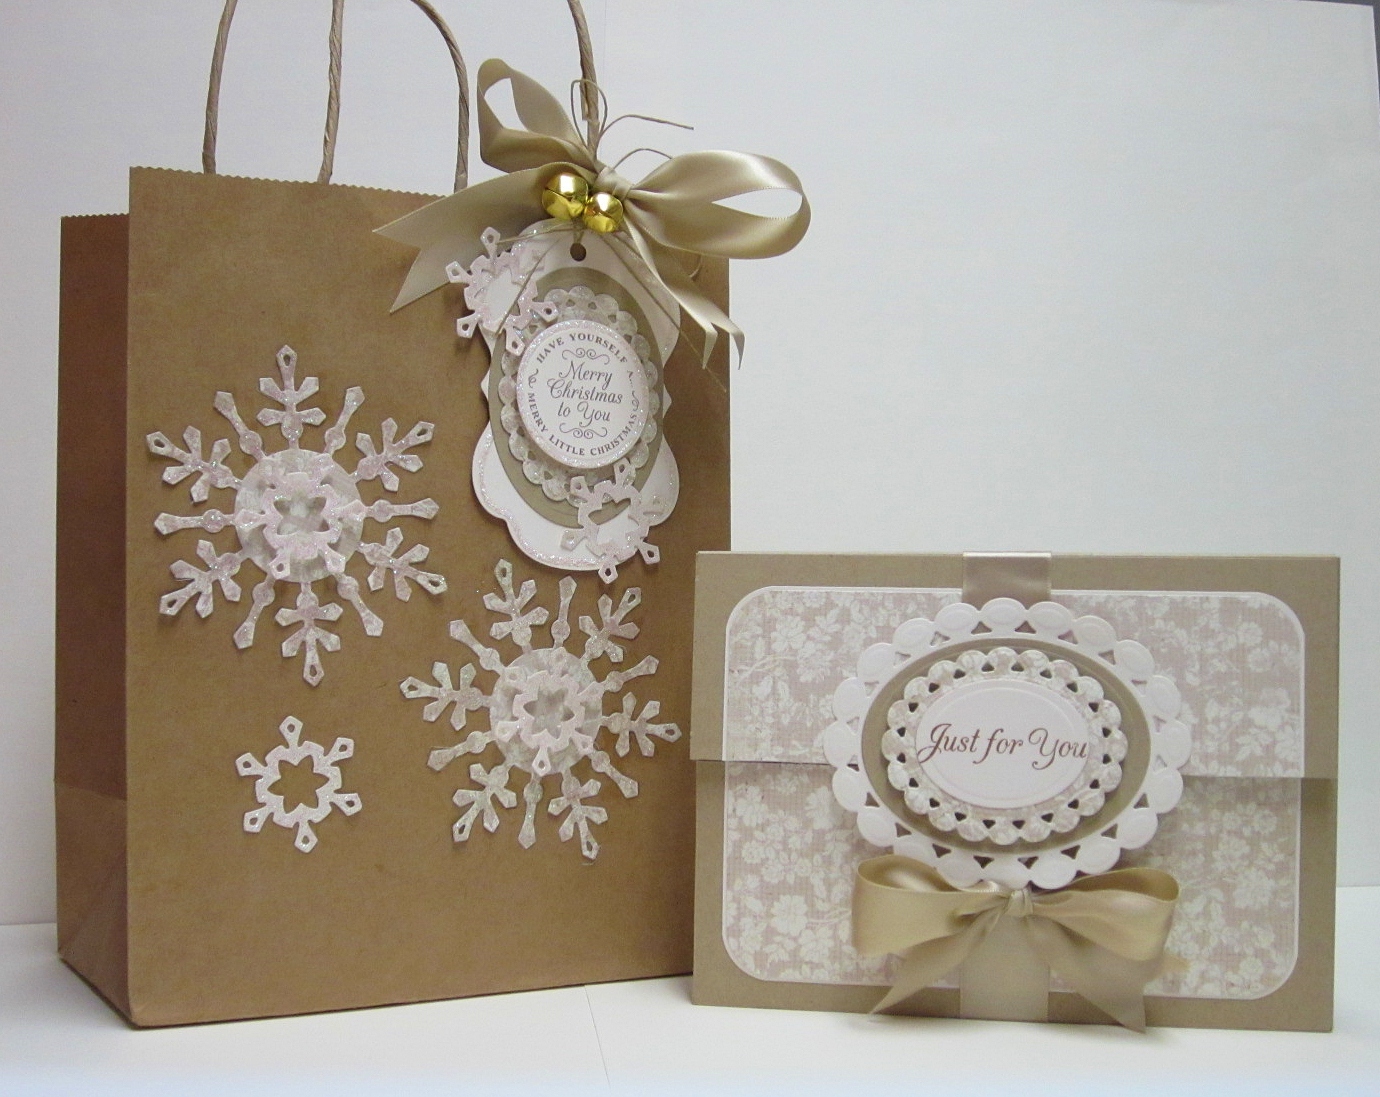
There are so many words to describe these Birthday Tag invitations! Stunning, adorable, cute, CAS, colourful, inventive....and so on. (see invite details)

Didn't Dana do an amazing job this year?! There you have my favs of Dana's designs for the year. To keep the size of this posting down, I'll be back in a couple of days to reminisce over my own top fav designs. 


Card Patterns 146 & FYI 20

FYI 20

I am combining the challenges Card Patterns 146 and FYI (For Your Inspiration) 20. When I came across the inspirational photo at FYI my first thought was Wow! The colours are beautifully saturated. So why not try to make a card with like saturated colours of turquoise, blue, purple, etc. and a little white. A card just bursting with colour like the photo.


Close up of the flowers and tag.


So, there it is...my colour saturated card.

Thank you for stopping by, and hope that you have a Happy New Year filled with good things.


TOOLS & MATERIALS

SPELLBINDERS: Beaded Circles, Classic Circles Large
Ranger Ink Blending Tool
INK: Versa Magic Perfect Plumeria, Versa Magic Turquoise Gem, Versa Magic Cloud White,Memento Bahama Blue, Memento Tuxedo Black
FLOWERS: Recollections
DIES: Provo Craft Cuttlebug Leaves
Pearls
Dark Navy ribbon, Dark Plum ribbon

Happy Birthday - Colour Q Challenge #117

Love the photo of these damask dishes from Target! I lived in the US for 11 years, and that is one thing I wish we had up here in Canada - Target! I loved shopping there because they have some unusual finds at reasonable prices.

Anyway, I'm not here to discuss shopping, but to enter my card for the Colour Q Challenge #117. I love working with black & white/cream and to add a colour to it is always fun.

And I had so much fun checking out all the entries thus far as to see what colours were being chosen by others. There are some fantastic entries! Not to mention the design team inspirational projects!

I decided to try and use as much colour as possible and go a little different...a little offbeat if you will, but still using one of my favorite tools - Spellbinders. For my additional colour I chose to go with a colour that I have a ton of in my scrap files - Spring Green! This is what I came up with.


Now some you Spellbinder lovers will wonder where I got a rectangle of the Fleur De Lis pendant? ...well I actually cut out two, cut them with the Square in the center to create a frame, and then cut and pieced it together. It worked much better than I thought it would. But, even though you can barely see it, knowing the light and camera would not be kind to the piecing of the frame, I covered the seam with the ribbon. And that is another story! do you know how long it took me to decide on what colour of ribbon to go with? I went back and forth between white, black, and green.

And next is a side view of the card so that you can see all the layers popped up. Will have to mail in special envelopes at this thickness...4 popped up layers!


I think I might try this again with a variety of colours. It was a fun card to make despite being unable to make up my mind on what colour ribbon to go with. ;)

Thank you so much for stopping by, and let me know what colour of ribbon you would have gone with! Happy crafting!


TOOLS & MATERIALS

Spellbinders - Fleur De Lis Pendant, Classic Squares Large, Fleur De Lis Accents, Crown Circles, Standard Circles
Stamps - Flourishes Tag Lines
Ink - Memento Tuxedo Black
Kaisercraft Pearl Strip - White

ADDED  January 3, 2012

I was awarded Color Queen Courtier for the ColorQ Challenge #117!!  Wow! That's the second award this week. Talk about excitement. I guess I'm going on like a little girl, but I can't help but be excited everytime I'm awarded something.


Christmas Gift Thank You

This Christmas I received a very generous gift from a family in the congregation I attend. So of course I had to make them a Thank You card. As I'm giving it to the entire family I didn't want to make it too feminine; and again I used mainly the paper for the card, cutting flowers from another paper in the set.


In distressing the edges I used Tim Holtz's Distress Ink - Antique Linen, and Versa Fine - Vintage Sepia. And since I'm packing away my craft things so that I can paint the room, most of the embellishments are not readily accessible at this point, so it is a simple card.

It's getting close to the New Year! It seems like we just welcomed 2011, and now it's soon 2012! Thank you so much for stopping by and leaving your comment on our blog. We love to hear from you. Happy New Year if you don't stop by again before then, and happy crafting.


Dead Batteries! Oh No!

I had planned to enter the Flourishes Timeless Tuesday 149 challenge, but when I went to take my photos to post, the batteries in my camera were dead! And they were the last of a large package; all those Christmas photos, you know. I didn't have any new batteries left :(   Of course that meant that I couldn't enter it yesterday since the deadline was so close and didn't allow the time to go get some new batteries in time.


The challenge was to use a Flourishes stamp and create a telescoping image. I used Flourishes Sweet Violet stamp and one of my new Spellbinders given to me for Christmas - Blossoms Four. Now, since I don`t have Copics I had to use my old set of water colour pencils, with water and a brush, to colour in the stamped image.

 I guess we are all cleaning up after the festivities to get ready for the New Year celebrations. Then comes what I call "the downer" until the coming of Spring. That's when crafting really helps, and I look forward to that. Do you have a down time between New Year and the coming of Spring?

So nice of you to stop by today. Come again soon and have a great day!


Sharing My New Treasures

Hope you all had a wonderful Christmas!

Thought I would share with you some of the new crafting treasures I received for Christmas. As you know I'm currently on the DT for Colour Create Challenge and the DT members decided we would participate in a Secret Santa exchange. It was quite fun to do and difficult to put the package under the tree and wait until Christmas when it arrived. My Secret Santa ended up being Sylvia from Norway! You should see the beautiful tags she made. Anyway, she sent me some lovely things that I can hardly wait to use. I think she went over our price limit though ;).


This is the gorgeous gift tag she made for me! And here are the goodies...


I can hardly wait to use them! Thank you Sylvia!

I didn't take any photos of another crafting gift received; a gift from Dana. She sent me 3 sets of Spellbinders!! Beaded Circles, Blossom Four, and Crown circles.

 
I love Spellbinders and can hardly wait to use them too. Thank you so very much Dana!

Thank you for stopping by and check out some of the fun gifts I received. Hope you all got some fun goodies too.


Featuring the Paper - Another Gift Set

Sometimes you come across such gorgeous paper, that it has to be the star of the design. That is what I did to create this 16 card set as a Christmas gift for my Mom. Plus, making the paper the star of the show, the job so much easier, ;).

A couple of months ago I came across some gorgeous designer paper from K & Company-Brenda Walton's Flora & Fauna - that  caught me eye. It had been reduced in price, too, since there was some damage done to the pad of paper. I ended up making 4 cards per the four papers that I chose form the pad. Here are the four sets tied up together.


And here is each set  in their container.


You'll note that whatever is lying down in these photos, rather than standing up, doesn't have a true respresentaton of colour due to lighting at a different angle than for those standing up. Now, instead of taking a photo of each card individually, I've taken one photo of each set of 4 cards that make up the whole set.


So there you have it. 16 easy 5 1/2" square cards, made in a day, by focusing on the paper. I used Spellbinders Fancy Tags Two, the same one for all cards, and placed it where it didn't take away from the paper. I used the same stamp for them all, "Just For You" because inside you can say - on your Birthday, to Thank You, because I love you, to Congratulate you, with best wishes, with Get Well wishes, etc. In other words, an All Purpose card!

I tried to chose papers that would appeal to a variety of tastes in style. Some even work for masculine cards if need be, but still have a Victoria, BC flair to them.

Hope Mom likes them!

It was so nice of you to stop by and... have yourself a very Merry Christmas. ;)


Calendar Notepad Cover

Yesterday, I visited my ex-mother-in-law, whom I love dearly, to drop off a card and little gift. So Wednesday night I quickly put together her gift. She is one very busy and active lady! Especially for a woman at the age of 88! She is always making lists or taking notes, and possibly quickly writing down a quick recipe here and there. So when I came across these 2012 calendar note pads for a $1.00, I knew I had to get a few and convert one of them for Kay.

I took off the thin magnet that was on the back of the pad and trimmed the backing as much as I could. After measuring the pad, and taking into consideration the pencil, thickness of pad & pencil, and the folding allowance, I cut some thin chipboard accordingly - a total of 5 strips. ( I should have taken photos as I went along) Cut the patterned paper, one for the outside & one for the inside, as once piece for each, and scoring according to my calculated measurements where the folds would be. (It worked! So my calculations were right on! That's always a plus.)

Then after applying Scor tape to each side of the chipboard, began the careful assembly.


It would have been fun to decorate the holder more, but I had to be practical...after all, Kay does a lot of note taking like I mentioned earlier.


Here with the bow untied, you can see that I forgot to put the magnets under the paper! I did remember to do that when I made the tab on the front though ;). And the inside...


Too bad I didn't have a better match for the pencil! Kay won't mind. I kept it simple for her, and it was easier to put together that way too. I may make one in the future with more elaborate embellishment, just for the fun of it.

If you're wondering about the Christmas card I mentioned, it is one from a previous post, here. It doesn't match the gift, but I think she'll like it.

Have a great Christmas!! ;) ...and thank you for coming for a visit.

Just For You Gift Set

In October I started making a six card gift set, as a Christmas gift, for the couple that picks me up every Sunday to take me to church and bring me back home afterwards. A wonderful couple. I worked on it here and there, in between other projects, and completed the cards the first week of November but never got around to making the card box, or the gift bag to hold them until recently.

This is the gift bag and the cards in the card box. Of course I had to make the Christmas gift bag to match the card set. ;)


 The large snowflakes are cut out of the same floral patterned paper you see on the card box. The smaller snowflake popped up in the center of the larger ones is cut from cream cardstock. Both are covered with Chrystal Stickles.


Here are the cards in the box.


Here you can see the layering of the medallion on the box with the ribbon. You see that it's bulging a bit. That's because I forgot to put three cards one direction and the other three the opposite direction.Of course I didn't notice it until just now! lol ;)  I did put it together correctly after taking all the photos when I had to put it all back together.


Here are the cards.


Sorry that this image is unclear. I must have forgotten to make an adjustment on the camera.There are 2 birthday cards, 2 thank you cards, 1 get well, and 1 just a note.


Here you can see that the person's handwriting becomes part of the card adding some interest to the layout.


There you have all the details of the gift card set and matching gift bag.

Great to have you stop by and taking the time out of your schedule. Just a few days left now, and then comes the new year!


TOOLS & SUPPLIES

Spellbinders: Squares, Classic Ovals, Beaded Ovals, Circles, Labels Fourteen
Martha Stewart Deco Fan Border Punch
JustRite Stamps - Cardmaking Set, All Occasion Nested Sentiment Set, A Merry Little Christmas Set
Chrystal Stickles