Colour Create Challenge 85 - Red, White & Green


It's time for another Colour Create Challenge! Sylvia chose Red, White & Green as the colours for this challenge, with the additional opption of using snowflakes. Traditional Christmas Colours! It is that time, and even though non-traditional colours are fun, traditional always makes one feel warm and cosy. To the left is the sweet inspirational image Sylvia chose for our challenge.

And the prize for the winner? Well it's sponsored by High Hopes Rubber Stamps. I checked it out and there are some real cute stamps to be found there. These are the fun stamps selected for our winner of Challenge 85. So if you'd like to win these stamps, enter our challenge. And then check out some of the other great stamps found at High Hopes.


For my inspirational entry I found myself using a lot of Spellbinders....lol, and pearls! I also looked into my stash of  scraps, with the exception of the card base itself.

Here is a closer look at the bottom right corner.

So there you have it, a beautiful lacey snowflake on a traditional red, white & green card. The excitement is beginning to build...I just love Christmas!

Hope to see some of our blog followers' enter the challenge, and be sure to check out High Hopes Rubber Stamps. Thanks for stopping by!


TOOLS & MATERIALS
Spellbinders: Beaded Ovals, Labels Six, Labels Fourteen, Feur De lis Accents, 2010 Snowflake Pendant
Stamp: Unknowwn
Pearls
Ribbon
Pearl Pin

A Double Whoopee!

I'm so excited! I received word today from two different challlenges that I entered the last few days that I was awarded some recognition!

I entered Colour Throwdown Challenge #169 with these colors  and was one of four chosen that were selected for "Honorable Mention" for this card (previously posted). Original posting here.


And for my second good news of the day, it came from Papercraft Star's Anything Goes  Cahllenge, I received this award along with - Our Runner-up, Sabrina receives 1 download page from THATB (the House Across the Bay). You have to check it out, there's some great stuff there!

If you're wondering what earned me this prize, it's my Christmas Explosion Box! Original posting here.


I hope you don't think me being silly, but hearing about two wins in one day not ony was unusal and exciting, but fullfilling and made my day. I just had to share it.


Too Much Bow?

 I had a piece of gold doilie left over from this project, and when I pulled out the teal card base, it came to mind... teal and gold. Then I kind of chuckled to myself, because the next thing I thought was, "Oh, no! The 80's!" lol. Then, to top it off I ended up making the bow much to full/big. Well, at least it's a shear bow and not a solid one.

This is another of those RS notecards I've been making over the past few weeks. Well, lets hope the next one will be better. Thank you for stopping by again today. Hugs to all our ATC Friends.


Thinking of You - Scraps Revisited

This cards has a scrap leftover from a class I taught at Scrapbookers Paradise - Calgary... Inking the embossing folder on one side before embossing the paper. You can view that project here if you wish.

 I don't remember what the name of the folder is that I used for this piece because It was Dana's folder. When I lived in Calgary, there was a time when Dana had her scrapbooking stuff over at my place to keep tempation away from here young children. It was nice to scrapbook together and borrow each others things. Though I think I did most of the borrowing.

Back to the project. I was so glad that the Gray Liquid Pearls matched the three large pearls I placed in the upper right corner.

Well that's it. Thanks for stopping by, and happy crafting everyone!


American Crafts Giveaway Winner!

The winner from our American Crafts giveaway was chosen via random.org:

#3 Deb

Congratulations, Deb!! Please email me at tigriswillreign at gmail dot com with your address info!

Thanks to all who participated! It was so fun to see where y'all live!


and the

Papercraft Star Challenge 72 - Anything Goes!

Papercraft Star ANYTHING GOES CHALLENGE
I was so excited when I came across this challenge! The previous day I had looked everywhere for a challenge that I could enter my design in. However, I was unsuccessfull. I know....you find a challenge first and then make a project. But I had wanted to make this project for a long time now...something for my Mom and Dad. Anyway, I posted it the day before this newest Papercraft Challenge was posted. I didn't enter it on the 23rd when I came across the challenge because I thought I couldn't, but after a few days I decided to go ahead before the deadline. I'm taking a chance on entering it, hope against hope that I'm not disqualified. If I am, at least I tried. Nothing ventured, nothing gained...right.
I created a Christmas Advent Explossion Box, and here it is.
Here it is open...
If you'd like to see all the details on putting it together and viewing the page of the box, click here. It's a long posting, so be sure you have a few minutes.
So there you have it. I guess I'm so pleased with it, I just had to show it off in a challenge... A little pride I guess. Thank you for stopping by!


ADDED

November 29th I was awarded the PaperCraft Star Quasar Award for this project!


American Crafts Giveaway!

*This is a sticky post. Please scroll down for more recent postings!

Sooooo...

I've been winning a bunch of wonderful things on the wonderful wide web lately... It's been wonderful!

;)

I recently received a HUGE box in the mail from American Crafts (you can check out their beautiful blog here)... I knew that I had won some paper from them on the Moxie Fab World blog, but what I had actually won was paper and an amazing assortment of embellishments!!

I could feel, more than see, my husband rolling his eyes as my children and I delved into the box of goodies with squeals of delight.  ;) My children are 6, 4 and 2 and are, as their age would suggest, craftily-minded.

By the time I had reached the bottom of the box, I realized that I couldn't possibly keep this all to myself. I doubt I have the space!! ;)  And so, I split 'er up!


The pile on the right is mine (I've never had Thickers before so forgive me for snagging them all!) and the one on the left could be yours, as explained in this video:


I recorded this around 3pm and you can see the sun is beginning to set! I'm in Calgary, Alberta and our bit of snow just melted.

So, to enter this most awesome giveaway, you need to post a video or picture on your blog/gallery of (the exterior of) your house and/or neighborhood during this most beautiful Fall (or Spring, if you're in the Southern hemisphere!) season and link directly to it below! You do not have to be a follower of this blog but you're welcome to do so if you aren't already. It will be so interesting to see whether some people have snow or the gorgeous colors of the NE coast or the palms of the Southern clime...

This giveaway, open to residents everywhere, ends on Friday, November 25th, giving our friends in the United States until the day after American Thanksgiving, aka Black Friday, to enter.  :)


and the

Color Throwdown Challenge #169 & Inkspirations Challenge #97

Hello friends! The Color Throwdown  challenge is one I wanted to try because I was intrigued with the unusual color combination and wasn't sure how to go about using the colors. I felt challenged to come up with something. It has been a very, very long time since I checked out the blog. I combined it with the layout sketch #97 found at the Inkspirations Challenge blog. Did I rise to the challenge? ...I'm not sure... I'm not well right now, so that might have something to do with it.

As you can see I had a stamping issue on the darker blue...but having the flu I'm in no frame of mind, or body for that fact, to try doing it all over again. So it is what it is. Here's another view.


Thank you for stopping by today and checking out my challenge entry.

With the season soon upon us and we're all getting busier. All the best to everyone in your preparations. And, happy crafting to you all. We all know that there is always some last minute crafting stuff that creeps up on as the holidays approach and get closer with each passing day. All the best!


TOOLS & MATERIALS

Spellbinders: Clasic Ovals, Feur De Lis Boarderbilities, Fancy Tags Two
Stamps: Old Lettering
Ink: Versa Memento Dark Cocoa
PTI Buttons
Ribbon
Red embroidery Floss

Using More of My Scraps - RS Thank You Notecard

Unusual colour combination, for me that is, is what prompted me to post this card which is an addition to the number of RS notecards I'm making. I'm not adding a whole lot of details as I'm not feeling well and am thinking that I've got a light case of the flu. Here it is.
 
You can see that the notched banners are curled up a little on the right end. Here's another view.

Thank you for your comments and for stopping by today. Hope all our friends from the US had a great Thanksgiving!
 
TOOLS & MATERIALS

Provo Craft: Swirls Cuttlebug Folder
PTI: Buttons
Stamps: JustRite
Spellbinders: Fleur deLis Accents
Adirondack Dimensional Pearls - Lettuce
 

Christmas Advent Explosion Box for Mom - long post, lots of photos

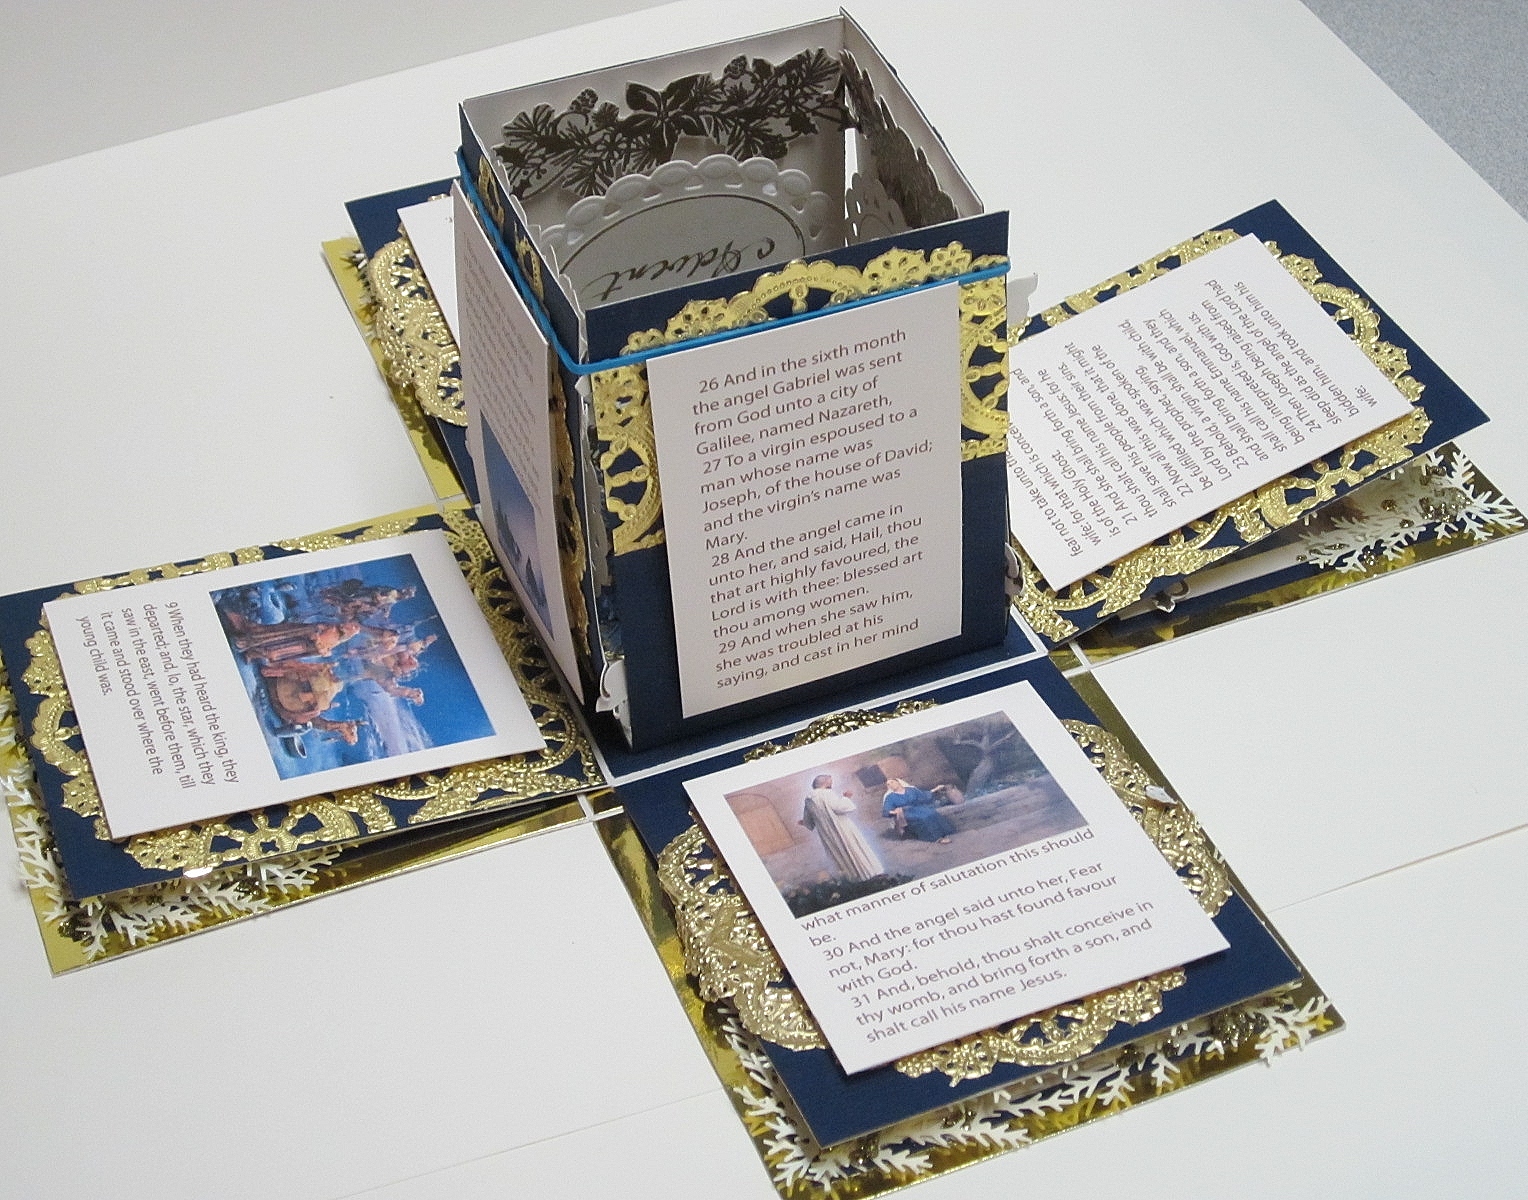
The four Sunday evenings before Christmas, my family has the tradition of burning first one candle the first Sunday, then two on the second, then three, then four and reading Christmas stories, including the real one from the New Testament. While doing so, we eat Christmas goodies and drink hot chocolate or Pero, or Eggnog. Those are beautiful memories from my growing up years, and I did it again while raising my own family. Because those memories are dear to me I wanted to make something special for those future occassions still to be had by my Mom and Dad. So I've taken the Christmas story from the scriptures, found some paintings to go with it, and came up with a plan for a beautiful Christmas Advent Explosion Box. I chose Mom's favorite colours - Ivory and gold and added some navy blue that goes nicely with some of Mom's  fancy collection of porcelain pieces.


 I took some pictures throughout the creation of the box, but forgot at times to do so. That means some steps are left out in the series of photos.

1. To start, cut four squares: 12 X 12, 11.5 X 11.5 and 11 X 11 & the lid 6" x 6"
2. Score the 12 X 12 at 4 & 8- rotate and score again at 4 & 8; the 11.5 X 11.5 at 4 & 7.5-rotate and score again at 4 & 7.5; and the 11 X 11 at 4 & 7- rotate and score again at 4 & 7. DO NOT FOLD SCORE LINES - Makes it a little easier while putting the box together.
3. Score the lid - at 1.25 and 5.25- rotate and score again at 1.25 & 5.25
4. With your scissors cut down the score lines on the three box pieces only to where they meet getting rid of the four corners leaving a cross shape. On the lid cut only on two opposite sides, not all four, down to where the score lines meet. (This is one of the photos I forgot to take for you)
5. Now you prepare all of the embellishments (A few photos forgotten here too)
6. Apply all background materials.
Outside piece - 12 X 12


Stamped and heat embossed the side facing out.

On the flip side - interior - I attached gold foil. the outter 4 squares the exact size of the square minus a little on the side butted up to the base square. (photo forgotten) And the inside base square minus a little all the way around as to not hinder the scored fold. You may ask why you need to put a piece of decorative paper on the inside base when the other layers are just going over it. well, there will be a little corner showing at each corner, and I like having it look like the rest, plus it adds a little strength to the base.


11.5 X 11.5 Underside 


This is the underside that faces the upside of the larger outer piece. Therefore the center square doesn't need any decorative attention.


11.5 X 11.5 Upside


The flipside of this same piece will be facing uppward and does require the center square to be covered to match the flaps.

I used some very old gold doilies that I had left over from time in the early 1990's! You can see that I had two different sizes and found a way to make it work, and the background nicely for what I| have instore.


11 X 11 Underside


The last smallest piece is the inner part of the box. Again the center square needs no decorating as it will be facing down attached to the others. The entire side will face down facing the blue and gold so that when you lift up the flap all you see is blue and gold.


11 X 11 Upside or Innerside


The upper or inner side I'm leaving as is to embellish later.


outside dimesions-3.5" X 3.5"
Now, for some of the embellishments. Just a word here to let you know that all the evergreen branches used on this project were previously punched using scraps and ready for use whenever I want to use them. Here, in the not so clear photos, you can see the advent crown with tiny candles that I made. (Sorry, I forgot to take photos of it's construction for you)
Cutting the gold doilies up for embellishing the box lid corners and for gold accent under the mini advent crown to be in the center of the box when completed. For a more completed effect I found that I had to check out every inch of the doilie carefully and remove bits and pieces that hadn't come out when the doilie was originally punched out by the manufacturer. That was time consuming, but the doilies looked so much better for it.These pieces would have been so much easier to glue on using my Xyron sticker maker, but I had used up my refill for the RS Accordian handout and hadn't had the opportunity to purchase a new refill, so I painstakingly used liquid clue.
Using a Calligrapher gold metalic pen I hand wrote the title for each advent title page, so to speak, on the Spellbinders Beaded Ovals I cut and embossed on my Cuttlebug. Not seen here because I did it later, I used that same gold pen and put the Beaded Oval die frame back on each piece using it to trace a gold oval. This can be seen in later photos.
After stamping and heat embossing hese gold "Winter Borders" I hand cut them out u sing my detail scissors.(These I cut while watching an old favorite b&w movie)

Next I put together the lid, and once again forgot to take photos on how to assemble it. But, here is the end product. On the left you can see better the gold doilie medalions I put on the corners. The Poinsetia is heat embossed gold and cut out, then assembled in three layers. The blue leaves are die cut so I took my gold metalic calligraphers pen and drew the leaf viens as well as outlining them.
Adding the details and embellishments is getting to the fun part. At this point I was really looking forward to the seeing how the project looked completed and if it would look like I imagined it to look.


So there you have it; all done! Thanks for patiently going through this lengthy posting, but I've had some requests on how I put things together, and aticipating that with this project, I planned ahead for it.


I gave to Mom and Dad Sunday, and they loved it! Thank you so much for stopping by today. Hope you all have a great week and have some stamping & crafting planned for this week!


TOOLS & MATERIALS

ScorePal
Ink: Versa Magic
Stamps: Hero Arts Music Background, The stamp Barn Sunshine Designs Poinsettia,  Inkadinkadoo Winter Borders,
Gold embossing Powder
Spellbinders: Beaded Ovals Nestabilities
Provo Craft: Leaf  Die
Stickles: Gold
Liquid Pearls: Gold
Martha Stewart: Evergreen Punch
Calligrapher Quick Dry Gold Metallic Pen
Gold Doilies