Showing posts with label project - card box. Show all posts

Christmas Card Box for Maja Design Christmas Card Kit #2 - 3 1/2"W x 6"H Cards


Welcome!

Today I am finally getting the post out for the card box video tutorial for the cards in the Christmas Card Kit #2 - Holiday in the Alps. Obviously I had some problems getting it out, since other videos made after this have been posted. I won't go into details, but I finally have it for you now. Thank you for your patience.

These are the cards this card box is made for.


These cards are a unique size, measuring 3 1/2" W x 6"H. The box is just a little larger than the card and is 1 1/4" thick to accommodate the thickness of the card made by the elaborate embellishments. 

I ask at this time, before you see the tutorial, to forgive the mistakes made in this video. I corrected mistaken sizes with writing into the video the correct sizes. I will have all the measurements below the video on this post for you.


One card per box.

I was going to try and have my box completely embellished for you, but I still have not had the time to get to that yet. When I do, I will add the photos in then, but you are all creative and talented and I am sure you will have some great ideas to decorate your card boxes to match the cards you put in them.

TOOLS & SUPPLIES
  • Score Board & scoring tool
  • Paper Trimmer
  • Large Scissors
  • Double sided adhesive tape / Scoretape
  • 40 inches of 1" to 1 1/2" ribbon
  • Cardstock

CARDSTOCK CUT TO: 1 @ 10 1/2"W x 7 1/4"H (box bottom), & 1 @ 10 3/4"W x 3 3/4"H (lid)

SCORING

Box Bottom: 1 1/4", 5", 6 1/4", 10" leaving 1/2" for the seam/joining tab

Box Lid: Please watch video for these instructions
  1. Line up the piece with the 10 3/4" across the top with the left side of the piece @ 1/2". This is very important.
  2. Before any scoring, move the piece 1/16th of an inch to the left, & score @ 1 1/4"
  3. Slide to the left again another 1/16th of an inch (you should be at the 3/8" line), and score @ 5 "
  4. Slide the left another 1/16th inch and score @ 6 1/4"
  5. Slide the left, for the last time, and score @ 10" leaving you a 1/2".

If you plan to stamp, stencil, paste, or add patterned paper to your box, please do that before assembling your box together.

BOX ASSEMBLY: Please watch video for these instructions

I know that you will love this card box.

Once I get mine finished I post it, but in the mean time you have this tutorial to help you make your own boxes.

Happy Creating!


Christmas in July Shabby Chic Card Kit - BOX #1 - FREE Instructions


Welcome Back!

I think that you will have fun with this post, and the next one, as they will be instructions on how to make two different boxes for those square and lavishly embellished Shabby Chic cards. There is no way you can get one of those cards into a regular square envelope!

Since Scrapbook Parade asked that I make Shabby Chic Christmas cards for the yearly Christmas in July theme, I knew we would need to make something to put the cards into. So, for today's box instructions, I will be showing you how to make a pizza box for a 5 1/2" x 5 1/2" square card that is about 1" thick with all the embellishment on it. (These boxes can be made thicker if needed.)


Let's begin.

This is how I figure out how to make a box for a thick card. First, I decide what kind of box I want to make. For this one I chose to make a mini pizza box. I know the size of the card and usually add 1/4" to the card measurements. Then I draw that measurement on grid paper (I have a grid note book that I use all the time), and then from there I know how thick the box needs to be, and continue adding to the sketch. When I'm done, it will look like this.


I next figure out the cutting dimensions, how many cardstock sheets I will need, wether it is better to use 12 x 12 or 8 1/2 x 11, and where I need to score. (The scoring info is on the next page in the photo above.) In this case 12 x 12 was the only option I had.

For this box you will require 2 sheets at 12 x 12, and cut one to 9 3/4"W x 9 1/4" H. The second sheet needs to be cut at 7 3/4"W x 6 3/4"H.


SCORING

Take the smaller piece - 7 3/4" x 6 3/4"  with the 7 3/4" across the top and score at 1" and 6 3/4".


Turn the piece with the 6 3/4" across the top and score ONLY on the left side at 1".


With a large pair of scissors (you can cut a straighter line) cut as you see below on either side of the score line and then rip the sliver off toward the back/inside


I can't believe that I forgot to take the 2 photos of the larger piece and scoring each way! So I hope the following will work for you.

1)  With 9 3/4" W going across the top, score at 1", 2", 7 3/4", & 8 3/4".
2)  Turn the piece around so that the 9 1/4" is across the top and score at 1", 2", 7 3/4" & 8 3/4" leaving a 1/2" attachment tab.
3) With those longer scissors cut the piece as you see below.


BONE FOLDING & ADHESIVE

After making your nice bone folded creases along all the score lines you will need to use up some double sided adhesive tape.

For the bottom piece inside, this is where you will place your tape.


Then flip the piece over to the outside and place adhesive as below. There is some along the edge of the fold at the top here, and then on the two tabs at the bottom.


THE PIZZA BOX TOP

Decorating

This is where you can decide how you would like to decorate your box; and there are many options! You can stamp images or words, heat emboss, stencil with ink and blending tool, or with paste. I used NUVO Moonstone Glimmer Paste and then quickly heat dried it and watched it puff up.

You can also use beautiful designer papers and cut pieces 1/4" smaller than the box panels are  so when you attach the paper you should have a 1/8" border of cardstock showing all around the paper.

BONE FOLDING & ADHESIVE

Then once you have finished creasing all the score lines with your bone folder, attach adhesive tape on the outside of the lid as seen here.


Then turn it over to the inside, and place adhesive tape as seen below.


JOINING THE 2 PIECES

1)  Remove the backing off of the tape from the inside edge of the lid that has no fold, and bottom piece with the 1/2" tab on the outside of the box piece.
2)  Carefully place the top/lid straight edge over the 1/2" joining tab right along the fold without overing the fold.


3) In the photo below, look at the corner. The outside part of the tab is attached on the inside lip of the box. Do this on both of the bottom corners as you see below.


4)  Now do the same thing with the corners on the lid of the box. (Left side of the photo below)


5)  Going back to the bottom of the box, remove the tape backing and fold down the flaps to not only strengthen it, but to also cover the tabs. Now it will look nice and finished, and it will better hold in the lid.


In the next photo you can see what the finished box looks like on the inside.


When you close the lid, you will place the lid section on the inside of the box bottom.

Now you may wish to further decorate the box. If you are putting a fancy Shabby Chic card into it, you will want the box to be just as elaborate. This is what I did with my sample for you.


And here is the box with the Shabby Chic Christmas card inside.


You could even make a little envelope with your Envelope Punch Board, attaching it on the inside of the box lid, to hold a gift card or two.

I hope these instructions are straight forward enough. If you have a question, just ask in the comment section below, because if you need to ask then someone else will too. I answer your comment and everyone gets to read the answer that needs it.

The next Card Box I will be sharing how to make, will be the more traditional Envelope Box to fit these cards and any other future Shabby Chic or other type of thick card.

Once you are done making your first one, the others will come along easily for you. Have FUN!


ADDED JULY 29, 2020

I thought I would add another mini pizza box for the thick Shabby Chic Christmas cards, just to give you an idea on how you and use just patterned paper on it.

Here we go.


Happy Card Box Creating!


Graphic 45 Time to Celebrate Cards in a Gift Box


Another September Graphic 45 Class to share with you. I have already posted photos of this project, so bear with me as I re-post them with the class information today.

Time to Celebrate Cards in a Gift Box
Thursday, September 22, 2016
5:30 - 9:00pm
$42.00 (includes taxes)

Contact Stacey to sign up - sbebc201@gmail.com


To see more details of each card, check out my previous post here. If you do not live locally to take the class, may these cards in a box inspire your creativity.


BRING TO CLASS: Paper trimmer, scissors, 12 x 12 score board, double sided adhesive, scotch tape, favorite vintage colour ink pad (like Brushed Corduroy, Old Paper, Frayed Burlap, or Gathered Twigs) and a sponge, and dimensionals/pop-dots.


Stop by again for another class posting!

Happy creating!


3 x 3 Card Box Instructions

Wishing you a wonderful weekend, everyone!

I have had many requests on how to make this cute box for 10 to 15, 3 x 3 cards. Thank you everyone for the wonderful comments you've made.
So here are the instructions to making this box.


Tip: I cut to size, score, and cut to shape several of these so that when I need a box I can grab one and
put it together.

Have fun making your boxes!


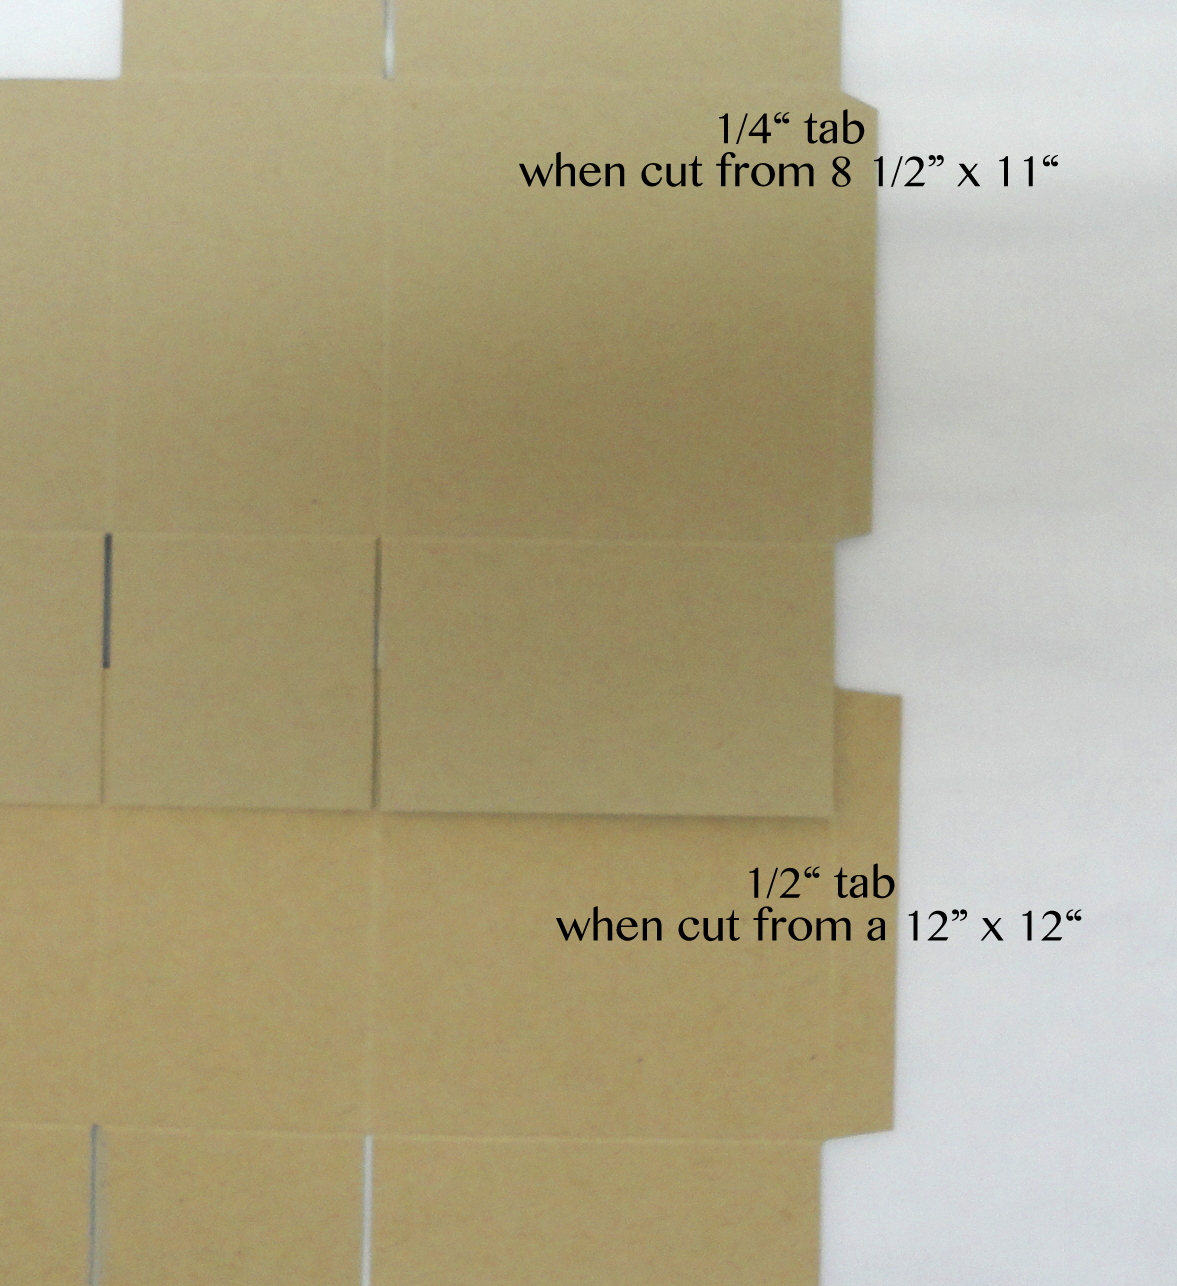
You may use either 8 1/2” x 11” or 12” x 12” cardstock. The advantage to 12” x 12” is that you will have a more substancial tab for assembly, but the other works fine.

1)


Cut from 8 1/2” x 11” a piece that is 8 1/8” x 11”
Cut from a 12” x 12” a piece that is 8 1/8” x 11 1/4”

2)


With the length across the top score @ 2”, 5 3/8”,
7 3/8”, & 10 3/4”

This is the same for both sizes.


3)


Rotate, so that the shorter measurement is across the top, and the narrow tab section is at the bottom.

Score @ 2”, 5 3/8”, & 7 3/8”
4)


With your scissors, cut along scorelines so your box will look like this. Be sure that the tab is on the back side of the box with the lid right next to it.

I like to cut on each side of the score line, so that you have a narrow space between folding parts as you see in the photo.
5)


Here you can see the tab size difference depending on what size  cardstock you used.
6)


With your paper trimmer, cut off 3/8” off of the bottom two smaller sections

With your bone folder crease all the score lines
7)


With the outside of the box facing up, attach your Tear & Tape adhesive (or glue if you prefer) onto the tab as indicated in the photo
8)


With the inside of the box facing up, attach your Tear & Tape adhesive (or glue if you prefer) onto the tabs as indicated in the photo

The larger tab is on the front of the box and later will be the last one to be attached.
9)


The first part is to attach the side panel to the back panel's tab. This is 1/4” if you used 8 1/2” x 11” cardstock, or 1/2” if you used the 12” x 12” cardstock.
10)


The bottom of your box will look like this. (I have the top flap folded toward the outside with my bone folder as weight)
11)


Take the back flap down, and attach one of the smaller flaps to it.
12)


Now attach the other flap.
13)


Lastly, attach the remaining flap from the front of the box.
14)


Your box is now complete. Take your bone folder and rub the inside bottom, to be sure of the adhesive tape's maximum adhesive qualities, or the spreading of the glue.
15)


You can embellish your box however you please, but these are the measurements I used for colour cardstock, and DSP.

Cardstock Matting : 2 @ 3 1/8” x 3 1/8”, &
4 @ 1 3/4” x 3 1/8”

DSP: 2 @ 2 7/8” x 2 7/8”, & 4 @ 1 1/2” x 2 7/8”
16)


Adhere the DSP onto the Cardstock
17)


Next mark the center on the piece that will go onto the lid.
18)


Attach the Tear & Tape adhesive on the underside before punching your hole.

If you are using wide or thick ribbon you will want to use a 1/4” hole punch.

If your ribbon/cord is narrower you will use your 1/8” hole punch.
19)


Narrow ribbon/cord will be about 7”

Wider ribbon you will need more; about 8 or 9
20)


Loop the ribbon and tie a knot so that you have a loop about 1” long. For wider ribbon you may want to make it longer so that the proportions look right.
21)


Add adhesive tape to the underside of the knotted loop tails.
22)


Slip the tails into the hole from the top...
23)


...to the underside.
24)


Remove the backing of the tape by the hole, and attach the ribbon tails as in the photo.
25)


Remove remaining tape backing and attach to the top of the box, onto the lid.

Attach all other pieces and embellish your box.

These are great gift sets to give for any occasion, or just because. And of course a great way to use up your scraps!

Have fun!