Showing posts with label seasons - winter. Show all posts

I Can't Believe It!! I Missed Posting a Kit! - BoBunny Winter Playground Kit


Either that, or it got deleted somehow.... I do not recall ever forgetting to post a major post before, but I did. If it wasn't for someone asking to see the photos, and me looking to to see if they were here after telling her how to find them, I would never have realized that I forgot. How terrible is that? I really thought I had posted this card kit for you all. Since some of you need these photos, I am posting it even though the kit is sold out.

This card kit uses BoBunny's 'Winter Playground' paper collection and there are 8 cards in this kit. (I believe these have all sold out now)


BOBUNNY CHRISTMAS/WINTER CARD KIT

These fun cards feature children playing in the snow. Not only do these make fun Christmas cards, but can be used to create some fun Winter Birthday cards too! The sentiments will not be stamped and heat embossed for you allowing you to choose your own sentiments for whatever occasion you want to use the cards for.

After spending a little time fussy cutting, these cards assemble quickly. You are of course free to add to or rearrange the design of the cards to meet your creativity. The kit includes instructions, adhesive foam snowflakes, a list of is included in the kit, along with product, supplies, and tools needed/used to create these cards.

KIT COST: $30 + GST
Available Tuesday, September 25th at the studio after 5:30pm (SOLD OUT)

For those making these cards from the kits, and those of you that have this paper collection stil, here is a closer look at the 8 cards.


Hope you enjoy making these cards! Or are inspired from these for ideas in creating your own cards.

Happy creating!


Stamperia Fantasy - Unicorn & Roses Shabby Chic Card Class


Stamperia makes some of the most gorgeous papers! I do not get to use them very often, and was excited to get the chance to create another Shabby Chic class using some of this beautiful Fantasy paper. I know many of Scrapbook Essentials BC customers will love it too.

So here are the two cards we will be making in class.


STAMPERIA FANTASY UNICORN & ROSES SHABBY CHIC CARD CLASS


WHEN: Wednesday, November 28th
TIME: 6:00pm - 8:00pm (willing to have an afternoon class that day from 2:00pm to 4:00pm if needed)
COST: $27 + GST

RSVP: Stacey at 778-533-4290 OR sbebc2011@gmail.com

This gorgeous paper lends itself to Winter with the snowflakes and can work as wonderful Winter birthday cards, or what ever you wish. In this class we will not use a paper distresser but learn to give a cleaner Shabby Chic look by using our fingers. We will also learn to use brush blender (Tim Holtz or NUVO) to add colour to lace, etc. For these cards there is very little fussy cutting, so we will do that in class this time. So no homework! We will also be discussing liquid glue and how to avoid that dried glue shine where the glue comes out from behind or from our fingers when accidentally touch somewhere we shouldn't have. Find out in class.

PLEASE BRING TO CLASS: fussy cutting scissors, regular scissors, nonstick craft mat, double sided adhesive tape, liquid glue, tweezers or paper piercer, blending brushes (not foam blenders) either from Tim Holtz or NUVO, wipes for your fingers, a piece of paper towel, white foam pop ups or tape, and the following ink pads - Distress Tattered Rose, & Iced Spruce.


Shabby Chic cards seem to speak to our femininity. Not all women are drawn to to this genre, but it sure is popular at Scrapbook Esstentials BC for the past year.

Let's have a closer look at the cards we will be making in this class. If you are taking the class you may print these photos to bring to class if you feel it will help.

Which girl, or woman, does not like the fantasy of unicorns?


A closer look at the top part...


...the bottom part...


...and the side view.


And what woman does not have a soft spot for roses?


The top part of this card...


...and the bottom part of this card...


...and the side view of this card.


Did you notice the coloured lace? I have a tip to share with you in class.

Happy creating!


Very Merry

I'm particularly pleased with how this card turned out.


The wooden snowflake embellishment was given to me by Stefanie. I sprayed it with a bit of her white Heidi Swapp Color Shine spray (not very evident - I had difficulty with application for some reason). I added a Tinier Tag (PTI Stamp-a-fair 2015 kit) with a sentiment from the Tiny Tags stamp set. The tiny holly image is from the PTI Make It Market Kit All Through the House. I threaded the tag with red and white baker's twine and added a teeny bell.

I affixed the snowflake embellishment on a kraft die cut Snowflake Medallion (from MFT) that I spritzed with Mister Huey's Opaque White spray.


{Supplies--all Papertrey Ink unless noted}
  • Cardstock: Dark Chocolate, Kraft, Stamper's Select White
  • Patterned Paper: Dark Chocolate Bitty Dots
  • Stamps: All Through the House, Tiny Tags
  • Ink: Dark Chocolate, Pinefeather, Pure Poppy
  • Dies: Tinier Tags, Snowflake Medallion (MFT)
  • Accessories: wooden snowflake (unknown), red & white baker's twine, mini bell (dollar store?)
  • Other Tools: Mister Huey's Opaque White spray (Studio Calico), white Color Shine (Heidi Swapp)

Birch Trees

I love CAS cards so Christmas card #3 is one of my favorites:


I got the strip of patterned paper from Stefanie's scraps. I just love birch trees!

The bird stamps are from the In the Meadow stamp set from PTI, and the sentiment is from Stocking Prints (also PTI).


{Supplies--all Papertrey Ink unless noted}
  • Cardstock: Stamper's Select White
  • Patterned Paper: unknown
  • Stamps: In the Meadow, Stocking Prints
  • Ink: Dark Chocolate, Pure Poppy
  • Accessories: rhinestone (Imaginisce)
  • Other Tools: iRock (Imaginisce)

Christmas Comeback

After many years apart (papercrafting-wise), my friend (and former blog contributor), Stefanie, and I got together yesterday evening to make Christmas cards! As usual, Stefanie produced an astonishing number of cards in comparison to my paltry few (15 to 4, to be exact). Out of fairness to myself, I did also attach tags to some gifts, and there was a fair bit of orienting to craft tools and their location. ;)  We started crafting at about 9 p.m. and finished just before 3 a.m.!!

My first card of the evening is probably my favorite:


I tried achieving the background by inking a sheet of acetate with Tim Holtz Peeled Paint Distress Ink, spritzing some water, and then inking my stamp on the acetate, but the result was a bit sparse. I just inked my stamp directly and stamped right over top--problem solved.

I'll be posting the remaining cards over the next few days.

It was such a joy to be crafting with someone again. :)  The best part is that Stefanie really enjoyed getting back into card-making! She's coming back over today for more. :D


{Supplies--all Papertrey Ink unless noted}

Pine Bough Christmas Card

This Christmas card uses a unique die set available from Stampin' Up (see here for complete supply list):


Pulling on the left side of the card "opens" the card and flips the centre panel to the back side:


I will most likely write my personal Christmas note on the back. :)


All supplies used for this card can be found here.

Christmas Cards Starting in July

I recently had the opportunity to visit my mom in Victoria, BC. We attended an all day crop at which I finally got around to making some cards!

Me and Mom
 Using my mom's Stampin' Up supplies (see here for a list), I started with the following Christmas card:


I really like the sentiment I used on the interior (you'll see it a few more times!):


It was fun to craft again!!
Thanks for peeking!


All supplies used for this card can be found here.

Tinsel and Tags Cards

It's that time of year where I am scrambling to get Christmas cards done in time.

Since I am dropping off some gifts at my former workplace tomorrow, I whipped up a couple of Christmas cards tonight using the dies from the latest PTI Make It Market kit: Tinsel & Tags. Quick, they were not, but it was fun to do some simple layering!

**I apologize for the picture quality--our camera doesn't work so I had to use my phone!


{Supplies--all Papertrey Ink unless noted}
  • Cardstock: Stamper's Select White
  • Patterned Paper: Tinsel & Tags
  • Stamps: Tinsel & Tags
  • Ink: Versamark (Tsukineko), Pure Poppy, Berry Sorbet
  • Dies: Tinsel & Tags
  • Other Tools: sewing machine/thread, Kaleidoscope embossing powder (Stampendous), Y21 Copic - Buttercup Yellow

The Last Christmas Card

This is probably the last Christmas card that this blog will see for awhile. A friend of mine is particular about receiving handmade cards. ;)


 I used a dark, shimmery card base and linen vellum snow drifts as the back drop for this cute little Lawn Fawn snowman. Some Copic coloring and white heat embossing and voila! A satisfied friend. :)


{Supplies--all Papertrey Ink unless noted}
  • Cardstock: Night Sky shimmer, Stamper's Select White, Pure Poppy, Linen Vellum
  • Stamps: Making Frosty Friends (Lawn Fawn), heart - A Little Birdie Told Me (Lawn Fawn)
  • Ink: Memento Tuxedo Black and Versamark (Tsukineko)
  • Dies: In The Meadow, heart - A Little Birdie Told Me (Lawn Fawn)
  • Other Tools: Glossy Accents and Black Enamel Accents (Ranger), assorted Copics, white embossing powder (Filigree)

PTI 6th Anniversary: Day 4

As an owner of all the Year of Flowers stamps, I'm thrilled to see dies come out for each of them!

I started this project in anticipation of a visit from a friend not seen in years. I only had time to stamp it all and then color only one calendar page since. Today's contest could not have come at a better time!  ;)


There is Clear Star gel pen on the poinsettia centers which really makes the whole piece memorable.  :)

Thanks for peeking!


{Supplies--all Papertrey Ink unless noted}
  • Cardstock: Stamper's Select White
  • Stamps: Year of Flowers: Poinsettia, Calendar Basics
  • Ink: Memento Tuxedo Black (Tsukineko)
  • Dies: Calendar Page
  • Other Tools: 2013 mini-calendar page(s), Copics, Clear Star gel pen (Sakura)

Carta Bella WInter Fun II Layouts

I hope that everyone had a very Merry Christmas! I missed my children and grandchildren, but had a  wonderful time with my parents. Now it's back to work and planning for the months ahead.

A while back I posted what Scrapbook Parade calls a "Double Double Layout Class" project using Carta Bella's Winter Fun paper collection. Here is the second Dbl Dbl LO posting for a class to be held at the end of January. I've had this in my drafts for a while and almost forgot to post it!


I love the corduroy covered brads from UpsyDaisy (no longer in business) whose colours just happen to match Winter Fun colours!


The center piece was punched using We R Memories Lucky 8 Punch and then ink distressed with Tim Holtz Pumice Stone ink. I drew the journaling lines on with a black journaling micro pen and a ruler. I love how the tied floss around the photos turned out.


I used some letter rub-ons (from UsyDaisy now retired) for the title of this LO.

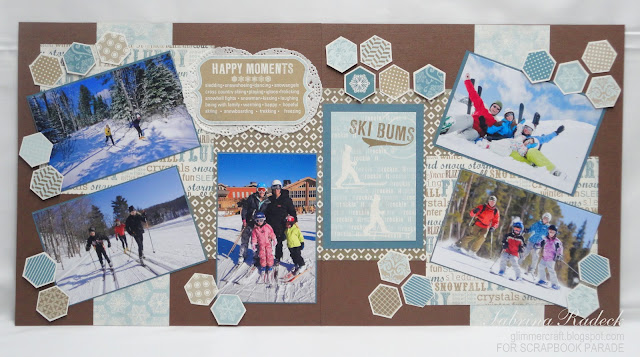
Here is the second LO.


I had a lot of fun working with all the hexagon pieces I cut out. I played with their arrangement on the LO for a bit. Some are popped up with dimensionals while others aren't. But, wherever there is a photo tucked in under, none are glued down there allowing enough space to tuck the photo in underneath the piece.


Well, thank you for stopping by to check out these Double Double layouts. Hope you are inspired to put together some of your winter fun photos from this year, or years past. I just have to say one more time that I just love the colours of this paper collection. Don't you?

For those of you taking the class at Scrapbook Parade here in Victoria, the things to bring to class list is at the very end of this post.


This is what you will need for class:

-Paper trimmer (make sure your blade is sharp)
-scissors
-a pair of old scissors to protect your good ones
-pencil & eraser
-ruler
-quick dry glue
-pop dots
-repositional tape/removable tape
-1/4″ double side tape and any other double side adhesive
-TH Pumice Stone ink
-ink blending tool
-a rub-on tool or popcicle stick