Showing posts with label theme - religious. Show all posts

Silent Night

Delayed Post

For my grandparents, I wanted to create a more religiously-themed card.


Stefanie got a steal-of-a-deal on these kraft cards from Michaels and gave me one to experiment with. I die cut masks and then sprayed the card with Mister Huey's Opaque White.

The lace came with adhesive already applied, somewhat crookedly.

The sentiment was stamped on a die cut from the Fabulous Frames collection.


{Supplies--all Papertrey Ink unless noted}
  • Cardstock: factory-made kraft card base, Vintage Cream
  • Stamps: Star of Wonder
  • Ink: Dark Chocolate
  • Dies: Fabulous Frames, Nativity Silhouettes
  • Accessories: adhesive lace (Hero Arts)
  • Other Tools: Mister Huey's Opaque White spray (Studio Calico)

January Visiting Teaching Handout

Some of our followers are LDS and love to see the handouts I make for church classes or for Visiting Teaching, so on occasion I like to post them.

This month I used Graphic 45's large tags and turned them upside down, die cut a circle out at the new top and changed it to a door hanger. On the right you can see what the tag looks like before doing anything to it.

I used Tim Holtz Vintage Photo around the edges of the tags and just about everything else.

So this was the end result.


 A little closer look...


 I used My Favorite Things Upsy-Daisy Die-Namics for the daisy and Spellbinder's Foliage for the leaves, and Spellbinders Petite Ovals to cut the photo and it's mat. I printed onto Bazzill cardstock the quote from a favorite hymn that was part of the VT message and cut them out like a banner.


 I attached the leaves and daisy to each one.


And from the back, you can see the eyelet hole of the tag and how I attached the ribbon and string.


So there you have the Visiting Teaching message handout, a door knob hanger, made from Graphic 45's Large Tags. Each woman that received one enjoyed her little handout. One even plans on taking it with her to Jamaica as she and her husband are to serve a mission there for 18 months. I was touched that she would do that.

Of course you can make this door knob hanger with other themes and purposes than I did here. Have fun coming up with your take on this idea!

Thank you for stopping by today, and happy papercrafting!


Relief Society Bulletin Board

I've been meaning to post this for days now, but have been very busy. Still am, and should be doing something else right now, but will make this short.

The church I am a member of has a women's organization called "Relief Society". The Relief Society president of my Ward (congregation) asked if I would decorate the large bulletin board outside the Relief Society room with the theme of "Strengthening Home and Family". So using the Upsy Daisy collection 'Home Sweet Home', and my 'Heritage' cartridge on my Cricut, this is the board.


The little houses you see all over were fussy cut out from the leftover paper used to mat the printed quotes and popped up on the board. Yes, I can't go without popping things up, even on a bulletin board. The section on the right is for posting announcements, etc.

Here are closeups of the three corners.


Thank you for stopping by. Happy papercrafting, and see you on Sunday for the next Christmas Card Challenge.


January Visiting Teaching Gift

-Every month Gail and I go Visiting Teaching to three women assigned to us in our congregation. We visit with them, check to see how they are doing and if they need any help, and also leave them with a message. When I have time I like to make them something to remind them about the message we discussed at our visit.

Seldom do Gail and I have the chance to complete our Visiting Teaching early in the month like we wish we could do because of everyone's schedules. For that reason I knew the chances of seeing them in February before the 14th would be slim, so I tried to base this month's message in that of love so that I could 'Valentize' the gift we would leave them.

Here it is.


I wish the Dollar store still carried these 8 x 8 frames (4 x 4 window). I got them a year ago when I purchased a bunch of them for a class, and bought a few for myself. Now I wish I had bought a few more. It would be fun to custom make one for each of my seven grandchildren with their initials! I just have to come up with something a little different.

Thank you for having a peek. Happy crafting!


April Visiting Teaching Handout - Works


Just a quick post today. I've been so busy planning and preparing for several new classes that I haven't had a chance to create anything for a challenge, but I do have a handout that I made for the ladies that Gail and I visit. The theme was that our works of service are an offering to Jesus as that is how he lived His life. Hence the word 'Works' on the front of the panels.

The 3 in the back are folded closed, and the one in front is open and standing
Here is the back view with the 1/2 envelope pockets and tags.


I did something like this when living in Calgary, on the theme of Faith. Click here to compare. I didn't make the box this time around since I was a little too busy to do so.

Thank you for stopping by today, and happy crafting!


February VT Handout - Guarding the Hearth Tin Box Booklet


I forgot to post this earlier in the month!

It's time for another Visiting Teaching handout. These are made from tins that I just had to keep because I knew I could use them for something. You'll never guess where they came from. About three years ago my migraines were getting bad and the usual over the counter meds where no longer helping. The Dr put me on meds that came these adorable little tins that measure 2 5/8" X 3 1/2" X 1/2".

Of course February being the month of Valentines, the booklet boxes are in red and white with a blue accent and some hearts. Here they are!


Now, in case you're wondering about all those tiny little flowers...I didn't cut them for this project. I save them from my punches and Spellbinder pieces that are not part of the piece created. The tiny ones like these I keep in small ziplocs, and each shape has it's on bag.

Well, this was a fun little project to make and was well received. I think I should have taken photos with each step in the production, then you'd be able to see how I did it. I get so much into making my projects that I don't think about doing it. I'll have to try harder.

Thank you for stopping by and checking us out. Be sure to stop by Thursday for the Colour Create Challenge #91 and see what colours Mina chose for the next challenge. Oh, and check out the March prize, too.

Happy crafting!


Visiting Teaching January 2012 Clipboard

Just a quick post for today.

I purchased a few small clipboards a while back at a $1 store. I also had downloaded some mini-calendars a couple of weeks ago and knew they would work well for this project. I made a card for each month with a few questions to keep in mind when going out to Visit Teach, contact info to fill in, and a mini-calendar. The back of the card is white for further information to be written down for each month, if needed.

I took this photo of the clipboard before, but forgot to take an after photo of a completely refabbed/repurposed clipboard. Oh well.

Here are all of the cards. I tried to find colours and patterns that would work well for that particular month. Because I was making six of these, I kept it pretty simple, with no embellishments.


Here are the assembled Clipboards.


So there you have it. All text was printed off of my computer generated files. Nothing fancy, but a fun project none the less.

Thank you so much for stopping by and leaving your comment. Happy crafting everyone!!


First RS Handout of 2012

Living what we believe -  All walks of life have trouble at times living what we truly believe. Since the outlined lesson refers to someone who wrote a personal creed to live by, I thought that it would be nice to make something that the ladies in class could write their own personal creed on and be able to display it somewhere discretely as a personal reminder. What though?

I had been given a couple of packages of light blue cardstock from a business that no longer wanted them and thought that I might be able to use it for this project. But what to make? I then came up with the idea of a sleeve frame! That's what I'm calling it anyway. So, starting at the beginning of last week, I began the preparations to make 55 of them. I knew this project would take time, and I'm glad I had the time at the end of each day for the last week to work on it. And here they are.


I tried to make a few different looks with varying the embellishments I chose - about 5 different styles/looks. I was able to use up a lot of my $1 store embellishments that I purchased between1 and 2 years ago. I ended up using them for something other than what I had originally bought them for, but I can always come up with something when I need it.

Each one is free standing sleeve frame and measures 7"W including the tag, but not the ribbon, by 4 1/2" H. The person can gently trace the outline of the Labels Fourteen frame and write their personal creed that they come up with. Or, they can put a picture of their choice in that spot and write their creed on the back of the giant tag to keep it more personal. They will be reminded of their creed when they look at it. Should they desire to read it again, they can pull out the tag.


Yes, I used a gold metallic gel pen, tracing the Spellbinders die on all 55  - while watching TV  ;)


With the piece I die cut out of the sleeve, I scored and attached to the back as a stand for the frame sleeve as seen next. For the giant tag, I used Spellbinders Labels Six on the ribbon end.


Oh, the "My personal Creed" banners I had figured out the size beforehand, and typed and placed them accordingly, printing them onto PTI Kraft cardstock. I cut those out using my paper slicer - while watching TV  ;) and snipped each end.

So there you have it - 55 sleeve frames.

Now if I was making my own, I would have made it a little differently, and embellished it differently. I wonder should I make one, and show it to you?

Thank you so much for checking in today. We love to have you stop by. Wishing you all a good week with some great crafting time!


TOOLS & MATERIALS

SPELLBINDERS: Labels Fourteen, Labels Six
EMBELLISHMENTS: $1 Store -  stickers, dimensional cardboard embellishments, dimensional laser cut paper & my own computer created banners
PTI Kraft cardstock
Gold Metallic Gel Pen
Ribbon Punch
Ribbon
ScorPal

Variation & Revamp of a Previous Notebook

Last week I took a $1 Store notebook and refurbished it. Then someone who had heard about it from the person I had made it for and not even having seen it, asked me to make one for her! What do you think about that?  What a surprise that was for me. (View original posting here)

In contemplation, wanting to improve on what I had made last week, I decided that I would create a variation of the notebook. I wanted to see if I could hide the large spiral binding in some way.

What was real fun was working out al the details in my mind to be sure that I wouldn't have to scrap any trial runs. I had to think about the best way to put two pieces of cardstock together to create a binding cover for the spiral binding of the notebook. I must have thought of every detail for the assembly and the opening & closing of it, because it worked the very first time! It's always rewarding when something like that happens and works out so well.

And, this is the variation on the original one that I created last week. And my appologies for some of the photos not being as clear as would be nice, but it's late and I want to go to bed. I have a busy day in the morining.


Here it is open so that you can see the front and back cover, as well as the spiral binding cover I made.


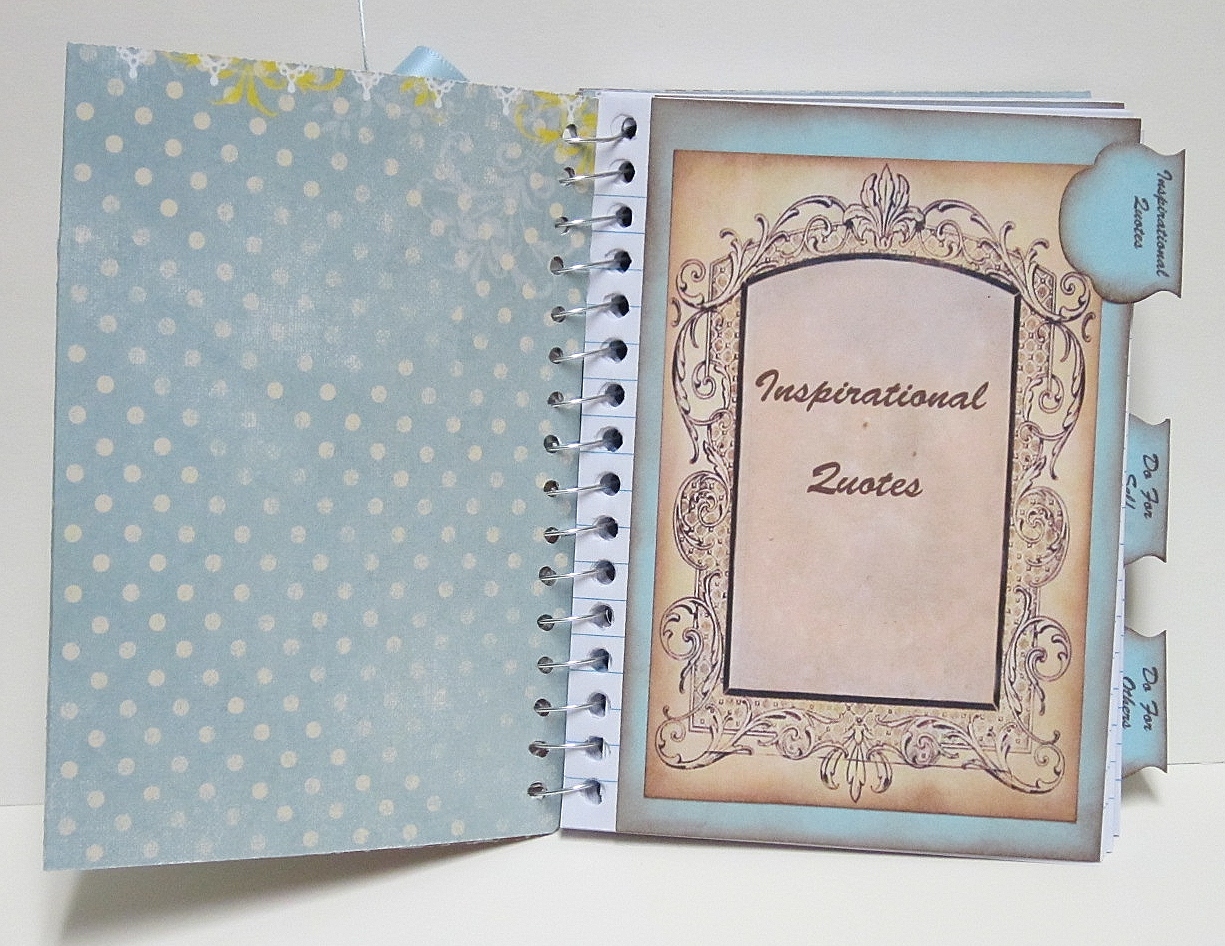
And here are the three dividers for each section of the book.


You can see that this time I extended the cardstock paper of the divider pages right out into the perferation for the spiral binding. Not only will it be sturdier this way, but it looks better too. I also reprinted the divider pages with spelling corrections and a slight change of wording.

So now I just have to hope that, sight unseen when requesting a notebook, this person will be happy with it.

Well, there you have it. Thank you for taking the time out of your busy schedule these days, and coming for a visit.


RS Lesson Christmas Ornament

Today, being the second Sunday of the month, it was my Sunday to teach the lesson. Being December and Christmas, I decided to incorporate the lesson message on a Christmas Tree ornament...55 of them actually. They were a hit, and the lesson went well. Here they are.


And  closeup -


These were, of course, not too detailed with 55 to make and were easy to make in an assembly line manner. More like a tag to hang on the tree.

Thank you for stopping by and taking a look. Can you believe it? Only two weeks left!


TOOLS & MATERIALS

Spellbinders Labels Thirteen
Gold Gel Pen
Martha Stewart Cedar Branch Punch
Gold Bells from the $1 Store
Gold 1/4" Ribbon

December Visiting Teaching Handout - My Divine Mandate

This is what I started with


 In trying to come up with a Visiting Teaching handout that I could put together quickly I was searchig my shelves. I only have two to make since we only have two ladies to visit. In scanning my shelves, I came across a small pile of notebooks purchased from a $1 store.

That's when the notebook idea came to me. I even knew what paper I wanted to use. I love Websters' papers and wanted to use some for this project.  And it came to me that I could use for the first time a prize I recently won from a challenge. Some digi prints!

The lesson being about the sphere of action in women's mandate to help others (since it's our nature to do so), I divided the notebook into three sections; Inspirational Quotes-to help us keep on track, What Can I Do For Myself-a section to take notes on helping oneself be the best they can be, and What Can I Do For Others-a section to write about what we can do for others to help them be their best. So here are the photos of the notebook.


So there you have it. Not too fancy, as I could have done a lot more to it, but good enough for a quick put-together. I would have liked to have had the time to do a better, more solid job, on the section dividers - to have the blue cardstock go all the way to the edge of the hole punched side like I did on the covers. It just takes too much time when you have to punch each hole seperatey and then cut with scissors into each hole so that it can wrap around each spiral.

Thank you for stopping by today in your busy schedule. All the best and happy days!

Oh my goodness! After posting, I noticed I spelled 'divine' incorrectly on the cover and didn't catch it! I'll see if I can hide my typo somehow and appologize to the receivers. I guess I was in too much of a hurry. I really don't like it when I make these kinds of mistakes!