Christmas In July Shabby Chic Card Kit


Hello!

Not only do we get to celebrate Canada Day in July, but July is also a traditional month to start getting those Christmas cards made. With our busy schedules, and if you give out a lot of cards, July is the month to start!

So in that tradition Scrapbook Parade is putting out their first Christmas card kit of the year! This kit is made using the beautiful 'Joyous Winterdays' by Maja Design from the 6 x 6 pad/format; and it is in the popular Shabby Chic style! (At least in Victoria it is.)

Here are the 6 cards in the kit. AND there is a bonus of 6 accompanying folded gift tags too!


For this kit you will need the following:

  • Mixed Media or Artist Paste 
  • 2 different patterns of stencils: 1 large flourish like pattern, 1 small dots like pattern. If you don't have these patterns it doesn't really matter. You need a very small pattern and a very large pattern that can be Christmas like if you wish or florals.
  • Paper distresser
  • cup of water & paint brush
  • Craft Smart Glitter Paint (Dollarama or Michael's) OR NUVO Glimmer Paste in Moonstone (I prefer the first for this kit)
  • Acrylic white paint
  • White with Sliver Glitter Embossing Powder
  • Liquid glue
  • Double sided adhesive tape
  • paper plate or cup to mix media into
  • smoky blue ink refill or acrylic paint
  • Paper trimmer
  • scissors
  • pop ups or foam tape
This is what Scrapbook Parade posted earlier.

"Joyous Winterdays" Christmas in July Card Kit #1 with Maja Designs from Sweden 

You will make 6 cards and 6 tags with this kit.

There is over $35 in product included as well as full colour instructions printed for you.
Kit Cost: $45.00

Note: There are no envelopes included because the cards are so thick. Sabrina will be making tutorials on her blog how to make square card boxes for thick Shabby Chic cards. One using the scoreboard, and the other using the envelope punch board. This way you can make them on your own if you wanted

This is the list of "other" products Sabrina sent me that you will need to have in order to complete these cards - she has also done videos that will be available for you to watch for the various techniques she used. A ton went into designing these cards - that's what shabby chic is, layers and dimension!


As mentioned by Carol, the kit will include colour written instructions as well as a video that you can view from this blog. There will also be a tutorial on how to make square box envelopes for these and other such cards we will make in the future. It will posted on the blog post where I share additional photos for those that have purchased the kit and need larger photos to follow along.


HAPPY CREATING!


Coming Soon! Square Card Box Envelopes 2 Ways!


Hello & Welcome Back!


Today I am making a tutorial announcement! In a couple of days I will be posting another kit for Scrapbook Parade; a Christmas in July kit using 'Joyous Winterdays' from Maja Design. These cards are all bulky, square, Shabby Chic cards, that do not fit into a standard envelope, so I thought a tutorial on what you can make as a square box envelope would be in order. I will be showing you how to do this two different ways. One using the Envelope Punch Board, and one using the Scoreboard.

I hope to have the tutorial ready for you some time within the first 2 weeks of July. So be sure to
check in every so often, or enter your mail on the right (Subscribe to Our Posts Via Email) to be notified with every post made. Thanks for popping by today, and see you again next time.


HAPPY CREATING!


Denim & Girls (Maja Design) Card Kit - Detail Photos


This post is for those that purchased a kit and need to see more photos, or larger photos, than the ones that are on your instruction sheets for the Maja Design "Denim & Girls" kit of 10 cards.

I really enjoyed making these cards for you, and thank you for purchasing a kit. I hope that you will enjoy making them too.

If you haven't purchased a kit, but wish to, you can contact Carol at Scrapbook Parade.

So here are all the photos. Each set of photos for each card will be numbered as they are on your instructions.


CARD #1


Side view to show you what has been popped up.


CARD # 2

What's been popped up...


CARD #3


Check out the layering from the side.


CARD #4


On this card I made a bit of a mistake. The plane was to trim off an 1/8" off of the straight edges of the cuts I made, but forgot until I attached 2 pieces of the doilies and compared it to my sketch. I then realized that I had accidentally forgotten that step. SO YOU CAN CHOOSE. Do as I did, or as I intended to do.

Side view.


CARD #5

If you notice the inner green dotted frame, you will see that I messed up again! I did not follow my own plans in cutting this frame as indicated in your instructions and had to put pieces together. Yours will look a lot nicer and than this pieced frame.

Check out the layering on this card.


CARD #6


Now this card may look incomplete. That's because it is. I had inked and matted the Cut-A-Part for this card, but when assembling all the pieces I could not find it anywhere! And believe me, I looked everywhere two or three times. My only hope is that it did not fall into the garbage, because part way through making this card I took the garbage out as it was very full, and the next day was garbage day.

There is a sweet little Cut-A-Part for this card of a soft yellow skateboard being held by a woman in a pink top and jeans. This is to be placed on, and then attach the bow and flowers.

Layering on the card.


In the above photo, if you notice that the first layer is popped up less that the top, second layer, that is because I ran out of my favourite foam tape, and had to switch to another one which turned out to be thicker.

CARD #7


Here are the layers for this card.


You will see that I forgot to put a few drops of glue on the braided ribbon on the front, to keep it from lifting up as you see here. Once I get the card back, I can fix it then.

CARD #8


CARD #9


I love how this one turned out. It looked better than the one I imagined!

Here is the side view for the layering.


Last card, #10.


Do you notice a mistake on this card? Every time I played with the positioning, I did it right. But when I actually attached the tiny blue heart frame, it ended up sideways!

No matter how many years you work in in cardmaking, there are time when you mess up, and I did that a lot with these cards. I still love them and think they are beautiful cards though.

This is the only card that I stamped a sentiment onto. That is because it had to be stamped on a piece that is part of the card. The other cards can have sentiments stamped onto cream cardstock and attached on the cards later.

Here is the side view of this card.


I hope that these photos have helped you in putting your kit cards together.

Just FYI, the next kit will be a Christmas in July Kit! So keep a look out for it.

Happy papercrafting!


Three Birthday Cards, Three People, For The Same Day


Hello Everyone!

Did you expect me to post again so quickly after yesterday's post? Well after I completed those cards for the 'Denim & Girls' card kit yesterday, I immediately set out to make three birthday cards for three different people that have their birthday on the same day! These people are my Dad, who is turning 87, and my two younger sisters, who are twins and turning 60! I had to get them done on time so that my sister that lives an hour away could also write in and sign the cards for the other two birthdays in time to send them off in the mail. As a matter of fact, she is the one that commissioned me to make the cards. I also had to make one for me to give to her too. So let's have a look.

Here are three cards all together.


The first card you see here should look a little familiar to some of you if you have been following my posts for about three years. I posted it here when I was teaching at Scrapbook Essentials BC after being chosen to be a Spellbinders Educator. This was a card that I hung on to for a long time because it was a favourite of mine. This is the card that I decided would suite the younger of my twin sisters.

 I just added the stamped 'Birthday Greetings' and the large '60'.


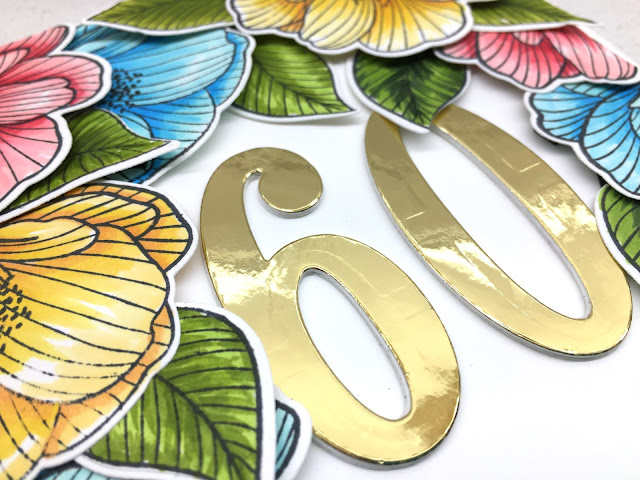
This next photo shows the '60' closer.


Hopefully you can see the four layers of light pink cardstock under the gold foil layer. I love this technique the Jennifer McGuire shows many times on her video tutorials.

Next in the first photo is a masculine looking card that I made for my Dad.


This card is comprised of Stampin' Up! stamps from when I was a demonstrator a few years back. (If you haven't seen my Stampin' Up! blog here is a link for some further inspiration for you.) I tried to make this an elegant masculine card.


You can see the layers above. You know me and layers; I love them!


I think my Dad is going to really like this card! I forgot to take photos of the inside, because I did some gold embossing on the inside too.

Now come the last card for my other twin sister, the oder of the two by 2 1/2 minutes. This one uses Altenew's "Cherished Memories" stamps and dies. I also used their alcohol markers to colour the flowers and leaves.

 The 'Happy Birthday' stamp is from Stampin' Up! however. If you look closely you can see that all the flowers around the edge are glued down to the edge of the cardstock piece, and them popped up toward the center of the the piece. I love how it turned out!


I used the same technique with the '60' again, except I used layers of white cardstock for this card.


I think I will do more alcohol marker colouring again. I forgot how much fun it is, and I'm a little out of practise.


Well, that's it for these three birthday cards. Hope you enjoyed seeing them and that they have inspired your creativity too.

Happy creativity!


Denim & Girls (Maja Design) Card Kit


Hello Everyone!

How are things going for you? This Covid thing really has changed things up. Some places are beginning to open up again, and it will be nice to gather in larger groups again when it happens.

I'm here today to share with you another card kit for Scrapbook Parade. This kit has 10 cards! And, this is the first time I have worked with Maja Design paper! I have always liked their papers and have wanted to work with it. These 10 cards are made using the "Denim & Girls" collection in the 6 x 6 paper pad size. I do not like 6 x 6 cards, but 5 1/2 x 5 1/2 looks much better to me. so my square cards are usually 5 1/2 x 5 1/2. So take a look at the cards.


This is what Scrapbook Parade posted for this kit.


WOO HOO!
Here is the first Maja Kit Sabrina created using the Denim & Girls Collection. You get everything you need to create 10 cards with full color instructions and envelopes. These cards are loaded with Lasercuts, Lace, Metal Embellishments, Ribbon, Flowers and more... Limited Quantities.
NOTE: Ladies on the pre-order list get first dibs and I will be sending you an e-mail with photos.
Kit Cost $42.00 total


As usual for these kits, I will post more detail photos for those that purchase a kit some time by end of Saturday, June 9th.

Thank you for stopping by to have a look, and for purchasing a kit, and Happy card making!


Till next time!