Showing posts with label seasons - fall. Show all posts

Still Playing With My Spellbinders Floral Oval Die Set


Hello Everyone!

I hope you week has gone well for you, and that you found some time to play and create. I have been playing around a bit with the Spellbinders Floral Oval die set. Remember my first card with this die set?

This time I created a landscape card and used fall colours and NUVO Mousse with that lovely metallic sheen and look. I am afraid that the metallic sheen does not always show up very well, but I will talk about that later. First let's have a look at the card. I used all the parts of the dies set for this card.


I do not know if you can tell in this next close up, but the 'brown' flowers are brushed with NUVO Mousse Cosmic Brown; the yellow flowers are brushed with NUVO Mousse Indian Gold, and the light orange flowers brushed with a little NUVO Mousse Fresh Copper. I did not have the Persian Red to try out on the more red flowers.


For the NUVO Crystal Drops, I used Metallic Copper Penny, Bottle Green, and Autumn Red.


As you can see I also brushed some Indian Gold NUVO Mousse on the leaf vines.


With the orange twine, I tied 2 bows and pinched each at the knot putting a mini-glue dot on the top and bottom of the knot and inserting it under the oval. By putting the two side by side you get a nice fuller look without having to worry about the thickness you would get from a ribbon bow.

I did create a second card, while playing with this die set, and I will show it to you another time. In the mean time...

Happy creating!


Check out the Floral Oval die set.


Altenew November Challenge


Welcome back!

It has been a long time since I have entered a challenge, and right now I have a little time to create something that is not for a class. Because I got some of my first Altenew stamp and die sets a couple of weeks ago, I searched for a challenge to enter and I stumbled across the Altenew November 2017 Inspiration Challenge; a colour challenge. You should go check out all their challenges! Great inspiration!

Since this is a newly discovered stamp company for me, I was excited to see that they also have challenges that you can participate in!


This is the inspiration image for the challenge.


I used the Bold Blossoms stamp and die set and the Super Script sentiment stamp set for this card.


I have to laugh a little at myself because I was so excited about getting the card made that I forgot to follow through with some of the ideas I had in mind for creating this entry!  I wanted to include some copper metallic thread and ink blend around the edges a little with one of the colours. Even though, I think this card could would look better with those ideas, it still looks real good for my first Altenew card.

The next couple of photos show side views so that you can better see the layering and construction of the card.


I do not know if I would have ever come up with the idea to use these colours for a rose, had it not been for this challenge. Thank You Altenew.

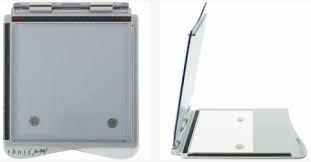
I also used my fairly new Tim Holtz Tonic Stamping Platform to make this card. It sure is much easier to "layer stamp" using this tool!


For those of you local followers, Scrapbook Essentials BC is planning on having classes in the new year using your choice of stamping tool (MISTI, Tonic Stamping Platform, or your new Stamping' Up Stamparatus), where we will start to introduce layer stamping and...Altenew stamp sets! So look for those classes in January if you want to really use your MISTI!

Thank you all for stopping by to have a look. Be sure to stop by tomorrow for another take on this card in Christmas colours!

Happy creating everyone!


Spellbinders Educator #7 Class - Fall Leaves


Hello everyone!

Some of you may be wondering why nothing much has been posted of late. Well there are a few reasons why. First, summer months usually are fewer posts due to people vacationing, etc. so we have fewer classes. Second, I am currently in the middle of a move, which does not give me much time to create classes and posts.

New Schedule of Classes

With my move, I will be living further from the Scrapbook Essentials BC Store & Studio. I have been teaching anywhere from 8 to 12 classes a month, and it has become too much for me. So I am taking a break with this move, and will be teaching only 3 to 4 classes per month for a while. Besides, driving from Sidney to Victoria means I need to cut down the number of classes anyway.

Now, on to the Spellbinders Educator #7 Class - Fall Leaves


October is a great time of the year for giving cards that use the beautiful Fall colours. Great for masculine cards too! Everyone will receive the Fall Leaves (S3-270) die set that includes words as well! And, we will be using the Floral Embossing Folder (SES-007) and creating a dual tone through an inking technique. Because it is easy to die-cut a bunch of leaves, we will have time to create three cards this time!

Please bring to class: die cutting machine, (if you have a Prizm, you might like to bring it as well), Tool 'n One, a medium to dark brown ink pad and ink blending tool, double-sided adhesive tape (Sookwang), mini-glue dots, black foam squares or tape, scissors, scotch tape, and liquid glue.

Date: Wednesday, October 25th
Time: 6:00 - 8:00
Cost: $45.00
RSVP: sbebc2011@gmail.com or 778-533-4290

ONLY 7 spots available!

Here is a closer look at each individual card.


Looking forward to seeing you all there! This is a great little die set!!

Happy creating!


Relief Society Bulletin Board

I've been meaning to post this for days now, but have been very busy. Still am, and should be doing something else right now, but will make this short.

The church I am a member of has a women's organization called "Relief Society". The Relief Society president of my Ward (congregation) asked if I would decorate the large bulletin board outside the Relief Society room with the theme of "Strengthening Home and Family". So using the Upsy Daisy collection 'Home Sweet Home', and my 'Heritage' cartridge on my Cricut, this is the board.


The little houses you see all over were fussy cut out from the leftover paper used to mat the printed quotes and popped up on the board. Yes, I can't go without popping things up, even on a bulletin board. The section on the right is for posting announcements, etc.

Here are closeups of the three corners.


Thank you for stopping by. Happy papercrafting, and see you on Sunday for the next Christmas Card Challenge.


Autumn & Thanksgiving - Spectrum Noir Fun Club October

I love the beautiful Autumn colours, and with now being able to use markers it makes it so much more fun to create Autumn and Thanksgiving cards!

So for October's Spectrum Noir Fun Club class we are doing just that. These are the two images we'll be colouring and making cards from.


For this class we will practise blending with different colours (yellow with greens, oranges and browns), colouring sentiment labels, and giving an ink distressed look using our markers rather than the favorite TH Ink Distress blending.

We use My Favorite Things Inspired by Autumn stamps for both of these cards, as well as JustRite Antique Autumn Tags One.


I also used Hot Chocolate Liquid Pearls on this card. Here is the card again from a couple of different angles.


The Spectrum Noir markers used for this card are : CT2, CT4, GB5, OR1, TN7, DG2, CG2, EB2, EB1, CG1& TN8, and of course a palette.
This next card has pumpkins - another favorite Fall image.


For this card I dry embossed the Capers green cardstock with Spellbinder's M-Bossabilities Flora.

The pumpkin stamp is a single one, so I masked to get three pumpkins. And I have to say that I like my first colouring of the pumpkins on my class practise sheet than I do the one ones on the card. Since that happens often, maybe I should colour my card image first and then the practise one.

You can see the edges of the pumpkin paper has been distress with the markers using EB2 and the Blender pen.

Here is the card again from a couple of different angles.


The markers used for this card are: CT2, CT4, GB5, OR1, TN7, CG2, DG2, DG4, CG10 EB2, EB1, CG1, TN8, CT1,  and the Blender pen and a palette.

Here is the practise sheet for my class.


It was great of you to stop in for a peek.

Happy colouring!


"School's Out" May Vintage Layout

-May Vintage layout class - school memories. Aren't my granchildren adorable?

This class is scheduled mid May, and school will soon be out. Using We R Memory Keepers "Hall Pass" collection for a vintage layout makes this an ideal time for a vintage style school layout.


I debated whether or not to put all the banner strips I fussy cut onto the layout, but I knew that my grandchildren in the photos would like it, so I did any way.

Every edge in this layout, including the photo, were ink distressed along the edges, with the exception of the banners. Faux stitching is on everything but the photos and banners, using a dark brown pen. I used a combination of Tin Holtz Distress Tea Dye, and Walnut Stain ink pads (I wanted to use Vintage Photo, but don't have that one) and Inkssentials ink blending tool.

All the photos are double and some even triple matted. That means extra work and added weight to the layout, but it sure looks good.

Here are photos of each 12 x 12 side of the layout and a close up.


I used Chestnut Liquid Pearls on the ribbon tabs. (I didn't want to bother with brads, lol)
 

So there you have it for this layout. Thank you for checking in for a peek.

Happy papercrafting!


Fall Thank You


I really wanted to try and capture multi-colored leaves. It didn't quite turn out the way I imagined but I'll play with it a bit more.  ;)

Using a Make It Monday technique from Erin Lincoln, I impressed the cardstock over the die. Turned out fabulously!! And I am completely in love with this Herringbone impression plate!!

Thanks for peeking!


{Supplies--all Papertrey Ink unless noted}
  • Cardstock: Rustic White
  • Stamps: Leaf Prints, Think Big Favorites #19
  • Ink: Memento Dandelion and Pear Tart (Tsukineko), Scarlet Jewel, Simply Chartreuse
  • Dies: Leaf Prints
  • Other Tools: Herringbone impression plate, scoreboard (Martha Stewart)

Home Sweet Home Thanksgiving Layouts

It's so fun planning all the classes through to December! With September full of classes I'm working on the October ones and have just about filled it with classes as well. You just saw the warm Autumn colours of the Home Sweet Home frame in an earlier posting, and today I'm showing you three double layouts using the same line of papers. 
This class is scheduled for October 3rd and I look forward to seeing some beginner scarpbookers! So here is what we'll be making in class.


And the second one-


Plus a couple of closeups -


I love the Tim Holtz Tattered Florals die for these flowers. Next, is the last layout followed by a couple of closeups as well.


Oh, and I still love the Spellbinders Foliage die for the leaves! I use it a lot! Works for both cardmaking and scrapbooking. In case you are wondering about photos, I decided to put them after I've taught the class.

Well that's it for today and I thank you for stopping by today to have a look. Be sure to check in tomorrow to find out who won our 3rd blog anniversary giveaway!

Happy Crafting everyone!


Home Sweet Home Frame - Scrapbook Parade Class


This was such a fun project to make. With the noticeable change in foliage colours these days, I was drawn to use like colours in paper for this project. Soon it's back to school, and not long after it will be Thanksgiving! (In Canada Thanksgiving is in October). This four photo frame is easily embellished with the paper.

Here are close ups from either side.


This class is scheduled for October for those of you that are followers at Scrapbook Parade here in Victoria. We'll be using three papers of the Upsy Daisy's Home Sweet Home collection.

Thank you for stopping by today, and happy crafting!