SBEBC Envelope Punch Board Class 'A'


PUNCH BOARD classes will soon be starting! And 1st up is the ENVELOPE PUNCH BOARD!


Do you have an Envelope Punch Board, but never get around to using it much? Or wonder how all those different projects can made using the Envelope Punch Board? Maybe you don't have an Envelope Punch Board, but always wanted to get one. Now is the chance to learn how to use it for basic envelope making, and a whole lot of other creative uses! This two part class (A & B) will get you comfortable using the Envelope Punch Board, and teach you just a few of the incredibly creative things that you can make using it. 

Class A will be more simple projects, keeping it to envelopes, envelope card boxes, cards, and bows! Wait till you see what we will be making in Class B!

$32.95 + tax per punch board (10% off all the punch boards when you commit to all 6 classes)

Envelope punch board class DATES:
A Class - Saturday, February 18th (class projects pictured)
B Class - Saturday, March 4th
Time: 2:00 - 4:30
Cost: $25 + GST for each class (6 total)
Where: 3730 Grange Road in the Studio
RSVP: sbebc2011@gmail.com or 778-533-4290

This is what you will need to bring to class with you: Paper trimmer, 12 x 12 score board (there will be one that someone can borrow if need be), scissors, 1/4" Sookwang/Scor tape, mini-glue dots, liquid glue, ruler & pencil, paper piercer & mat, a non-stick craft mat and your printed class instructions that will be emailed to you just before class. If you are purchasing your Envelope Punch Board, you will receive it at class. If you have your own, please be sure to bring it with you.

Future class dates are:

Gift Bag punch board:
A Class - Saturday, April 22nd
B Class - Saturday, May 27th

Gift Box punch board:
A Class - Saturday, June 10th
B Class - Saturday, June 17th

So let's have a closer look at what we will be making. It may look square in the photo due to the angle, but this is a standard A2 size envelope. How pretty envelopes can be when you make them from design paper collections!


This is the tiniest envelope that a person can make on the envelope punch board. But, the measurements to make it are not on the board!


This envelope is sized just right for a gift card!


...and is not sealed like a standard envelope.


This is a box envelope! For those cards that have a lot of layers or flowers on them.


There many options for this box envelope closure. You can use velcro, magnets, ribbon, or a belly band as we are here.


Now this box envelope is much thicker so it can hold a set of cards to give away, or for an even fuller, thicker card!


This box envelope had a tuck-in closure.

This next project may not look like much, but it is a combo card/envelope for a special purpose.

It holds cash! Just add white or cream cardstock on the upper flap to stamp a sentiment and write a little note.


Next we have something that looks like a mini-file. no, wait! It is it a card? Yes, it is a tabbed card. You cam write or stamp things onto the tabs and add other things, like a sentiment on the front. Great card for someone at the office...


Next you see...what exactly? Well I ran out of designer paper to attach to this project, but you can see what it would look like.

When you open it up, a gift card pops up! All that needs to be done is cut up and add the designer paper, embellish it a bit, and you have a fun kind of card to give that holds a surprise for the receiver.


I don't quite know why, but policy or coin envelopes have always been a favorite of mine. Perhaps it is the interactive part of winding that string around? I will show you how to construct one.


And lastly, we have some bows that we will be making in the envelope punch board. You can make a variety of sizes, and do different things to them to create for your projects.


So that kind of wraps it up as to what we will be learning in this class, but there's more in the part 'B' Class! Yup, there's more. In each class you will be getting step by step instructions for other Envelope Punch Board projects that we will not have time to create in class. But you can take it home and try them out there!

Hope to see you in class!


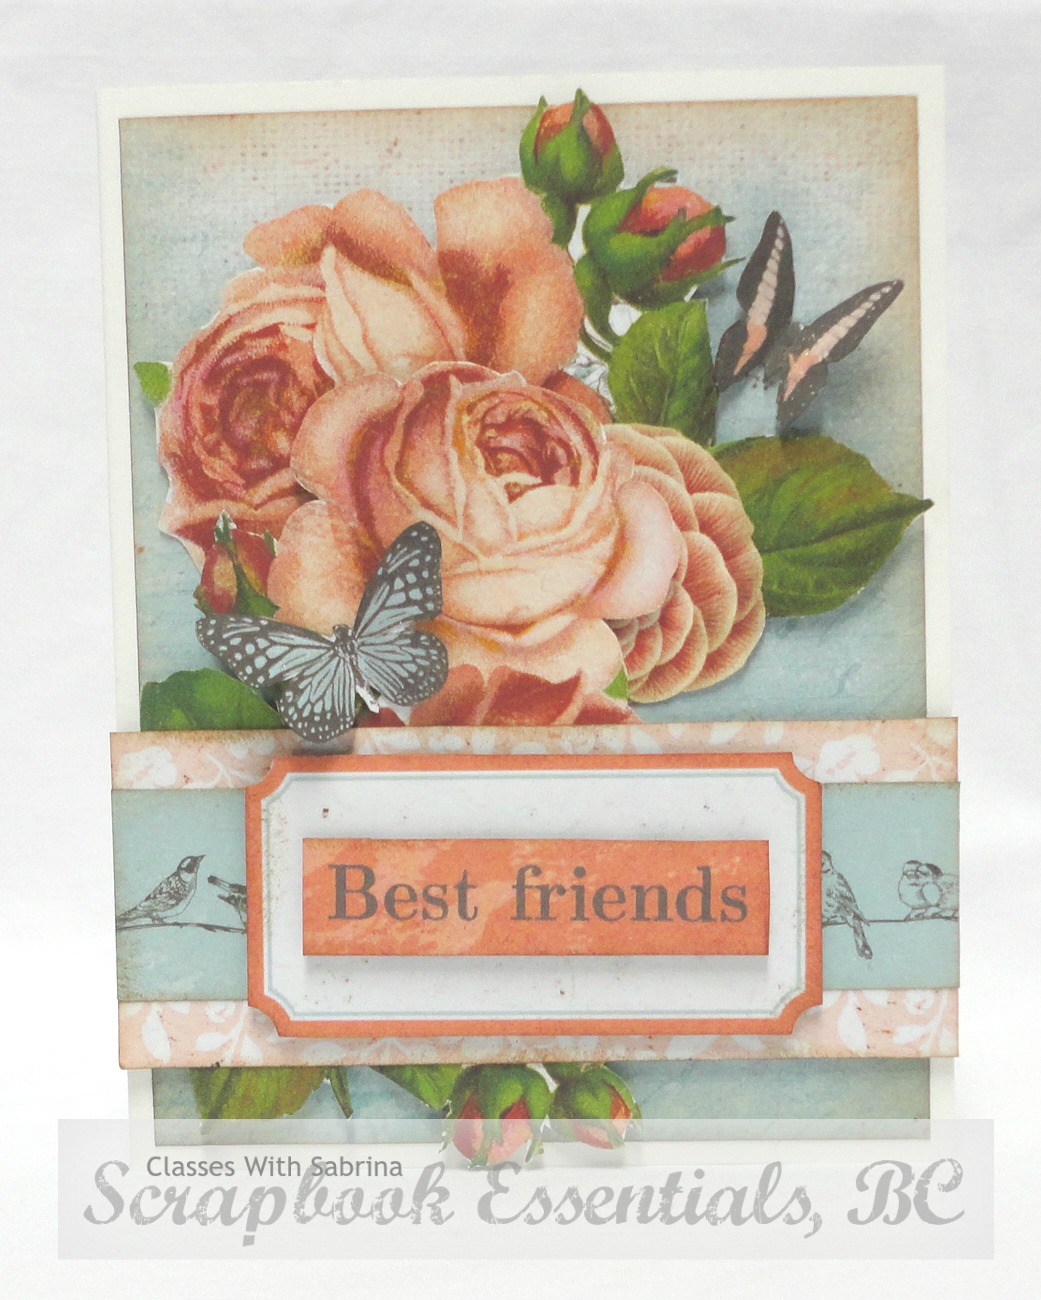
Kaisercraft "Ooh La La" Vintage Card 4


Today's project is the last card of four, for my Kaisercraft "Ooh La La" Vintage Card class. It has a simpler look to it, but fussy cutting is still very much a big part of this card. This one I find calming with the blue background, and anything from nature seems to have a calming effect, too.


This card also has a lot of popped up layers, as you can see in the photo below.


In this next image, I am trying to get the Clear Wink of Stella to glimmer in the photo. All of the butterflies in these four cards have been covered with it.


While making these cards, all with a 'Friend' theme, made me realize I need to send cards to my friends for other than birthdays and Christmas. Friends are always there with encouragement, an ear to listen to your complaints and sorrows, and any help you need. So, I really should be giving them way more cards! How about you and your friends?

I'm looking forward to teaching this class as it has been a while since I have taught a Vintage card class.

Happy creating everyone!


Kaisercraft "Ooh La La" Vintage Card 3


OK, today's card of the Vintage Kaisercraft "Ooh La La"series is the third one. For this one I fussy cut out some of the sketch-like images on the paper. The bird on the branch was a tiny challenge, but worth the effort.


Tearing and curling are always such fun to do for vintage. It's like be a naughty little girl do something that you shouldn't be doing. (lol)

If you click on the photo below, you should be able to a larger version of it. That way you can more easily see the details.


You can see the layering better in t his next photo.


This nearly colourless card, is actually quite intriguing in real life. It could be considered a monochromatic card.

Hope you are enjoying this series of cards! There is one more left to show you; a much simpler one that still has fussy cutting, however.

Happy creating!


Kaisercraft "Ooh La La" Vintage Card 2


It's time to show you the second card in of the Vintage Kaisercraft "Ooh La La"series. Yesterday's card was darker and lacy, while today's is lighter and much more feminine.

I took advantage of the window for this card, with some fussy cut flowers and butterflies.

Stamped a sentiment on one of the cut-a-part sheets, in keeping with the theme of 'friendship' of this collection and other cards of the class.

The side view below shows you that the fussy cut roses and sentiment tag are popped up.


I was trying to take a photo that would show the clear Wink of Stella glimmer on the butterflies. I think you can see just a hint of it below.


Such a lovely card. And for those of you wondering about how to give this card to someone, coming soon are a couple of Envelope Punch Board classes where we will learn how to make an envelope box for just such cards!

Until tomorrow's third card. Happy creating!


Kaisercraft "Ooh La La" Vintage Card 1


OK, so let's have a look at each of the cards for the Kaisercraft "Ooh La La" Vintage class. I love the deep brown of this pattern and cardstock. It complements the blue and pink beautifully.

Aging and tearing paper is a lot of fun! I tried to get the clear Wink of Stella on the butterflies to show, but no success. You can see it with the naked eye...but not through a camera lens I guess.


Creating ruffled lace with a doily adds to the vintage vibe, especially when aged with ink on a sponge.


In the next photo you can see what as all been popped up with dimensionals/pop-ups.


To me, whenever I create a vintage look, I have to fussy cut. So you will see a lot of that with these four cards. Be sure to stop by for the next card in this series.

Happy creating in the meantime!


When: Saturday, February 4th
Time: 9:00 am - 11:30 am
At Scrapbook Essentials BC Studio - 3730 Grange Road
Cost: $30 plus GST


Kaisercraft "Ooh La La" VIntage Card Class


This class is coming up on February 4th! Better register before it fills up!


Kaisercraft "Ooh La La" Vintage Cards

Going Vintage! You know you have some friends and family that love vintage. Tearing & curling paper, inking paper, layers, creating lace from a paper doily and fussy cutting are a big part of creating detailed old world cards. Come have fun creating some for your card collection!

There is fussy cutting HOMEWORK to help speed up class time, so be sure to pick up your homework kit in plenty of time. (You can always have family or a friend do it for you if you don't like doing it).

Come join me to make this beautiful set of 4 Vintage Cards!

When: Saturday, February 4th
Time: 9:00 am - 11:30 am
At Scrapbook Essentials BC Studio - 3730 Grange Road
Cost: $30 plus GST

Details on each card will be posted separately so you can see them close up.

See you soon, and happy creating!


    Spectum Noir Colouring Class 1 - HFC Woodsy Treescape Stamps


    Scrapbook Essentials BC,  is starting Spectrum Noir Colouring Classes. For the first class we will be working with "Essentials" and "Greens", using the Heartfelt Creations stamps from "Woodsy Treescapes".

    I like to always create a practice sheet before I colour the actual piece for my project whenever I use a new stamp. That way I can put it in a binder and have it as a resource when I next use the same stamp again in the future.

    This is my practice sheet for these two stamps.


    Now, I will show you the simple (CAS) cards that we will have completed for the first colouring class.

    Front view


    Colouring close-up (you can see that I am a little out of practice)


    Side view


    The second card is a little more detailed. Front view...(I think I might change some of those colour banners as I don't like the colours...)


    Colouring close-up


    Side view


    Spectrum Noir #1 - Essentials & Greens


    I'm so excited to have the opportunity to teach Spectrum Noir Classes again. If you have never used alcohol markers to colour and blend before, or would love a refresher course, I look forward to seeing you there. We will begin with the two basic sets of "Essentials" and "Greens". You will receive Practice Sheets in class, as well as the stamped project pieces. You may wish to bring a 3-hole binder and clear page/sheet covers to place your practice sheets and notes into. We will complete 2 simple cards in class.


    This is what you will need to bring to class with you: pen &/or pencil (for notes), non-stick craft mat, adhesive, scissors, and your black & white 3D Foam Squares (large). If you already have your Spectrum Noir markers Bring your Essentials (blender, BGR1, BGR3) Greens (DG2, DG3, DG4, CG1, CG2).


    These are the Spectrum Noir classes that are scheduled;

    Class 1 - Saturday, February 18th - 10:00 - 12:30 (Essentials and Greens - 2 packs)
    Class 2 - Saturday, March 18th - 10:00 - 12:30 (Blues, Yellow and Cool Greys - 3 packs)
    Class 3 - Saturday, April 22nd - 10:00 - 12:30 (Pinks and Turquoises - 2 packs)
    Class 4 - Saturday, May 27th - 10:00 - 12:30 (Browns, Reds and Warm Greys - 3 packs)
    Class 5 - Saturday, June 10th - 10:00 - 12:30 (Pale Hues & Purples - 2 packs)


    Where:  Scrapbook Essentials, BC - 3730 Grange Road in the Studio
    Cost:  $25 + GST for each class IF YOU HAVE THE MARKERS

    If you do not have the markers each pack is $17.95 plus taxes PLUS the cost of each Class

    If you wanted to commit to the full series, and you need to buy the markers too, we will give you a discount on the markers of 10% off all 12 packs.


    Contact Stacey - sbebc2011@gmail.com to register 

    I will try to include the Copic coordinating colours in the Scrapbook Essentials BC class posting of marker colours to bring if you have copics instead of SN markers.

    Spectrum Noir     DG4                    Copic      VG99
                                 DG3                                   VG67
                                 DG2                                    G21
                                 BGR3                                  C4
                                 BGR1                                  C2
                                 CG2                                     ?

    On a personal note, it's been a long time since I've coloured with Spectrum Noir Markers. I loved it three years ago, and I still love it (even though I am a little out of practice).


    Kaisercraft Christmas Wishes - Last Minute Cards 2


    Yesterday I posted some last minute Christmas cards that I had forgotten to post before Christmas. Today is the second batch of cards created on the same day as the previous post. They are created from the 6 1/2" x 6 1/2" Kaisercraft "Christmas Wishes" pad.

    For this card I did want to use gold foil to mat a couple of layers, but was running out of gold foil cardstock, so I left it with white matting.


    Gold foil matting for this card. I fussy cut the gold doilies out of one sheet and positioned them at different layers.


    This next one is very simple, but with that lovely gold foil text on the pale blue, who wants to cover that up! So I took one of the larger fussy cut foil doilies to use as a medallion behind the sentiment.


    Lovely colours are found in this collection and are non-traditional colours for Christmas. But, I love pastels!


    So, there you have my last minute Christmas cards. Use for inspiration, if you wish, for next Christmas cards using this collection if you have, or other collections.

    I will be back soon with postings for classes I will be teaching at Scrapbook Essentials BC.

    Happy creating,


    Kaisercraft Christmas Wishes - Last Minute Cards 1


    I know that Christmas is now over, and I've just returned from a week long visit to Calgary to see Dana and the grandchildren, but it seems I did not schedule a couple of Christmas card posts. I had all the photos ready and in my draft, but didn't get any further with them. I'm sharing them with you anyway because it can still be inspiration for those that still have some of this paper left, or to those that start preparing already for Christmas 2017!

    These are all created using the 6 1/2" X 6 1/2" Kaisercraft "Christmas Wishes" pad. The first one has some fussy cutting of Poinsettias layered and cut off around the edges of the smaller section popped up on the front of the card.


    For the card below, I fussy cut one of the smaller gold foil doilies and cut it in half to position behind the gold matted little sentiment cut-a-part.


    Gold foil matted layers really make things pop on this card.


    Thanks for joining me on this quick, overdue, post. Of course the design, or layout, of these cards can work with any number of paper collections.

    Wishing you all a healthy, successful, and happy new year!

    Happy creating!


    G45 Safari Adventures - Shadow Box Class


    Hope you all had a wonderful Christmas!

    Today I am showing you a few photos of a class I am teaching January 21st. I should have posted this a few weeks ago, but if sat in my drafts for a while and I forgot to post it!

    This wonderful Safari Adventure Shadow Box would be a great project for the safari dreamer/lover, and could be displayed on the wall of an office, a child's room, or anywhere in the house. It would also be a great masculine gift. Of course this project entails a lot of fussy cutting homework before class, so be sure to pick up your homework kit in plenty of time. If you like the project, but don't like fussy cutting, perhaps a family member, or good friend, wouldn't mind doing that part for you...lol.

    There will be homework to do before the class. Sample in store. Limited space.

    When: Saturday, January 21st
    Time: 10:00 - 3:00 (1 hour lunch break)

    Cost: $55.00 + GST = $57.75
    (kit comes with OVER $40 in product)


    FOR HOMEWORK you will need to have good fussy cutting scissors, a 1/8" or 3/16" hole punch, black or gray marker, and Glossy Accents

    PLEASE BRING TO CLASS:

    paper trimmer, scissors, 1/4" (or 1/2") Sookwang/Score tape, glue, black 3D Foam Tape (not the squares), and a non-stick mat.


    The photos are round for the store, so hope you don't mind.

    This is the left side of the shadow box...

    ...and this is the right side.

    The shadow box has three sections. This is the left section...

    ...the middle section...

    ...and the right section.

    And this last photo, is the project in it's entirety.


    As you can see, it hangs on the wall by the burlap ribbon. I love the wisps of the green jute twine on this project. I think it gives it more of a jungle look.

    Looking forward to seeing all my Graphic 45 lovers and project lovers in class!


    Happy creating!