Having Fun With Spellbinders Charming Cottage Die Set


Hello everyone!

I am going to share with you some projects I have been having fun with. I am experimenting with different ideas. I have more ideas that I want to work on, but have to get back to working on class samples, so it may be a while before I can implement my further ideas. I had so much fun making these little boxes/cottages, and I think you would too, so lets have a look at the cottage boxes and the die set.


You can create with this die set for birthdays, weddings, Christmas, Easter, and more. This next photo is  of the Spellbinders Charming Cottage.


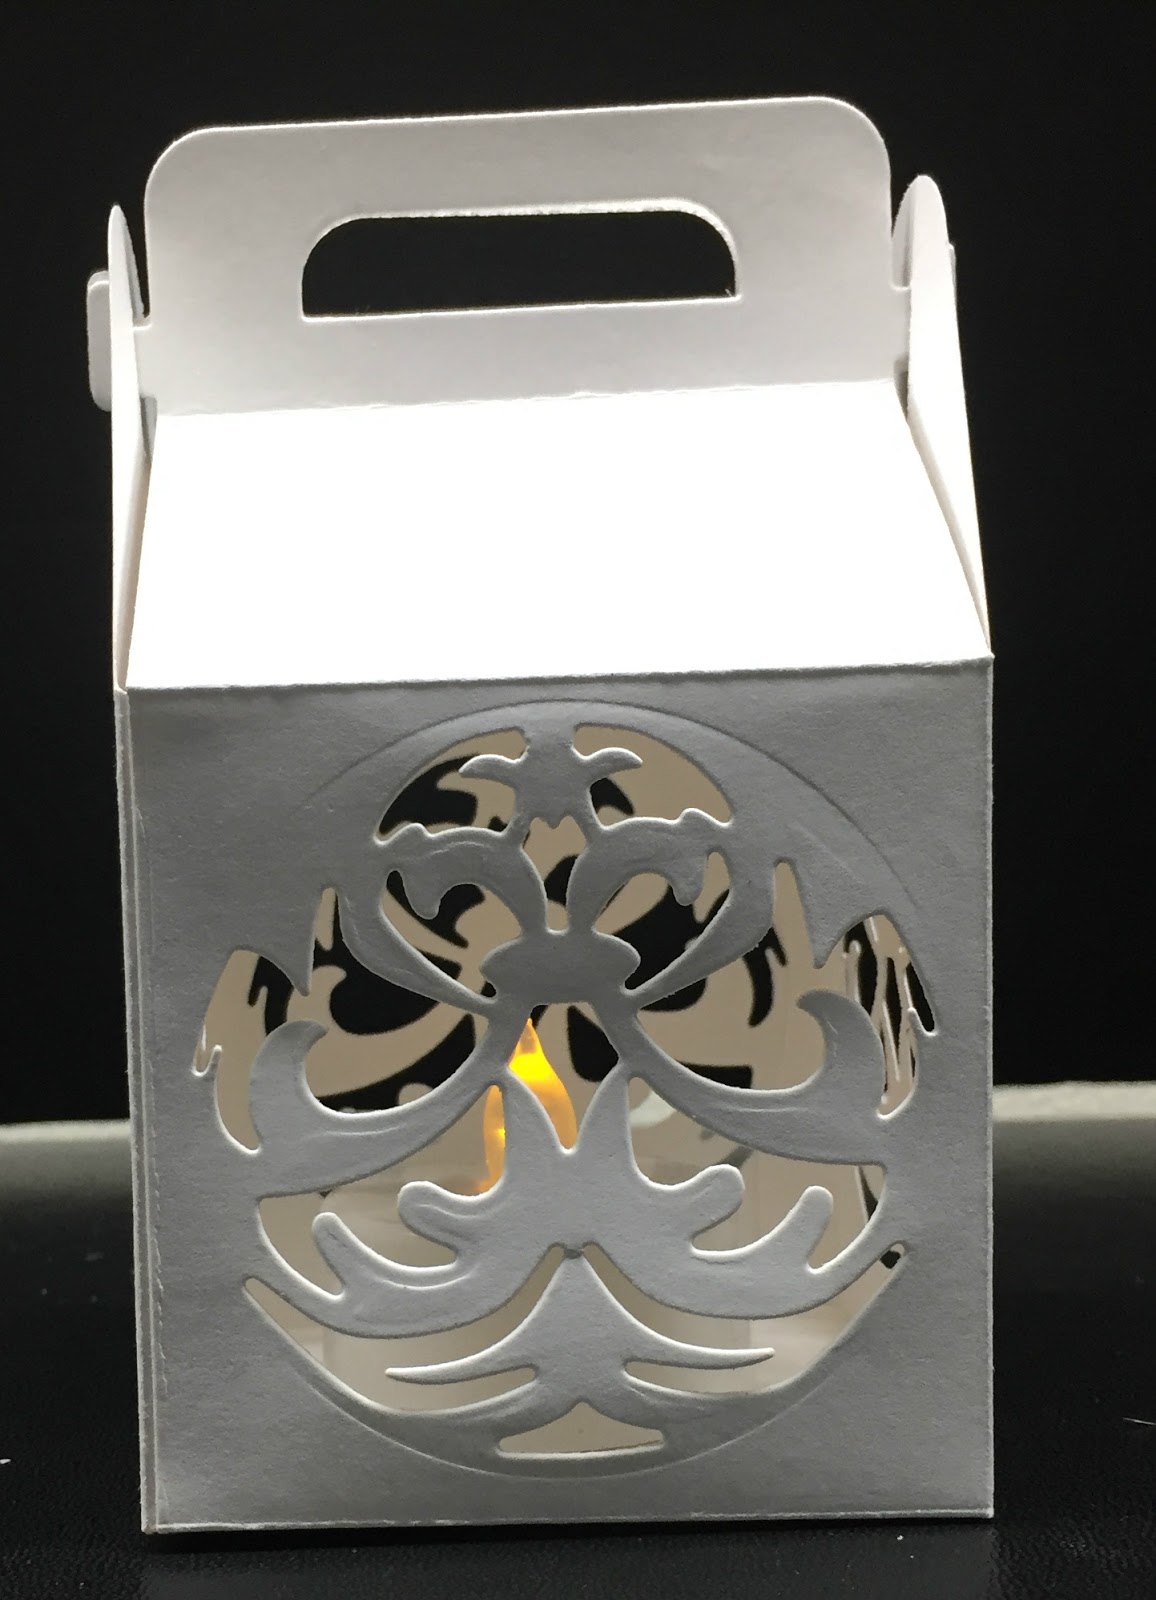
Let's begin with a simple use of this die in which I create a luminary. This one also uses the Spellbinders Gilded Ornaments die set. This luminary would work for Christmas as well as for weddings. You could have a number of these scattered all over the dining table as centerpieces, or one for each guest with their name on it as a named place setting. They could decorate the fireplace mantle, or be spre
ad throughout the home on all the tables.


I turned the lights out for this photo.


Next, is another version for Christmas using more of the dies included in the set. A gingerbread cottage!


I apologize for the darkness of the photo, but if I brighten it the roof is much too bright to see any details. So I left it as is. I have photos of many views going around the gingerbread cottage, so I will not be commenting on them.


The third cottage, or box, I made is one that could be used for Spring, Easter, or a birthday. Light pastel colours.


For this cottage I also used Spellbinders Botanical Bliss Beautiful Banner Basket, and Floral Oval for flowers & leaves.


I hope I have your creative mojo spinning ideas for you, and that you enjoyed my first three experiments. What ideas do you have for this Charming Cottage box?

Happy creating!


Shabby Chic Christmas - Authentique Solitude


Welcome everyone!

Another Christmas card post for you today. This time it is for three Shabby Chic Christmas cards. This style or genre of card seems to be very popular around here of late, and within two or three days of having the cards on display we have ended up with two classes for this card class. We only have a date and time for the first class, and once the order for additional paper arrives, we will have a date and time for the second class.

These cards are created using the beautiful vintage "Solitude" collection from Authentique.


Shabby Chic Christmas Cards with Authentique Solitude Collection
WHEN: 
CLASS #1 - Wednesday, October 24th - 6:00 - 9:30pm
CLASS #2 - Monday, November 1st - 6:00 - 9:30pm
CLASS #3 - Friday, November 16th - 9:30am - Noon

COST: $38 + GST

Contact Stacey at sbebc2011@gmail.com  or  778-533-4290 to reserve your spot

It's time for another Christmas card class for Shabby Chic enthusiasts. In this class we will use some mixed media/Shabby Chic products we have not used before, like Art Stones and Gel Medium.
These three square Vintage Shabby Chic cards will be a joy to create and to give to someone special, or you could frame them as three mini Christmas shadow box decor items. The choice is yours. See you there!

PLEASE BRING TO CLASS: paper distresser, double sided adhesive tape, liquid glue, white foam squares, non stick craft mat, heat tool, Distress Ink pad Gathered Twigs & ink blending tool, approx 1/2" flat brush, jar with water to clean brush a few times & paper towel, wipes for your hands, and any of the following you have - Prima Marketing Art Ingredients Art Stones (medium size), Gel Medium Matte, Ranger Texture Paste Opaque Matte OR Liquitex Ceramic Stucco, NUVO Crystal Drops Autumn Red, NUVO Glitter Drops White Blizzard OR NUVO Glimmer Paste Moonstone, & White Gesso.


PLEASE NOTE: I will have these products at class for your use if needed.

There is something quite fun about distressing and tearing paper. I'm not sure why, especially when the paper is so beautiful, but let's have a look at each card separately, and in more detail, shall we.


Love the use of Art Stones on these cards, and it was fun to take brown plastic pine cone twigs and layer them with gesso, ink, and glimmer paste.


Adding detailed die cuts is always very effective with shabby chic cards like this one from Ranger.


Popping up the fussy cut trees in front of the image gives it a layered dimentional look.


For this second card, if you look closely, you can see how I mitered the striped paper. This is something that I love to do with striped paper so that you can see the stripes al around rather than having them disappear in a vertical or horizontal direction. This way you get to see the stripes all the way around.


For the die cut snowflakes, I took a dry brush with gesso and stippled it onto the snowflakes to give them a snow-like texture. When dry, I added a touch of sponging Gathered Twigs onto them so that they would not be stark white against the old ivory colour in the paper collection.


Below is another of the dies is used from the same Ranger die set.


To create a little more colour, I used NUVO Crystal drops in Autumn Red to cover the bud ends of the plastic pine cone twigs to create red berries.


Another side view...


I love the bird paper of this collection, and was happy to use it on this third card.

To add further embellishment onto this card I decided to die cut Poinsettias. It as fun to die cut check Poinsettia leaves and create something a little unexpected or out of the norm.


Here is a closer look. More red berries created, too.


And, here is a side view for this card.


I thank you for stopping by to have a peek at the cards for this class. Hope that inspiration for some of your Christmas card creating is a result of viewing my creations for this class.  See you in class, or happy creating if you are using these for inspiration.

Till next time, may your Christmas mojo be with you as you start creating for the Christmas season soon to be upon us.




Spellbinders Gilded Ornaments Class


Hello!

Welcome to another Christmas card posting!


Spellbinders Educator Class #18

Gilded Ornaments
WHEN: Monday, October 15th
TIME: 6:00 - 8:30
COST: $42 + GST (includes $28 die)

Contact Stacey at sbebc2011@gmail.com  or  778-533-4290 to reserve your spot

Ornament Christmas cards are always fun to create!
In this class we are going to look at different ways to create with the Spellbinders Gilded Ornament dies. We will create two different types of 'see through' cards in class, and you will receive a kit with instructions to create a third card at home where you will layer die cuts to give a deeper dimensional look for ombre ornaments. The heat embossed sentiments will be done for you. There will also be a display of different things that you can do with this die set to create more beautiful cards at home.


PLEASE BRING TO CLASS: Die cutting machine & plates, Your die set if you already have them, paper trimmer, Score board & scoring tool (will have mine there), large scissors (if you have), liquid glue, double sided adhesive tape, white foam squares or tape, and NUVO Glitter Drops in Honey Gold if you have (will have mine there).

The first 'see through' card is created by directly die cutting into the front of the car base and adding the ornament topper on the front of the card. Then using some NUVO glitter drops all over the front to bring some Christmasy glitter to the front.


A closer look at the 'see through' and glitter drops.


Upon closer inspection you may see a double layer of cardstock. By die cutting  separate ornaments
and gluing them on the inside, the cardstock is reinforced protecting the delicate die cuts.


The second 'see through' card is created by die cutting several ornaments and overlapping them as you layer and glue them together. This creates a faux laser cut layer over the front of the card and is striking next to the red. I will show you in class how to accomplish this look, which can be done with many different dies.


Adding a sentiment on such a surface can take away from the look of the card, so you would want to keep it minimal. I chose to use another circle, a smaller one, to heat emboss my sentiment and pop it up on the lacy front.


To create a writing area on this card there are several options. I chose to place a smaller top fold card inside so that the red would remain behind the white ornament lacy layers as seen in the next two photos.


This is the third card, the take home card kit for class. The colours of the ombre ornaments are not true to real life, but give you and idea of what was done. The back layer of the ornament has been ink sponged so that the darkest of the colour is at the bottom and gets lighter turning into white at the top. This is then covered with the layers of cardstock and foil die cuts and the ornament topper to create some lovely ornaments.


A closer look at the ornaments.


From the closer side view, you can probably better see the layers of the ornaments.


There are so many fun creative things you can do with this Gilded Ornament die set. What creative ideas do you get for this die set?

Thank you for checking in today, and hope that you will have some inspiration from this post to create your Gilded Ornament cards with.

Happy creating!


Mixed Media Layout with 49th & Market Cottage Life


Hello Everyone!

Do you like mixed media? Well, today I am sharing with you a mixed media layout project class we are having where you make a great Christmas gift for someone special.


MIXED MEDIA CLASS - sample in the studio - A MUST SEE!!!
WHEN: Saturday, October 27th
TIME: 9:30 - 12:30
COST: $35 + GST (frame not included)

NOTE: We have Shadow Box Frames for $29.95 if you would like to purchase one please let Stacey know.
Contact Stacey at sbebc2011@gmail.com  or  778-533-4290 to reserve your spot

Mixed Media fans, we are going to have a layout class! As you know texture and using a variety of mediums to create a project are very much a part of this creative genre. A GREAT CHRISTMAS GIFT!

We will be stamping with no blocks, stencilling with paste, using die cut leaves and a new Spellbinders doilie, dry brush painting with Mousse & from an ink pad, misting with NUVO Mousse & water, heat drying between layers, splattering ink and watered down Mousse, learn to use corrugated box pieces to create depth in our layout, and layering a variety of products, and more. All these things together create this beautiful piece to display in a shadow box frame (not included for class). There will be fussy cutting homework so that we can use the lovely flowers of this paper on our gorgeous layout. It should be ready for pick up about a week before class. You will want to wear clothing that you do not mind getting splattered and dirty, or bring your mixed media apron.

PLEASE BRING TO CLASS: Homework, PHOTO - a must - any size but no larger than 4 x 6 (may trim down smaller) scissors (big and small), non-stick craft mat or mixed media mat, pencil & eraser, 4 - 5 paint brushes as seen in the photo (some will be there to use if needed), a jar of water, 3 - 4 tiny misters (filled 3/4 full with water), plastic paint pallet or lids, heat tool, liquid glue, matte glue if have, Glue gun if you wish things to adhere more quickly, white foam tape or square, spatulas (old credit card will work too).
TH Distress ink pads - Gathered Twigs & Iced Spruce, NUVO Mousse - Sea Spray Green, Aquamarine, Peony Pink, & Coral Calypso, NUVO Crystal Drops - Neptune Turquoise & Antique Rose, NUVO Jewel Drops - Paler Periwinkle, & Sea Breeze, and an Archival or Pigment ink pad in grey (black is OK if you do not have grey), a flap of a cardboard box, White Gesso, Clear Gesso (will have some there), Stencils of your choice (will have some there), Stencil Paste (will have some there), plenty of paper towel and wipes.
STAMP SETS if you have - 49th & Market - Vintage Artistry, Gabi's Postcard From Paris, Gabi's Cracked Texture Set (or something similar).

PLEASE NOTE: I will have most of these things there if you do not have them and or unable to get for yourself.

Here is the layout before it is framed.


Next are several photos to share a closer look at the details of this mixed project.


I love the combination of the splattered paint and NUVO Crystals & Jewel Drops; the texture of the cheese cloth and stencilled paste; the effect of the watered down NUVO Mousse and metallic touches, etc.


The aper layers behind the photos ended up being a bit hidden, but there are peeks of it hear and there.


You'll find a bit of lace here and there as well.


Metal embellishments peek out in a couple of places, too.


I am looking forward to teaching this class and have some mixed media fun with you.  If you are not from the area, I hope you are inspired to have some mixed media fun.

Happy creating!