Envelope Boxes for Sale

Crafteezee has these fabulous pre-cut and pre-scored envelope boxes for sale!

Photobucket

Tracy is also offering some up as blog candy so check it out!

:)

...A Merry Little Christmas for Owen

I ran out of cards! I guess I miscounted the names on my list. So I had to quickly put a card together for my youngest son. Last minute cards don't always turn out too great for me, and that remained true in this instance.  I think it does have a bit of a masuline feel to the Christmas card. So here it is.

 I used some dimensional embellishments purchased long ago from a $1 store in Calgary. I wish I had considered a better way off applying them and the finished result in the upper right corner. Plus the blue ornaments are a little off on this card, but I don't think that Owen will take note of any of these things. I'm thinking that it's a man thing. For most men, cards are not a thing of interest to them. But he will appreciate what I write inside.

No details will be included again, I'm much to busy for that. But, it's at least posted.

Thank you for stopping by blog friends! Are you beginning to feel the ticking of clock like I do?

Christmas Photo Card Sleeves

My original prototype for my Christmas photo cards was too labor intensive for mass production.


I cut down on the punching and eliminated the ribbon and sewing to come up with these:


Selective inking, die cut holly leaves and red Liquid Pearls. The corner snowflake punches aren't very apparent in the photo.

Hooray, I'm done!

Quick tip: Even when Liquid Pearls are dry, don't stack your cardstock over top! Some of them stuck together and pulled a bit of Kraft with them!


{Supplies--all Papertrey Ink unless noted}
  • Cardstock: Kraft, green (Bazzill?)
  • Stamps: Merry Christmas Ornament (Hampton Art)
  • Ink: Memento Ladybug and Rich Cocoa (Tsukineko)
  • Dies: Holly Jolly
  • Other Tools: snowflake corner punch (Martha Stewart), Corner Chomper (We R Memory Keepers), Ruby Red Liquid Pearls (Ranger)

December Visiting Teaching Handout - My Divine Mandate

This is what I started with


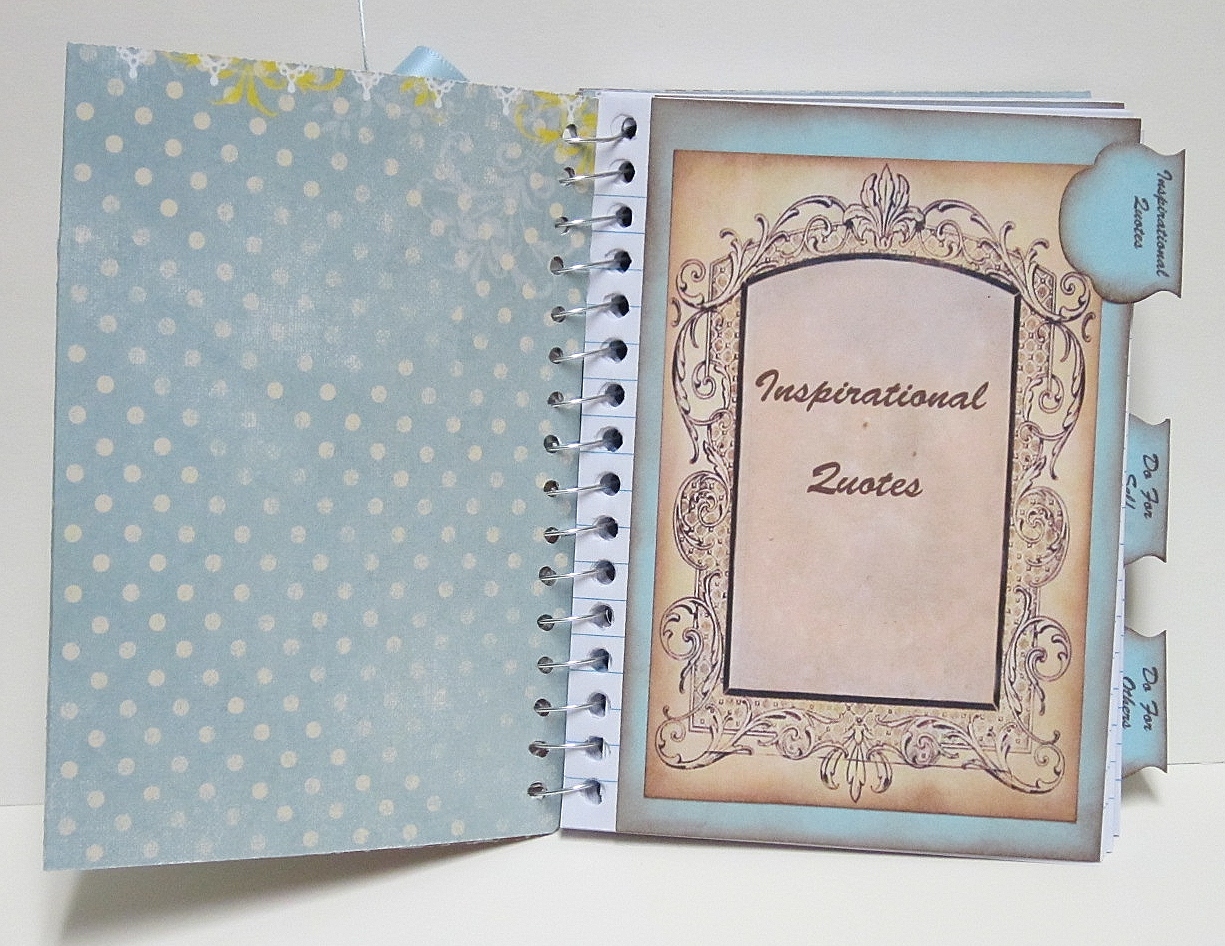
 In trying to come up with a Visiting Teaching handout that I could put together quickly I was searchig my shelves. I only have two to make since we only have two ladies to visit. In scanning my shelves, I came across a small pile of notebooks purchased from a $1 store.

That's when the notebook idea came to me. I even knew what paper I wanted to use. I love Websters' papers and wanted to use some for this project.  And it came to me that I could use for the first time a prize I recently won from a challenge. Some digi prints!

The lesson being about the sphere of action in women's mandate to help others (since it's our nature to do so), I divided the notebook into three sections; Inspirational Quotes-to help us keep on track, What Can I Do For Myself-a section to take notes on helping oneself be the best they can be, and What Can I Do For Others-a section to write about what we can do for others to help them be their best. So here are the photos of the notebook.


So there you have it. Not too fancy, as I could have done a lot more to it, but good enough for a quick put-together. I would have liked to have had the time to do a better, more solid job, on the section dividers - to have the blue cardstock go all the way to the edge of the hole punched side like I did on the covers. It just takes too much time when you have to punch each hole seperatey and then cut with scissors into each hole so that it can wrap around each spiral.

Thank you for stopping by today in your busy schedule. All the best and happy days!

Oh my goodness! After posting, I noticed I spelled 'divine' incorrectly on the cover and didn't catch it! I'll see if I can hide my typo somehow and appologize to the receivers. I guess I was in too much of a hurry. I really don't like it when I make these kinds of mistakes!

Christmas Cards for the Grandchildren (Part 3a)

The last of the six Christmas cards for my six Grandchildren. I threw rogether an unusual colour combination that seems to work (probably because the colours are in the printed image I used).


Well the cards are all completed and sent off in the mail Tuesday. The six cards will be split up and will be going to Calgary Alberta, Boise Idaho, and Phoenix Arizona.

Because I am, and probably you are too, so very busy right now, I 'm not going to take up more time. But I thank you for stopping by and checking in. Appreciate it. Happy days everyone!


Christmas Cards for the Grandchildren (Part 3)


The fifth of six cards made for my six Grandchildren is now completed, and is another challenge entry. The sketch is from Our Creative Corner and created by Iwona Palamountain. It`s a nice easy sketch which is perfect for this busy time of year.

For this fifth card, I used the same image as I did for one of the cards in Part 1, except printed it larger.


Using Spellbinders Fleur De Lis Accents, I created a five point star shape (or pentagon, if you will) around the circle and added various sizes of pearls to decorated it. This one, I think, will be for my 4 1/2 yr old Granddaughter, Claire.

The last, and sixth, card for this series I`ll post seperately as Part 3a. Thank you again for taking the time from your busy schedule to stop by and check out this posting. All the best to our friends out there.

Christmas Cards For Grandchildren (Part 2) & Mojo Monday #218


I have two more Christmas cards here; a total of four now, for my 6 Granchildren.(See Part 1 here) I decided to use the sketch from Mojo Monday for both of them. One I layed out exactly like the sketch and the other up-side-down (180 degree rotation). It was fun trying it out two different ways.

The exciting news is that there will be up to seven winners! The prize being the choice of Verve Stamps! I`d love to win one of their stamps!

So here they are.


And the up-side-down version...


Well, that means I have two more left to make for my six Grandchildren. Then I have to send them off! Time is running out and I have so much to do! There you have it, and I`ll wait to see if I will be one of the lucky seven winners. Thanks for stopping by today. 


Cards for the Grandchildren (Part 1)

I was addressing some Christmas cards when I realized I hadn`t made any cards for my 6 grandchildren! Since time is pressing, and children don`t need anything elaborate, I wanted to make creating these cards easy for myself. I went on line and found images that I had seen on cards over the years. I sized them for cards and printed them.

Here are two of the six cards cards I need to make. I have a busy day tomorrow, but I hope to get a couple more made since I need to send them off ASAP.


The red is popped up as is the image (Cover of a children`s book). Hopefully you can see this in the side view.


Here`s a cute one. I think this one I may give to my youngest grandaughter. I think she`ll like baby Jesus in the manger.


I tried something different on this card. Well actually two things. Behind the circle I used three of the oval Fancy Tags Two. I put one on each side of the circle and then cut the thrid one in half to place at the top and bottom of the circle. The other thing was using Glossy Accents instead of my usual Liquid Pearls. I think it looks quite pretty and will have to try it again. The Silent Night... is heat embossed with silver.

Well that`s it for this posting on the Grandchildren`s Christmas cards. I hope to have two more real soon. Thanks for stopping by today. All the best to you and happy days ahead.

Sabrina
(Having difficulties uploading my usual signature)

Moxie Fab Tuesday Trigger

I LOVE the photo inspiration for the current Moxie Fab Tuesday Trigger!


I used the fabulous colors on a sleeve for my photo Christmas cards this year.


This was to be my prototype but it will remain an original... Too complex for mass production! ;)  I'm fiddling with other ideas...


{Supplies--all Papertrey Ink unless noted}
  • Cardstock: Kraft
  • Stamps: Bells & Boughs
  • Ink: Versamark (Tsukineko), Dark Chocolate
  • Dies: Bells & Boughs
  • Ribbon: Pure Poppy grosgrain
  • Other Tools: snowflake around the page punches (Martha Stewart), sewing machine/thread, Corner Chomper (We R Memory Keepers), colored staples (Making Memories)

A Birthday Card with My Daughter

My 4-year-old daughter's preschool teacher had a birthday so I involved her in the cardmaking process.

Her specifications were "pink" and "flower."

I immediately thought of my new Lil' Inkers Fringe Flower die.


We kept it bright and simple.  :)


{Supplies--all Papertrey Ink unless noted}
  • Cardstock: Hawaiian Shores, Harvest Gold, green (Bazzill?)
  • Stamps: Half & Half
  • Ink: Versamark (Tsukineko), Hawaiian Shores
  • Dies: Half & Half, Leafy Vine
  • Felt: Hibiscus Burst
  • Other Tools: white embossing powder (Filigree), rhinestone frame (Recollections), Vineyard impression plate, Corner Chomper (We R Memory Keepers)