Waltzingmouse Sketch and CAS-ual Fridays: Embossing

This card started out as this project but was set aside as other ideas took over. I turned it into this week's Waltzingmouse Sketch. It's supposed to be a layout sketch rather than a card sketch, but I preferred it and so adapted it. Only one or 2 liberties have been taken!  ;)

It also works wonderfully well for this week's CAS-ual Friday challenge: embossing. I used heat embossing a couple of times on this. Such a fun challenge that I don't doubt I'll be back for more!


I am loving these Funky Town papers!  ;)

After die cutting a frame with Spellbinders Labels 2, I stitched the patterned paper to the pink cardstock. I heat embossed the lovely frame with clear and then heat embossed the sentiment with white.

I die cut and rolled the flowers with coordinating papers, making one a bit larger than the other. Added a few leaves.

I then added a couple of rhinestone swirls that I sorta regret. They're not terrible, they just don't add anything.

Thanks so much for stopping by!


{Supplies}
  • Cardstock: Stamper's Select White, Raspberry Fizz (both Papertrey Ink)
  • Patterned Paper: Funky Town (Papertrey Ink)
  • Stamps: Very Vintage Labels No. 2 and Fancy Phrases (both Waltzingmouse Stamps)
  • Ink: Versamark (Tsukineko)
  • Dies: Labels 2 (Spellbinders), Rolled Flower (My Favorite Things), Sending You leaves (Papertrey Ink)
  • Other Tools: rhinestone swirls (Recollections), sewing machine/thread, pink and blue rhinestones (dollar store), clear/white embossing powder (Filigree)

PTI MIM: Die-Cut Glitter Border, Moxie Fab World and Lily Pad Cards Felt Challenge

Three challenges in one card again...

This week's Papertrey Ink Make It Monday reminded me why I RARELY work with glitter. Yes, it's pretty and yes, it's MESSY! Especially when you have to leave in the middle of working with it and a child helps things along... *sigh*

I'm also entering this into the Moxie Fab World and Lily Pad Cards felt challenges.


I wanted to use PTI's Funky Town paper and the Sending You dies and went from there. The felt flowers were die cut, carefully arranged and then placed on some Scor-tape adhesive sheet. If you have a 1-1/2" circle punch, I recommend punching out a perfect little circle to make your own Glubers but since I didn't have the right size, I just cut out around my finished flower. Added a bit of glue and glitter to the centers. A little sprinkling around the "petals" is alright, of course!

I was quite surprised to end up with a stamp-free card!

Thanks for stopping by!


{Supplies--all Papertrey Ink unless noted}
  • Cardstock: Stamper's Select White
  • Patterned Paper: Funky Town
  • Dies: Sending You, Rolled Flower (My Favorite Things)
  • Felt: Raspberry Fizz, Hawaiian Shores, Simply Chartreuse
  • Other Tools: chisel glue pen, glitter (Prisma)

Timeless Tuesday #131 and Sketchbook Saturday #24

I love Chupa's sketches!

They're so eye-catching...

I've just never organized myself well enough to play with one.

Well, if I want to get any crafting time in right now, I have to be organized!

So I combined Chupa's Sketchbook Saturday challenge with the Timeless Tuesday challenge at Flourishes (pink, lace/ribbon, buttons).


The late-evening lighting took its toll on my photograph...  ;)

It's difficult to tell, but I sprayed some Rose Tea Glimmer Mist on the white card base. I added the stitched and circle patterned papers (more Kaisercraft Miss Nelly) and sewed on some lace.

The stamped panel took a bit more work.  ;)

I stamped the giant gift box in Frayed Burlap ink 3 times: once on the stitched white rectangle and once on each of the patterned papers. Then I took my detail scissors and went to work paper piecing!!

I love the effect! It looks like a gorgeous vintage box!

I had the thing all photographed and ready to go until I remembered the buttons...

Thanks for stopping by!


{Supplies}
  • Cardstock: white card base (Recollections)
  • Patterned Paper: Miss Nelly (Kaisercraft), generic parchment
  • Stamps: All Wrapped Up (Flourishes)
  • Ink: Frayed Burlap Tim Holtz Distress Ink (Ranger)
  • Dies: Rectangles and Grand Circles (Spellbinders)
  • Other Tools: sewing machine/thread, Rose Tea Glimmer Mist (Tattered Angels), Sweet Blush buttons (Papertrey Ink), Jute button twine (Papertrey Ink), bloomer ribbon (American Crafts), lace (dollar store)

Waltzingmouse Sketch and Paper Crafts August Gallery Challenges

I love this week's sketch at Waltzingmouse! I decided to incorporate it with this month's gallery challenge at Paper Crafts which is looking for girlfriend-themed projects.


I didn't realize that this was going to be a distressed card when I started it... That white card base is definitely incongruous!

I had fun sewing, stamping music over and inking up these gorgeous new Kaisercraft papers for this project. This is one of my favorite sentiments! I think I will add some pearls below it...

Thanks for stopping by!!


{Supplies}
  • Cardstock: Stamper's Select White, Pure Poppy (both Papertrey Ink)
  • Patterned Paper: Miss Nelly (Kaisercraft)
  • Stamps: Fancy Phrases, Musical Backgrounds (both Waltzingmouse Stamps)
  • Ink: Antique Linen, Old Paper, Brushed Corduroy Tim Holtz Distress Ink (Ranger)
  • Dies: Grommet Tags (Spellbinders)
  • Other Tools: Vintage Cream button twine (Papertrey Ink), distressing tool (Tonic), Big Bite/eyelets (We R Memory Keepers), sewing machine/thread

So Good To Be Crafting Again!!! - Granddaughter's Birthday Card

I'm Back! Oh, it's wonderful to have my own place again and be able to craft. My only current problem is I still don't have a good camera. For the next little while, the photos will be coming from my cell phone. So I apologize in advance for the next few images of my postings.

I must say that my daughter did a great job keeping up the blog while I was on hiatus. I'm very proud of her latest achievement with the Waltzing Mouse challenge!!

Dana did such a lovely job on her invitations for her daughter's 4th birthday! I just love them! And at the same time that she was making her invitations, I was making a birthday card for my granddaughter. I knew that Dana was going to use a Ladybug theme, and when I found this embellishment trim in my stash I had to use it. It's a very simple card, but cute enough for a 4 year old girl to like. The triple Happy Birthday is stamped with red and embossed with clear.

It's certainly good to be back sharing this blog with Dana again. And, since there are a lot of birthdays in our family at this time of year, you'll be seeing a few more of them (using the cell camera unfortunately).

Thanks for stopping by,
Sabrina

Congrats

I was in the process of throwing out the little die cut centers from the 4s of my invitation project here, when I thought they might make a fun abstract project...


I traced around the edges of the triangles with a Copic multiliner and added a few Pebbles...

Meh, it's definitely different.

;)


{Supplies--all Papertrey Ink unless noted}
  • Cardstock: Stamper's Select White, Pure Poppy
  • Stamps: Think Big Favorites #5
  • Ink: Memento Tuxedo Black (Tsukineko)
  • Dies: By the Numbers (indirectly)
  • Other Tools: Copic Multiliner pen, Pebbles

PTI MIM: Copic Ribbon, Playing in Paradise: Color Combo and Papertrey Princesses: Tribute to Laurie

Wow, that title is a mouthful!!

This week's Papertrey Ink Make It Monday challenge invites us to create our own custom ribbon with our Copic markers.

This week's Playing in Paradise challenge asks us to create something with brown, a pastel and a neutral.

The last Papertrey Princess challenge was a tribute to Gallery Idol Top 10 Laurie Willison.

The hardest part of these challenges was simply narrowing down which card of Laurie's to CASE!! My goodness, I must have dozens of her gorgeous creations throughout my Pinterest boards!

I finally went with the following card of Laurie's since it went well with the other 2 challenges:


Here is my take:


I used the same impression plate because I felt guilty that I have it but have never used it before. ;)

I used Copics E59, R02 and BG11 on the white grosgrain ribbon.

The glittery pebbles on either side of the sentiment are from my stash of blog team goodies from Scrapbooker's Paradise!

Thanks for stopping by!

[Edited to add: This card won the Playing in Paradise challenge! I'll be contributing as Paradise Player on Friday, August 26!]


{Supplies--all Papertrey Ink unless noted}
  • Cardstock: Melon Berry, Stamper's Select White
  • Stamps: Turning a New Leaf, Fillable Frames #10, Faux Ribbon
  • Ink: Memento Rich Cocoa and Brilliance Pearlescent Chocolate (both Tsukineko), Fresh Snow, Aqua Mist
  • Dies: Fillable Frames #10
  • Other Tools: Book Print impression plate, Fresh Snow grosgrain ribbon, E59, R02 & BG11 Copic markers, Pebbles candy dots

Birthday Invitations

I hate entertaining.

Some women love it (yes, I'm thinking of you, Stef!), but not me.

I hate purposely adding stress to my life.

Despite this, I decided my soon-to-be 4-year-old daughter deserved a birthday party.

I love to papercraft but dislike mass production.

I survived.


I started out with a prototype (see left). From this, I decided that the impressed numbers were too busy and the 4 needed pizzazz.

Aimes Wanford inspired me to break out my Linen & Canvas impression plate for the sky (Linen side). I used a Polka Dot Basics stamp  to make the 4 look like ladybug pattern (my birthday theme is ladybug/summer).

To make the invitations, I die cut PTI's Library Card in Spring Rain. All the information was typed out, printed onto white cardstock, die cut with the Library Card and adhered to the front of the invite after passing it through my Xyron after assembling everything else. I used my Corner Chomper to round the upper 2 corners with the 1/2" setting. I put a bit of magnet on the back so recipients could place it on the fridge.

The process wasn't wholly unpleasant and so the idea of making my son's birthday invites (soon!!) isn't so daunting.

Thanks for stopping by!!


{Supplies--all Papertrey Ink unless noted}
  • Cardstock: Spring Rain, Stamper's Select White, Pure Poppy
  • Patterned Paper: Bitty Dot Basics
  • Stamps: Beautiful Blooms II (flower), Big Birthday Wishes (sentiment), Up, Up & Away (clouds), Four of a Kind (stem), Polka Dot Basics
  • Ink: Brilliance Pearlescent Poppy, Memento Tuxedo Black and Versamagic Cloud White (all Tsukineko), Ripe Avocado
  • Dies: Library Card, Beautiful Blooms II #2, By the Numbers
  • Ribbon: Lemon Tart swiss dot
  • Buttons: Lemon Tart
  • Other Tools: black embroidery thread, 100 Copic (ladybug faces), Corner Chomper (We R Memory Keepers), grass punch (Fiskars), ladybug button charms (unknown)

Waltzingmouse Sketch Challenge 59

I love Waltzingmouse Stamps!

I actually own quite a few of them.

I only realized this when I was going through them to find something for the latest sketch challenge. ;)

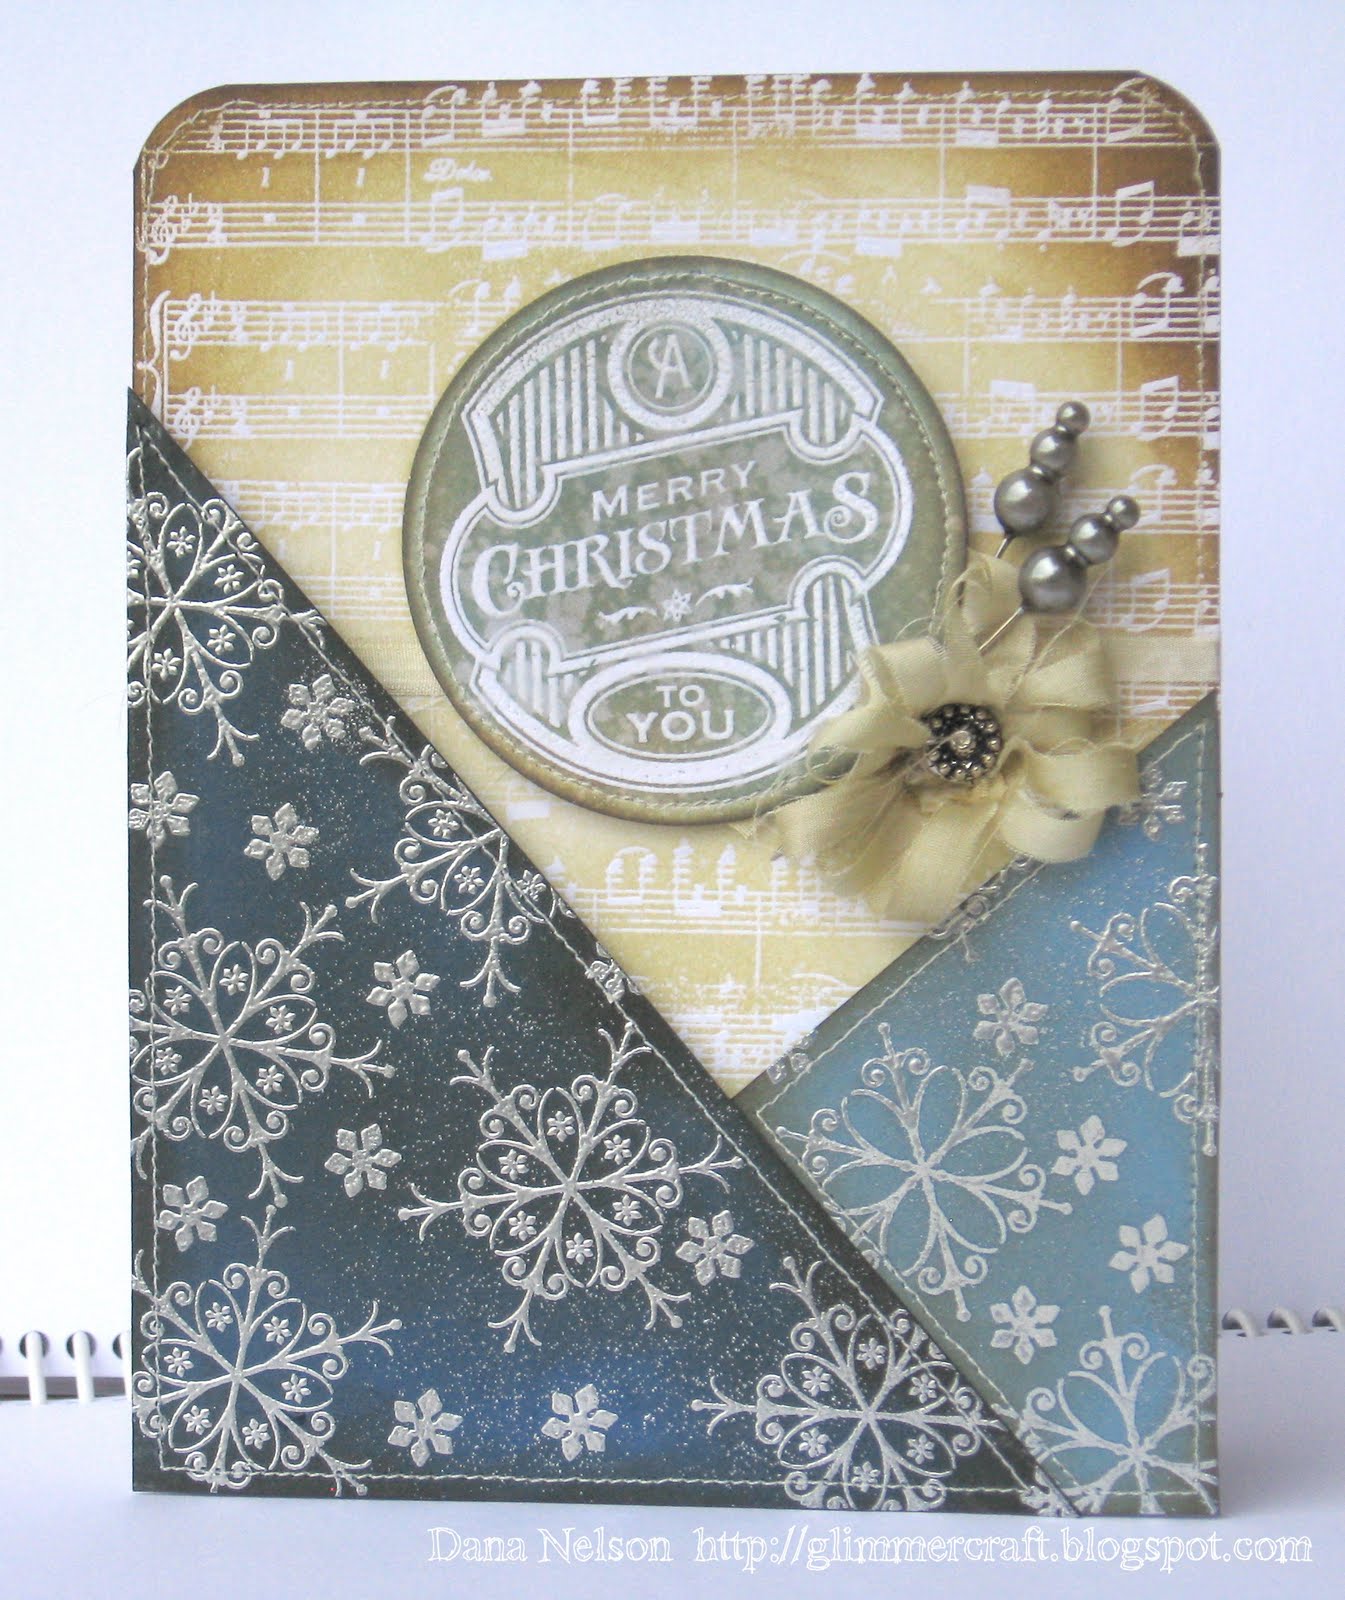
I've been watching WMS sketch challenges for some time, always intending to participate but this is my first actual entry! And it's not even my favorite sketch!


I was inspired by a woman's shirt that reminded me of this sketch. The card actually looks NOTHING like what I started out to do. I started with a one-layer CAS card and ended up with something vintage!

Not my typical style and so I'm not sure if I nailed it or not.  ;)

I've had those gorgeous Maya Road pins for a little while just begging to be used. Finally got them in!  ;)

The snowflakes were heat embossed in silver. Then I sprinkled on a little loose powder and heated it from underneath to get it to stay put while I finished the embossing process on top. The blue panels were then inked up a bit and sewn around the edges.

The sentiment circle was created by clear embossing the stamp on white and then using 3 distress inks and a spritz of water.

The bow/flower was a serious pain. I had no idea how to do what I wanted to accomplish and ended up winging something else. I inked the silk ribbon with 2 distress inks (both sides) and then trimmed the sides to give it an antique, frayed look. The grommet stud (can't remember what the brand is) in the center is hiding the knot while glue and Scor-tape are keeping it together!

[Edited to add:] This card shared Top Mouse award with 2 other contestants! I'm so thrilled!!

Thanks for stopping by!


{Supplies}
  • Cardstock: Enchanted Evening, Blueberry Sky (both Papertrey Ink), white card base (Recollections)
  • Stamps: Musical Backgrounds, Season's of Love - Tags, Very Vintage Christmas (all Waltzingmouse Stamps)
  • Ink: Versamark (Tsukineko), Antique Linen, Old Paper, Frayed Burlap, Walnut Stain, Smoky Sky Tim Holtz Distress Inks (Ranger)
  • Dies: Circles (Spellbinders)
  • Other Tools: sewing machine/thread, Corner Chomper (We R Memory Keepers), silk ribbon (Papertrey Ink), vintage pins (Maya Road), grommet/stud (unknown), clear and silver embossing powder (Filigree)

I Win!

Don't you love winning prizes??

Can you believe that I've won not one, but two prizes recently?!

I won a $500 gift certificate to a bra and swimwear store off of the radio! Something I desperately need!!

I also won 2 Paper Smooches sentiment sets from Lynn Miller's blog, Millers Ink! Check out the fabulous goodies I received!


She made a sweet packet for the stamps to go in!

And check out this card!


 This gorgeous tag was attached to the stamp packet:


Thanks so much, Lynn! (I made her a card but I don't know if I'm going to send it... It's def not my best work...)